Ugh. Well, I did it.

I did it. I tried timeout for the 2nd time… and, it worked. It KILLED me. Like, seriously. She’s been almost impossible to change diapers (kicking and hitting). And, I can barely get her changed. This time we did a 30 second time out… she cried and said mama up mama up mama up… oh man… it was TERRIBLE. My heart ached.

The results from this 30 second timeout… a sweet toddler. We hugged, we gave each other a kiss. I said, “Thank you.” She said, “You’re welcome.”. WOw. As hard as that timeout was… it was so worth it. I think I will need to keep doing this… especially since she’s getting pretty ‘hitty’ with Mike and I.

Are timeouts successful for you? Inquiring minds need to know. ๐Ÿ˜‰

signature

Categories: about me


Paper Doily Wreath tutorial

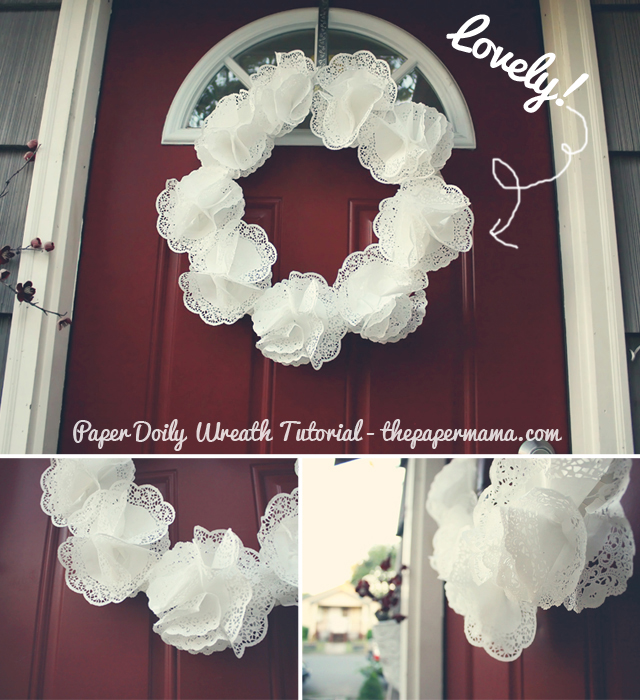
SUPER easy Paper Doily Wreath tutorial. And, cheap too. I believe the total cost for this project for me was $8. Plus about 45 minutes of my time. It’s perfect for the upcoming holidays! It would have been lovely to have up this summer… too bad I didn’t make this in May! FYI: This is made of paper… and I doubt it will hold up in rain. Our door is protected from the rain. ๐Ÿ™‚
Supplies:
– Wreath (size is up to you. what size will look best on your door?)
– Doilies. I used thirty six 6″ diameter doilies. Each doily flower need 4 doilies (or more if you’d like).
– Hot glue. I ended up going through 4 glue sticks.
– Ribbon. To wrap around the wreath as a base coat.

Step 1 (optional): Wrap the wreath in ribbon. Yes, the first step is optional! I chose to wrap my wreath in white ribbon for two reasons. 1: it will be easier to glue the doily flowers to than just the wire of the wreath. 2: I didn’t want the dark green wire showing through the white doilies.
Step 2: Lay out your doilies on the top of your wreath. This is so you can know how many doily flowers you need to make. I needed to make 9 doily flowers for my wreath.

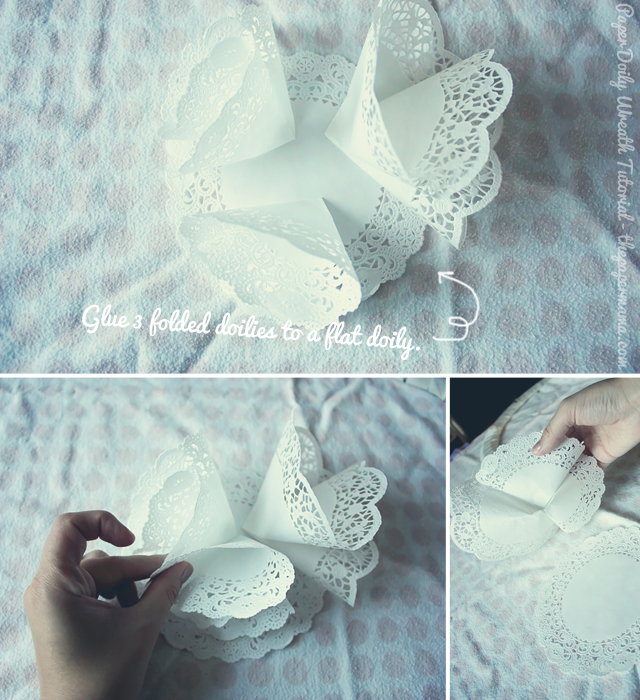
Step 3: Start making the doily flowers. To make the flowers: fold the doily in half (do not crease it, just pinch in the middle) and then, fold that doily in half one more time (again, do not crease… just pinch). Add a dab of hot glue to the middle of the doily flower (right above where you are pinching the doily). This will hold the folded doily shape. 
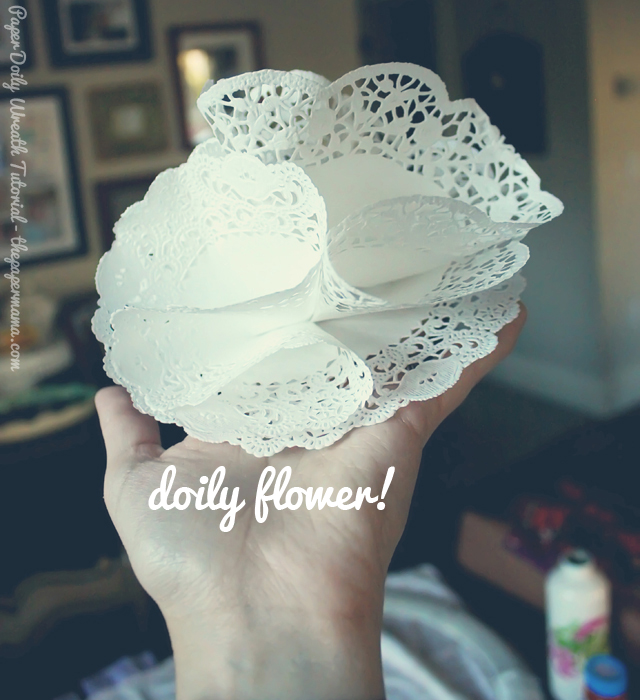
Repeat above two more times. You should now have three folded doilies. Glue the three folded doilies sides together. Once glued, glue them to a flat doily. You should now have a doily flower! Remember: it doesn’t need to be perfect. You can play around and maybe add more than 3 folded doilies to create a flower if you’d like!

Step 4: Glue your doily flowers to the wreath. That’s it!

AND, you’re done! Hang and enjoy! It’s really very simple. I think next time I do this I might try smaller doilies and bunch up a ton of mini doily flowers around the wreath! Have fun!
I love to know when people try out my tutorials. I’d LOVE to hear if you did!


Pin It

signature

Categories: Uncategorized


Steppin Out Saturday

my outfit: hair//sock bun, earrings//f21, top//thrift, jeans//f21, shoes//DKNY, dog//Angus
ruari: outfit//old navy
Soooo… Ruari and I didn’t actually step out… Well, we ran errands (and, I put on flats before I left… ;D). We can pretend I did something totally fun and exciting…. like a night out with the girls where I went to the concert and met the band… hee. But, I didn’t. Just a simple night at home with the fam where I got dressed in real people clothes (thanks to Steppin Out <3). I like it that way. ๐Ÿ™‚
Ruari actually had fun with these steppin out photos (rare)! She usually hates them. But, she was running over to the door whenever I pressed the timer on my camera yelling, “Sit down! Sit down mama!” So, I did. And, the animals were in on it too…
Linking up with the lovely Mandy from Harper’s Happenings.

signature

Categories: family


The Paper Mama Photo Challenge: Favorite from September


Week 74: Favorite photo from September
The challenge: The challenge will be based around your children. Take or find a photo of your baby (or kid… or puppy… or kitty). Share your favorite photo from the past month! ๐Ÿ˜€


My example of “Favorite photo from September”:

I love her.

…………………………………………………………………………………………………………………………………………………
  • First time joining the Paper Mama photo challenge? Start here for rules and upcoming challenges. ๐Ÿ™‚
  • My photo challenges do require you to have either your children or one of your furry children (pets) in the photo (unless it’s a self portrait week). It could be just one finger… or a toe… but, they must be there.
The Little Details
…………………………………………………………………………………………………………………………………………………

The Paper Mama


โ™ก Chelsey

Categories: Uncategorized


AND, the winner of the "Friends" photo challenge is…

This weeks challenge was: Friends

First:
{Bunch of Barrons}


Congrats to the winner! Great job, and please feel free to grab the Fact: I’m Awesome button! Because You are awesome!!

The Paper Mama


Second:
{Tugboat Photography}


Third:
{Nurse Loves Farmer}


Fourth:
{Lil Muse Lily}


Fifth:
{Heartmade Home}


Congrats to my top 5 winners! If you’d like… you are more than welcome to grab a Top 5 Photo button below!

The Paper Mama


My favorites (in no particular order):

{Little Mrs. Sunshine}
{Marcella Grace}
{LK Squared}
{And, Will Makes Three}
{All You Need is Love}


If you’re one of my favorites you are more than welcome to grab a “Paper mama hearts me” button below!

The Paper Mama

 . 2010 winners . 2011 winners .

Favorite photo from September

โ™ก Chelsey

Categories: Uncategorized