AND, the winner of the "Colorful" photo challenge is…

This weeks challenge was: Colorful
 
First:
{Pamplemousse}


Congrats to the winner! Great job, and please feel free to grab the Fact: I’m Awesome button! Because You are awesome!!

The Paper Mama


Second:
{Falafel and the Bee}


Third:
{Luvin Life}


Fourth:
{Life with the Baxtrons}


Fifth:
{Blessed Life}


Congrats to my top 5 winners! If you’d like… you are more than welcome to grab a Top 5 Photo button below!

The Paper Mama


My favorites (in no particular order):

{The Enlightened Bug}
{Tezzie}
{Our Precious Jas}
{I can see for miles and miles}
{Lisa Lu Photography}
handsome brown eyed man
{Grumbles and Grunts}

If you’re one of my favorites you are more than welcome to grab a “Paper mama hearts me” button below!

The Paper Mama

Chelsey

Categories: Uncategorized


50 DIY days of Christmas!!!

I hope you all enjoyed my 50 DIY Days of Christmas! I certainly enjoyed sharing everything! Even though I’m terrible with math and miscalculated the time between my start date and Christmas… BUT, 45 days was still fun! Did you miss a post? Here you go:

Pin It
day 1day 2day 3

day 4day 5day 6

day 7day 8day 9

day 10day 11day 12

day 13day 14day 15

day 16day 17day 18

day 19day 20day 21

day 22day 23day 24

day 25day 26day 27

day 28day 29day 30

day 31day 32day 33

day 34day 35day 36

day 37day 38day 39

day 40day 41day 42

day 43day 44day 45

signature


50 DIY days of Christmas!!!

day 1day 2day 3


day 4day 5day 6

day 7day 8day 9


day 10day 11day 12


day 13day 14day 15


day 16day 17day 18


day 19day 20day 21


day 22day 23day 24


day 25day 26day 27


day 28day 29day 30


day 31day 32day 33


day 34day 35day 36


day 37day 38day 39


day 40day 41day 42


day 43day 45


signature

Categories: 50 DIY Days, diy


Some links to love….

Some of my favorite links from this week. I hope you enjoy them! 😀

Ok… I need to buy a crockpot…. so I can make simple dinners. Like this one.
I love little Miss Rowan’s birthday party. <3
Check out this sweet shop for a custom baby doll for your baby doll!
Love this post: Finding Your Place. For bloggers. 
I wish I knew how to wear lipstick
Still need a children’s costume for Halloween? Here’s a super cute/easy/funny DIY one. 😀
Ok… I wish I had these moves…. go to this blogger’s home and click on “Salsa Sundays”. 
This photo makes me smile.
Did you ever see my who to follow on Pinterest post?
I absolutely love this outfit.

signature

Categories: Uncategorized


Delicious Fried Chicken Recipe

Delicious Fried Chicken Recipe

Look! It’s proof I cooked something once! See, there’s tongs in my hand… I’m standing by a stove! Proof! ;D In my little family I am not the cook (yes! ::karate chop::). I don’t like cooking. Ever. I REALLY don’t like doing it. Luckily I married a man that LOVES to cook (how convenient *insert evil laugh here* ;}).
For whatever reason… this day I decided to cook. Why? I don’t know. Maybe I had too much wine? I don’t know. I must have lost my mind. BUT, I did cook. What did I make? Fried chicken of course! See… I have a sort of LOVE for the chicken of fried. In fact… I have a whole board dedicated to fried chicken on Pinterest. I would marry it if I could (maybe not… but….). It’s the most delicious thing EVER. Yup. So, I thought I’d give it a try… without looking up any recipe or direction on how to cook raw chicken. And, the result: deliciousness! I don’t even know how it happened… Ok I do. Luckily my hubby bub was there to tell me how to cook it. How did I do it? WELL…. let me tell you!
The Oh Delicious Fried Chicken Recipe
by, The Paper Mama
Ingredients:
– 2 cups of flour
– 2 Tablespoons Lowry’s Seasoning Salt (Or whatever salt you prefer)
– 1 Tablespoon mustard powder
– 1 1/2 teaspoons garlic powder
– 1 1/2 teaspoons ground ginger
– 1 1/2 teaspoons pepper
– 8 chicken thighs
– 2 eggs
– 1/4 cup milk
– 2 cups olive oil (to fry on the stove top. You can use whatever oil you prefer)
Directions:
1. Take the chicken thighs out of the fridge 15 minutes before you start the following process. Blend together the dry ingredients in a shallow dish. In another dish beat eggs and milk until smooth in a bowl or a flat dish with sides. Dredge your chicken thighs first in the flour mixture, shake off excess, dip in the egg blend, and then again in the flour mixture. Set your chicken thighs aside and let them sit for 10 minutes (lets the mixture soak in).
2. Preheat your oven to 350 degrees f and heat your skillet (I prefer my cast iron skillet) to medium-high heat with the olive oil.
3. Dredge the chicken thighs in flour one more time, and shake off the excess. When your cast iron skillet is up to temp, transfer the thighs to the skillet. Fry up the first side of the chicken thigh until it is golden brown, then flip the thighs over and do the same for the other side. When both sides are golden brown, transfer your thighs to a baking sheet and bake in the preheated oven until the chicken is no longer pink in the middle. Roughly 20 – 30 minutes.
That’s it! It was very simple. Just the way I like it. AND, so moist and delicious.

Delicious Fried Chicken Recipe

signature


Wordless{ish} Wednesday: Shut Up and Eat.

{Noooo….. I’m not trying to be rude…. I’m talking about this delicious food cart my sis is trying out to cater her wedding next year: Shut Up and Eat. (She lives in New Zealand… so, we have to test things out for her… it’s terrible… ;D can’t wait for the cake! ;D)}
{So, Portland is sort of awesome (ok, really awesome) and MANY of our empty parking lots are now filling up with delicious food carts (and other sorts of carts… we saw a hair salon in the bunch). This particular food cart is off of Division in Portland. Shut Up and Eat is a little sandwich cart that will pretty much do any sort of catering you need! Delicious food at an affordable price. :D}
{We tried the Meatball Sub, the Old Style Eggplant, the Classic Pan Fried Chicken Cutlet, and the Broad St. Bomber. My fave out of the bunch: the Chicken Cutlet… but, it was fried chicken… soooooo…..}

{via}
{Mine and Ruari’s fave: The Chicken Cutlet (I mean really…. it’s fried chicken on a sandwich… :O). And, I had chocolate covered bacon… not from Shut Up and Eat… but, from the cart next to it. Yum….}

{If you have a Wordless{ish} Wednesday, please feel free to link it up below. BY the way: Shawntae from A Little King and I share our Wednesday Linky’s. :D. And, feel free to link up to these blogs too… 5 Minutes For Mom, Parenting by Dummies, Project Alicia, Supermom, And Then She Snapped, Jenni from the Blog, and Live and Love Outloud.}

signature

Categories: food, portland


DIY Fox Costume

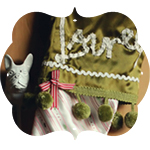
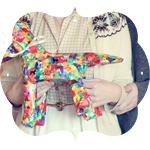
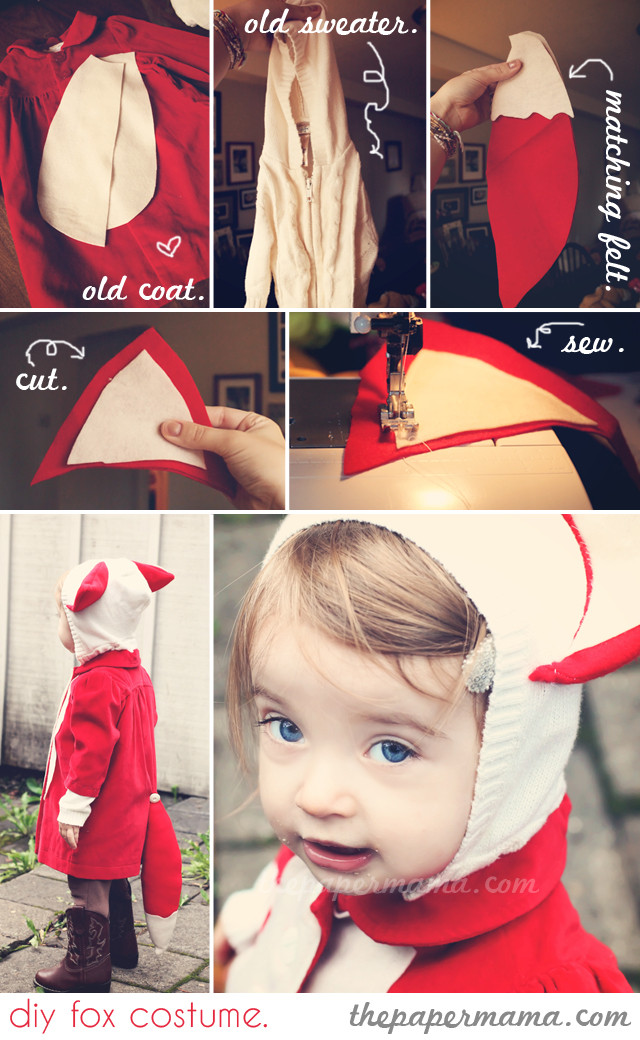
I’m pretty cheap crafty…. and I really wanted to make Ruari’s costume this year… at first I was considering creating a monster made out of jammies and felt…. but, I just wasn’t feeling it. She’s not really a monster kinda girl. BUT, she definitely is a doggy/fox kinda girl! I rummaged through her old clothes and found a red jacket that still fits…. an old sweater…. and felt I had in my fabric bin. And, ta dah! Her costume is made. I spent $0…. (well, the cost is probably around $8… I got the clothing on clearance when R was a baby and the felt was cheap-o).
You can TOTALLY do this for yourself! I may have put a total of 1.5 hours into this project. Not much time…
Supplies needed: 
– An old jacket that still fits.
– An old sweater (with a hood) that you’re done with.
– Felt (I used 2 sheets of red and 2 sheets of cream). 
– Stuffing for the tail
– Sewing machine
– Thread and needles
– Optional: buttons.
How I did it:
– First I took my old sweater and cut the hoodie and sleeves off. Set them aside.
– Next I freehand cut the shapes for the chest, ears, and tail out of the felt. 
– Remove the buttons from the jacket (if there are any). Pin your chest felt to the front of the jacket. Sew it on. Then, I added white vintage buttons to the jacket instead of the red ones it came with.
– Sew together the tail (inside out) and ears (leave opening so you can flip the fabric and then stuff it). When they are flipped, stuff the tail. Stitch it closed. I didn’t stuff the ears (you can if you’d like) and sew the ears closed. 
– Hand stitch the ears to the hood. I sort of bent the ears a bit so the would stand up on their own. When finished… sew the finished hoodie onto the collar of the jacket. 
– So, the sleeves of R’s jacket were really short on her… so, I added the sleeves of the sweater to the end of the sleeves of the jacket. This is optional… but, I kind of like it. It’s like they are the fox paws. I hand stitched those on.
– Stitch the finished tail onto the back of the jacket. Add a button, if you’d like. That’s it! I also considered making the tail removable… but, I didn’t go to the trouble. Might be nice. 🙂
That’s what I did! I don’t really know any technical sewing terms…. etc… I just guessed. “:D Pretty much: this is a great way to create a cheap/fun/cute/last minute costume for your babe (or even yourself….). A bear? A wolf? A kitty? A chicken? ;D
Happy Halloween!


Pin It

signature

Categories: diy