50 DIY days: The gift… of store bought cookies.

Day 24: Store bought cookies in a jar! Yup! I’m not beneath it…. I will gladly purchase a premade item… and package it up all pretty like to give to my friends and family! ๐Ÿ˜€ You should TOTALLY do this too… Very inexpensive… BUT, it looks so pretty. ๐Ÿ™‚ Below you’ll find some free printable tags for your own store bought cookies jar (made by meeeee)!!! My For You tags can be used for more than just these jars! They’re perfect for almost any gift.
Supplies:
– Jar (find them cheap at a thrift shop)
– Store bought cookies (make sure to measure your jar opening before you head to the store).
– Seam binding lace or ribbon (optional little decoration for the side of the jar).
– String
– A 7.5 inch by 7.5 inch piece of fabric
– Scissors
– Hot glue + hot glue gun
Directions:
– Glue a strip of ribbon or lace to the side of the jar (see above). Optional.
– Place your store bought cookies inside.
– Cut out your piece of fabric and tie it over the jar lid.
– Add one of my free For You Jar labels.
– You’re done!
ย 
Cost: $5
Time: 10 minutes

signaturePin It

Tags: , ,

Categories: 50 DIY Days, diy, Gifts


Happy Thanksgiving!

Happy Thanksgiving lovelies! I plan on STUFFING my face today and enjoying the lovely company of my family. I hope you all have a SUPER amazing day too! Gobble!

How many of you are going shopping tomorrow? I’m weird and actually enjoy getting up that early and wandering the stores… I never actually buy much… I just love the atmosphere… I wonder if I can drag torture convince invite any of my friends to join me in the morning? Mike would HATE it, so I wont make him… Hmmmmm…. ;D

signaturealt design banner

Categories: Uncategorized


50 DIY Days: Rainy Day Jar for kids.

Day 23: Hmmm, what? YES: another jar DIY! ;D They are just so simple and cute and inexpensive to make for little gifts for the holidays!
Today I’m sharing the Rainy Day Jar. My girlfriends and I are now overrun with children… ๐Ÿ˜‰ Hee, they outnumber us! Buying presents for each and every one of them… just isn’t even a possibility. The cost is way too much. Bring in, the Rainy Day Jar. It’s a fun DIY gift to give. This jar can be saved for those rainy day boredom and blues! Glue, scissors, puff balls…. and more.
I was able to buy and fill 3 jars with these rainy day goodies for $15… just by splitting up the items I purchased into the 3 jars. $5 a gift… pretty darn awesome.
What you’ll need (You can add/adjust/take out whatever you’d like below):
– Large jar or large container
– Hot glue + hot glue gun
– Scissors
– Ribbon
The Rainy Day Jar printout.
– Kids scissors
– Poms 
– Play dough
– Glitter Glue
– Crayons
– Stickers
– Letter stickers
– Colorful Pipe Cleaners
– Popsicle sticks
– Suggest items you can add: paint, paint brushes, small coloring books, paper, pens, pencils……
Directions:
– This little DIY is pretty self explanatory… BUT, pretty much you just shove all your rainy day items in the jar (or container) you find! I Took all my items out of their store packages and wrapped them in ribbon…. cuter.
– Cut out the Rainy Day Jar labels I provided (optional) and glue them on your container.
– Tie a ribbon around the top.
– Give away! That’s it!
Cost: about $5 a jar
Time: about 20 minutes each jar

signature

Pin It

Categories: 50 DIY Days


Wordless{ish} Wednesday: Dancy Dance

Photobucket
{This girl dances NON-STOP! Thanks to Jess for helping me with this .gif. :D}

{If you have a Wordless{ish} Wednesday, please feel free to link it up below. BY the way: Shawntae from A Little King and I share our Wednesday Linky’s. :D. And, feel free to link up to these blogs too… 5 Minutes For Mom, Parenting by Dummies, Project Alicia, Supermom, And Then She Snapped, Jenni from the Blog, and Live and Love Outloud.}

signaturealt design banner

Categories: Uncategorized


Live On

Thank you to LiveOn for this sponsored opportunity to blog about storing and sharing my most important memories with those closest to me. Although story ideas were provided, all thoughts and opinions are my own.
…………………………………………………………………………………………………………………
I need to tell you guys something…. ok… I’m now taking roughly 2,000 photos EVERY month. Phew! Felt good to get that off my chest. ๐Ÿ˜‰ That’s a TON. Not all of them are keepers… but, I’d say about 70% I want to keep around. Up until a couple week ago I was mostly using an external storage device to store and take care of my many many photos. But, I’ve had some concerns with my system: What if that storage device breaks? Or, we lose it? All my photos: gone…. all of the photos I put on my blog are small with watermarks on them… I want to keep my original photos alive and well. 
That’s why I jumped on the chance to check out 
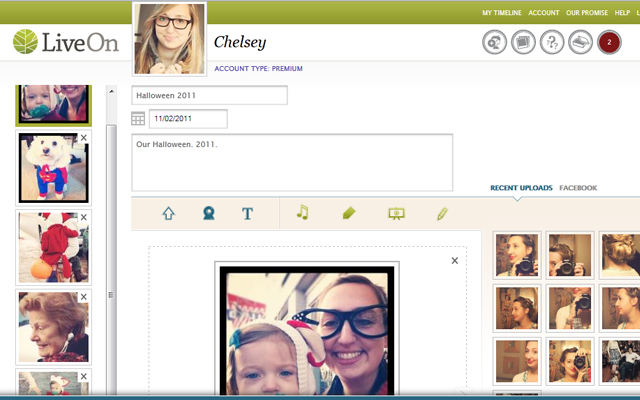
LiveOn. LiveOn is pretty much your place to store memories! Not just for photos… store your videos and thoughts. I love that if something DID happen to my external storage device… I’d have my photos safe… and stored with LiveOn.
So, I’m pretty bad at remembering to email my friends and family photos and… my Grammy wants more Ruari photos! Well, now I can create a “tribe” on LiveOn! I can pick and choose who I want to allow to view and enjoy my photos! No more having to email all these photos to grandparents and so on… There will soon be an option for your tribe members to download the original sized image if they want to! I love that! They can download and print that photo. I don’t even have to worry about it. ๐Ÿ™‚
There’s a multiple photo upload option (so important), only YOUR tribe members can view the photos, a lifetime storage guarantee, and the future option to allow your tribe members to actually download the content you share…. without worrying about a bathtub photo of your baby ending up all over internet. ๐Ÿ™‚ When you upload your images they create a “memory” of that series. It’s a little video of that memory…. which you can share online if you’d like! Through Facebook, Twitter, or Google +. They don’t currently offer embedding (which, as a blogger would be really cool). BUT, I believe that’s something that would be lovely if they offered!
One of my FAVORITE things about  LiveOn: the option for live help. I was easily able to ask any questions I had right then and there! With fast and helpful answer from a human. Wonderful! Wonderful customer service.
LiveOn has just launched and I definitely expect to see more awesome features as it grows! Use this coupon code for LiveOn Rewind to get 20% off a memory preservation! Code: cgc22

signature

Thank you again to LiveOn for sponsoring this blog post. Please click here to learn more about storing and sharing your most special memories. I was selected for this sponsorship by Clever Girls Collective. All opinions expressed here are my own.

Categories: Uncategorized


Day 22: White Chocolate Dipped Oreos with Peppermint!

Day 22: hi, chelsey’s readers! i’m stephanie, and i blog over at mrs.stephanie t. i’m so happy to be guest posting at this lovely ladies blog today. when chelsey contacted me about doing a DIY post, i have to be honest… i was a little skeptical. {i may very well be the least craftiest person in the world.} but then she mentioned cookies! and i was all for it. i hope you enjoy my super simple but deliciously yummy cookie recipe!
what you’ll need:
1 package of oreos
1 package of peppermints {you’ll only use 3 or 4}
1 package of white chocolate candy melts
i would say first step, but this is so simple you really don’t need them. all you need to do is melt down your candy melts until it makes warm, white chocolatey goodness. i took the time to crush a couple of peppermints with the back of a knife while they melted. // p.s. it’s okay if you think it resembles soup and decide to eat a couple of spoonfuls. not to say that i did or anything… *side eye*
after that, you’ll just dip those crunchy little cookies right in there until they’re completely submerged! then, take them out and set them on either a baking rack or parchment paper. if you’re the least domestic person in the world like i am, you’ll use aluminum foil. sprinkle with the peppermints while they’re still warm {that’s the key!}. and voila! let me dry for about 30 minutes or so and you’re done. i told y’all this was simple.
they’ll look a little like that when they’re done. granted, yours will probably look much better. remember the domestically challenged, here. after that, all you need to do is package them up in some cute little glitter {we all love glitter} chinese take-out looking boxes, add an ornament, and you have an adorable gift all ready to go! i bought the boxes at michael’s for $1 and the ornaments at target for $1 as well. i used J for my husband and H for my daughter. really cheap, but really cute.
now bask in your simple domestic-ness and enjoy a cookie. you deserve it.
………………………………………………..
Thank you SO much to Stephanie from Mrs. Stephanie T.! What a LOVELY guest post.I need those. Immediately! ๐Ÿ˜€ Thank you for joining my 50 DIY Days of Christmas!

Tags:

Categories: 50 DIY Days, food, Sweets