The Paper Mama "Pets" Photo Challenge


This weeks challenge: Pets
The challenge: Your kids don’t have to be in this challenge! Photos of your pet! Or, any animal!


My example of “Pets”:

Hello Pistachio!

…………………………………………………………………………………………………………………………………………………
  • First time joining the Paper Mama photo challenge? Start here for rules and upcoming challenges. ๐Ÿ™‚
  • My photo challenges do require you to have either your children or one of your furry children (pets) in the photo (unless it’s a self portrait week). It could be just one finger… or a toe… but, they must be there.
Red
…………………………………………………………………………………………………………………………………………………

Have you entered your holiday photo into my Holiday Photo Challenge yet? Prizes!

The Paper Mama


signature

Categories: Uncategorized


AND, the winner of the "Fave Photo" challenge is…

This weeks challenge was: Favorite Photo of November!

First:
{my real every day life}


Congrats to the winner! Great job, and please feel free to grab the Fact: I’m Awesome button! Because You are awesome!!

The Paper Mama


Second:
{Hot Coffee Mama}


Third:
{Stoneyville}


Fourth:
{Curls, Spunk, and Monkey Chunk}


Fifth:
{Corey Moortgat}


Congrats to my top 5 winners! If you’d like… you are more than welcome to grab a Top 5 Photo button below!

The Paper Mama


My favorites (in no particular order):

{My, Oh My! Ellie!}
{Callie Marie}
{Nurse Loves Farmer}
{Love.Bug.}
{Creative Gator}


If you’re one of my favorites you are more than welcome to grab a “Paper mama hearts me” button below!

The Paper Mama

โ™ก Chelsey

Categories: Uncategorized


50 DIY Days with A Good Life: Rice Filled Heating Pad gift!

Day 35: hey friends!  i’m amy from a good life.  i’m super excited chelsey asked me to be a part of her 50 days of DIY christmas because it actually gave me the motivation to start & finish one of my christmas projects early!  that in itself?  christmas miracle.anywho, i’m not really what you would call an advanced sewer/crafter/DIY-er so i picked something a novice like myself could handle.  i had a blast doing it & you will too! 

if you read my blog, then you may or may not know that i have a fabric buying obsession.  which is weird because i’ve sewn about two things in my entire life.  but buying fabric?  i’m totally addicted.  so that’s why step number one was my favorite. 

how could you not be addicted to buying fabric?  so many cute things, so little time.  you’ll need about 1/4 yard of each fabric.after washing & drying & ironing your fabric, proceed to step two.

of course this pattern isn’t set in stone, but i cut my pieces out 6″x18″.  seemed reasonable. 

self explanatory, yes?  just remember to leave a little hole open so you can fill it up with rice & lavender.    in fact, that’s the next step.  fill it up with rice & lavender.  i used about three cups of rice & two tablespoons of lavender… if i remember correctly.  oops.  just remember to only fill it about half full so there’s enough room to sew up the mid & quarter sections.  and you can put in as much lavender as your little heart desires.  you are the boss of you. 

after you’re all filled up with rice & smell-good lavender, go back & sew up the hole.  i am no expert so i just tucked in the edges & sewed over the top of it.  if you are a master sewer, you can do something like a ghost stitch {is that what it’s called?} to hide the hole.  i’m not that advanced.next you have to divide up the rice into half on one side, half on the other & sew down the middle of the pad, carefully moving the rice out of the way so you don’t break any needles.  i may have broken two.repeat this process to make quarters. 

when finished {pad on far right is completely finished}, you can just throw it in the microwave for 3 minutes or so & take it out for a cozy snuggly pad that will keep you warm & happy for a long time.  or? throw it in the freezer to use as an ice pack.  whatever suits your fancy.these are so fun to make & make such fun little stocking stuffers that i went out & bought a second round of fabric to gift them to even more friends!  you should too.happy holidays! 

{ps:  this project was inspired by this post.  thank you pinterest for helping me find it!}

………………………………………………..
Thank you SO much to Amy from A Good Life! What a LOVELY guest post. Thank you for joining my 50 DIY Days of Christmas!

Pin It

Categories: 50 DIY Days, diy


50 DIY Days with A Good Life: Rice Filled Heating Pad gift!

Day 35: hey friends!  i’m amy from a good life.  i’m super excited chelsey asked me to be a part of her 50 days of DIY christmas because it actually gave me the motivation to start & finish one of my christmas projects early!  that in itself?  christmas miracle.anywho, i’m not really what you would call an advanced sewer/crafter/DIY-er so i picked something a novice like myself could handle.  i had a blast doing it & you will too! 

if you read my blog, then you may or may not know that i have a fabric buying obsession.  which is weird because i’ve sewn about two things in my entire life.  but buying fabric?  i’m totally addicted.  so that’s why step number one was my favorite. 

how could you not be addicted to buying fabric?  so many cute things, so little time.  you’ll need about 1/4 yard of each fabric.after washing & drying & ironing your fabric, proceed to step two.

of course this pattern isn’t set in stone, but i cut my pieces out 6″x18″.  seemed reasonable. 

self explanatory, yes?  just remember to leave a little hole open so you can fill it up with rice & lavender.    in fact, that’s the next step.  fill it up with rice & lavender.  i used about three cups of rice & two tablespoons of lavender… if i remember correctly.  oops.  just remember to only fill it about half full so there’s enough room to sew up the mid & quarter sections.  and you can put in as much lavender as your little heart desires.  you are the boss of you. 

after you’re all filled up with rice & smell-good lavender, go back & sew up the hole.  i am no expert so i just tucked in the edges & sewed over the top of it.  if you are a master sewer, you can do something like a ghost stitch {is that what it’s called?} to hide the hole.  i’m not that advanced.next you have to divide up the rice into half on one side, half on the other & sew down the middle of the pad, carefully moving the rice out of the way so you don’t break any needles.  i may have broken two.repeat this process to make quarters. 

when finished {pad on far right is completely finished}, you can just throw it in the microwave for 3 minutes or so & take it out for a cozy snuggly pad that will keep you warm & happy for a long time.  or? throw it in the freezer to use as an ice pack.  whatever suits your fancy.these are so fun to make & make such fun little stocking stuffers that i went out & bought a second round of fabric to gift them to even more friends!  you should too.happy holidays! 

{ps:  this project was inspired by this post.  thank you pinterest for helping me find it!}

………………………………………………..
Thank you SO much to Amy from A Good Life! What a LOVELY guest post. Thank you for joining my 50 DIY Days of Christmas!

Categories: 50 DIY Days, diy


Linkidy do da Day

::::Favorite quote this week… R asking what happened to the animal on the wall::::

Ummm… do you love Parks and Rec like I do? Ruari needs this.

This series of photos cracks me up!
YES please! I will be making these.
OH Ruche…. why do you torture me? I love these. <3 
A thank you to you and you for the donation to help me get to Alt Design Summit!
Love how she combined the pinecone garland and clothespins to hang photos! CUTE.
Fried freakin’ olives stuffed with freakin’ cheese!
I’m loving this free printable thank you list for Christmas! Keep track of who got what…. and, then send them a thank you! 
I’d love to make heart-shaped pies for Christmas…. might just do it!
I am so in love and inspired by this space.
The 2nd year of ordering a Christmas gift from this company! LOVE it. Handmade… repurposed materials… AND, local. Well, Seattle. BUT, that’s pretty much local to me. ๐Ÿ™‚
I forgot about this post. Can’t believe my girl will be 2 in like a week! My sweet little girl. Maybe 9 months in the photos? And, you can also watch an old video of my pregnant hairy belly… Ruari kicking. 
Still need some gifts for Christmas? This jewelry is lovely! AND: it’s all on sale! Marked down 30% off for December.
I’ll be at this trunk show next week in Portland! Come by and say “hi”!

So, one more week to enter your photo into my Holiday Photo Challenge! Prizes! Prizes! WOOO! 
What are your favorite links this week? ๐Ÿ˜€

signature

Categories: Uncategorized


Live in Portland? Come join me!

Hello my fellow Oregon friends! I just wanted to let you all know about an upcoming trunk show for my lovely friend Roxana of Grace and Stella. I’ve been friends with Roxana forever now (yes, we both knew each other during the awkward teenage years….). I really believe in her work and want to support her! (The majority of her jewelry is one of a kind because it’s made from vintage pieces. The pieces at the show will vary in prices from $20 to $200!)

I bet you can find something! I will be there… dressed all cute wearing my Stella & Grace jewelry and enjoying some yummy wine. ๐Ÿ˜€ I’d love to see you guys there! It will be fun! Come say hi! 

The show will be at The Space. 1030 NW 12th Ave. TH1; On the corner of 12th and Marshal. in Portland. 6:30 – 9 pm on December 15th!!!
Let me know if you think you can come! Or, just come on by! All are welcome! We are really nice. ๐Ÿ™‚

signature

Categories: Uncategorized


50 DIY Days with Twenty Five Designs: Striped Vase Tutorial

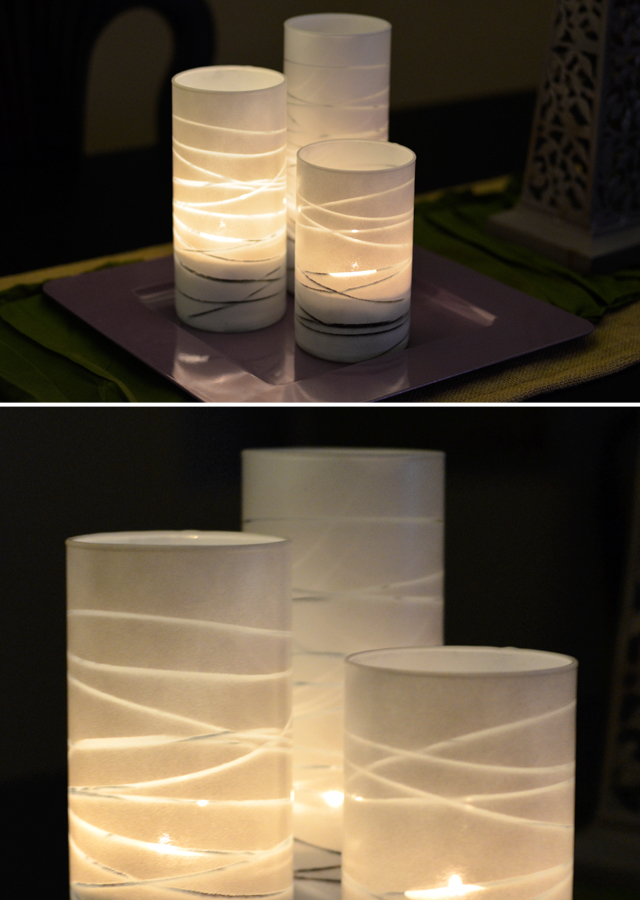
Day 35: Spray Painted Striped Vase

Hey there! My name is Torie and you can usually find me hanging out at Twenty Five Design Blog talking about my crazy 2 year old, and sporting a baby bump all while trying to keep fashionable. That’s a hard thing to do when you are pregnant!
I originally saw these vases on Pinterest and thought they would be a pretty center piece for the holidays. They actually were really easy to do and look so pretty in the evening.
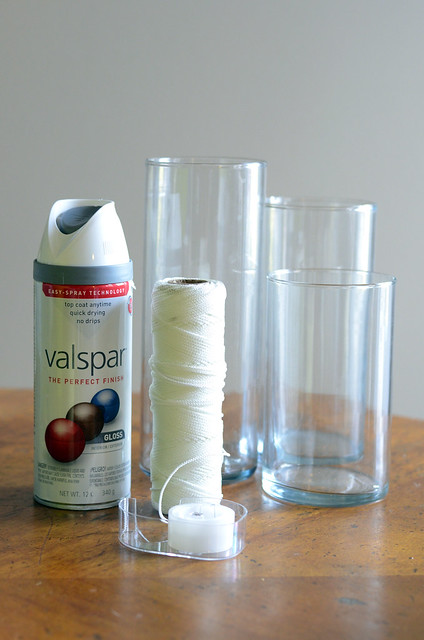
What you will need:
– A glass vase. (you can do as many as you’d like. These were left over from our wedding and just sitting in the garage.)
– Twine, string or yarn. The thickness depends on what type of look you are going for.
– Scotch tape.
– White spray paint.
– Scissors
Optional:
-Coffee beans for filler
-Tea lights (or any kind of candle will do)
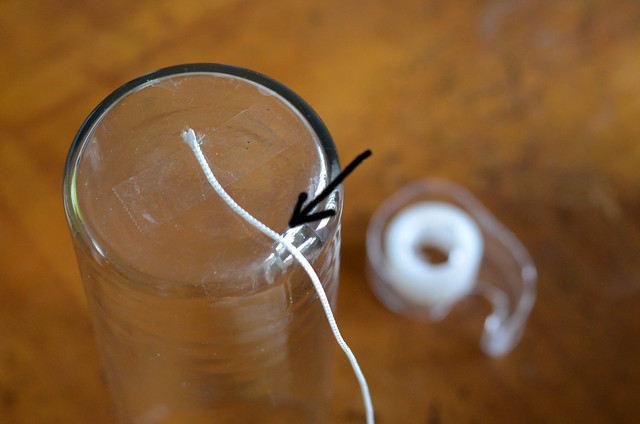
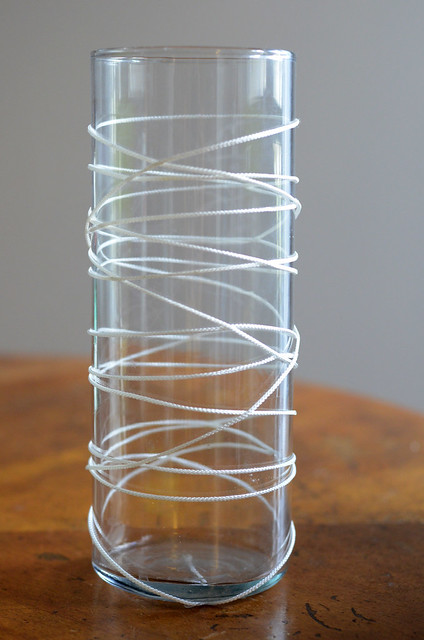
The first thing you will do is make sure your glass is clean. After that you want to flip your vase over and tape down one end of your twine. The picture shows the tape in the middle, but I found that putting it closer to the edge works better (where the arrow is pointing).
Now you want to wrap your vase very tightly with the twine/string. Trust me, keep it tight other wise it will fall off. You don’t have to make it perfect either. Play around with it until you get your desired look and then tape the other end to the bottom.
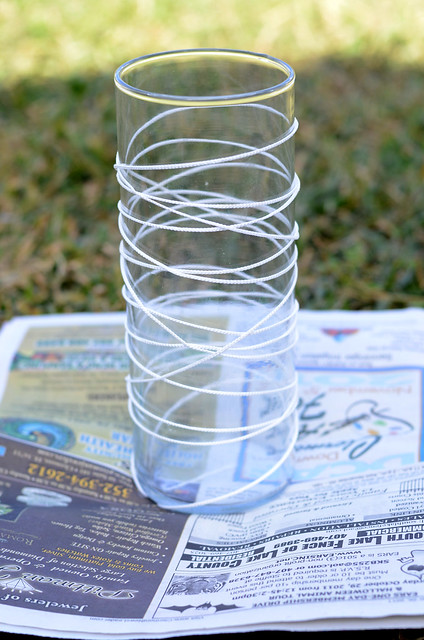
Next, take you vase outside and place it on an old newspaper.
This next step will depend on what type of look you are going for with your paint. You can spray it very sheer or apply it heavy. I would suggest heavier but not to where you can’t see through the glass at all–just enough to wear you will see a bit of the candle light peaking through.
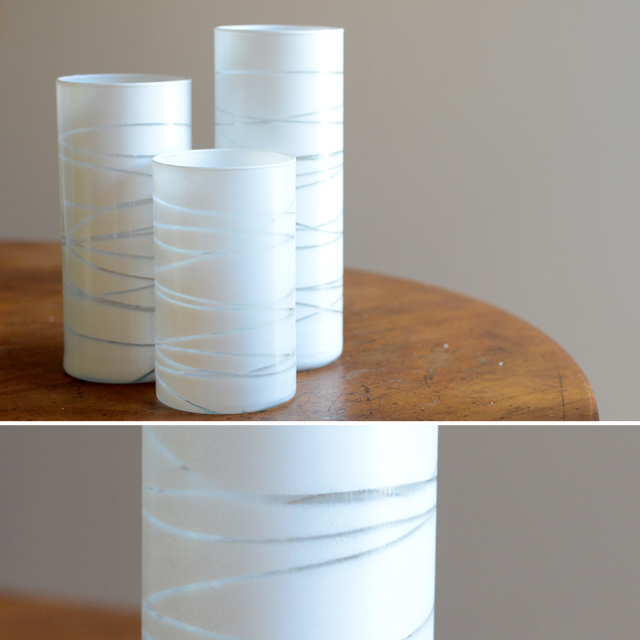
Let that dry completely. Then you will take the tape off of the bottom and remove your twine.
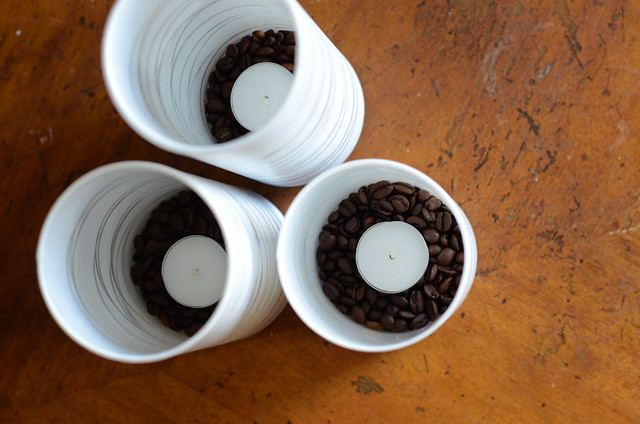
You can either put a candle inside or follow the next couple of steps for something different.
It was hard to find at the store, but I got a pack of whole (not ground) coffee beans and filled my vases about 1/4 of the way each.
Then I placed a tea light inside.
Make sure you use a long match or lighter to light your candles. They are hard to get to other wise.
And now you have a beautiful new center piece for very little cost. You can add garland, stones or any other embellishment to go around the outside of your vases. I will be spray painting some more coffee beans and scattering them around the plate that the vases are on.
………………………………………………..
Thank you SO much to Torie from Twenty Five Designs! Those are perfect for a sweet Christmas table centerpiece! ๐Ÿ˜€ Thank you for joining my 50 DIY Days of Christmas!

Categories: 50 DIY Days