50 DIY Days: Sweet Ribbon Stitching!

Day 37: So, who’s Laureli? Oh, that’s my daughter. ๐Ÿ™‚ Her real name… but, I call her Ruari (::hi Gilmore Girls::). I actually created this little ribbon stitched name on her stocking last year… but, never got around to sharing it! I absolutely love it! It’s really simple to do… and, it’s a sweet little custom touch for her stocking.
How I did it:
– Select the ribbon you’d like to use… and the item you’re stitching the ribbon onto. 
– I just wrote out her name free hand as I was stitching…. BUT, if you feel more comfortable you can pin the ribbon down before you sew it. Spell out the name or word you’d like…. and, stitch it on! That’s it!
It’s a fast and easy way to customize your family stockings.

signaturePin It

Categories: 50 DIY Days


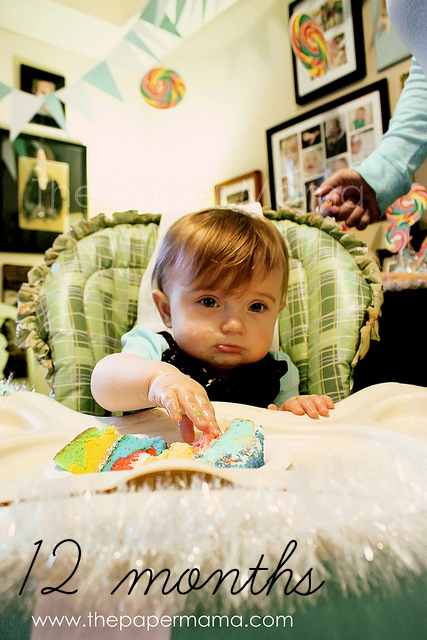
Her first year.

Well…. my girl will be 2-years-old on Sunday… omg. I LOVE going back through her old photos and watching her grow. Her first year….

Love you my sweet girl. Ruari’s second year coming up on Thursday!

**Have you entered your holiday photo into my Holiday Photo Challenge yet? Well, you should!**

signature

Categories: Uncategorized


{CLOSED} GIVEAWAY: RFRM $60 Shop Credit!

Giveaway winner is: Commenter Steph! Congrats!

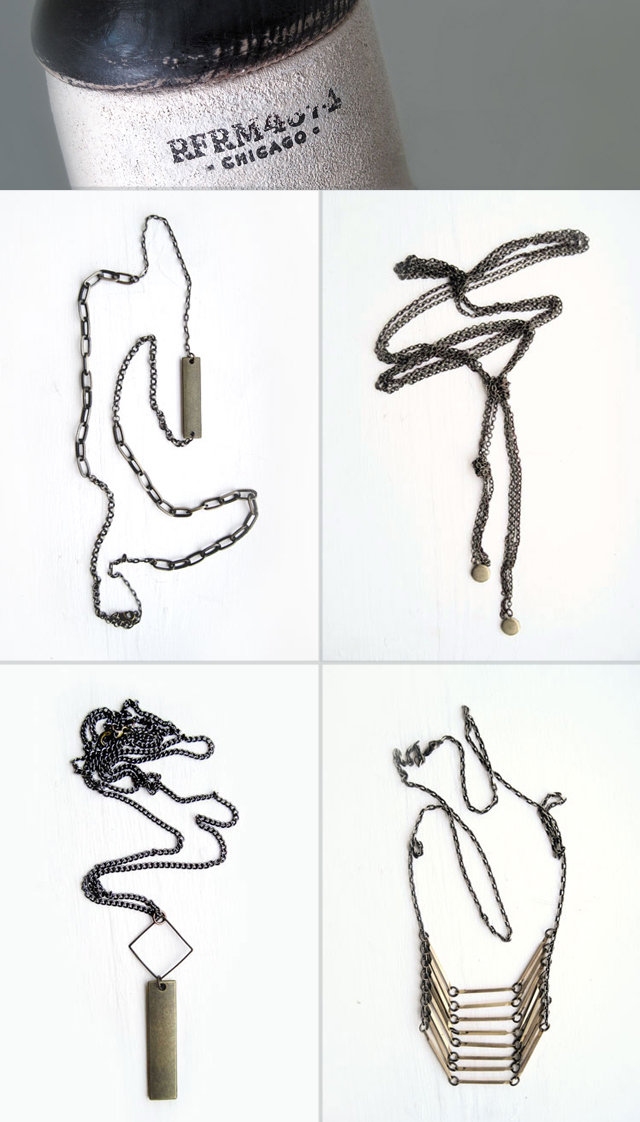
Hello lovely friends! Tonight I bring you a super lovely giveaway that I REALLY want to win! Please and thank you. BUT, I cannot… so many ::sighs::…. ANYway: Yes… you have the chance to win a necklace worth up to $60 from RFRM. I LOVE this jewelry.
Right now ALL of the jewelry in the RFRM shop are 30% off. It’s not clearly marked… but, they manually marked down all the normal prices 30%. Through December! AND…. one more thing: you still have a chance to order a Christmas present before December 16th! Yup… order before that date and you could still get your gift in time! Go go go! ;D
So…. on to the really cool stuff…
What you can win:
Choose a necklace worth up to $60 from RFRM!
How do you win? Please follow these steps… AND make sure I have a way to contact you through e-mail. If I don’t… I’ll have to delete the entry… ๐Ÿ™

Mandatory entry:
1) Head on over to RFRM and let me know what necklace you think you NEED. {1 entry}

{For extra entries (Please use a separate comment for each entry):
1) Become a follower of this blog via google friend connect, feedburner or bloglovinโ€™ (see sidebar) {1 entry}
2) “Like” me on FB: The Paper Mama{1 entry}
3) Follow me on twitter: @thepapermama {1 entry}
4) Like RFRM on FB: RFRM {1 entry}
5) Follow RFRM on Twitter: @rfrmjewelry {1 entry} 
6) Tweet or Facebook about this giveaway. You are welcome to copy and paste this tweet:

” Win a $60 shop credit from RFRM @
rfrmjewelry http://bit.ly/tjVJRC @thepapermama “{1 entry}

Note: Giveaway ends on Friday, December 16th, 2011 11:59 PM Pacific Time. Winner will be chosen at random from Random.org.

signature

Categories: Uncategorized


50 DIY Days with Olive Observer: Christmas Tree Skirt

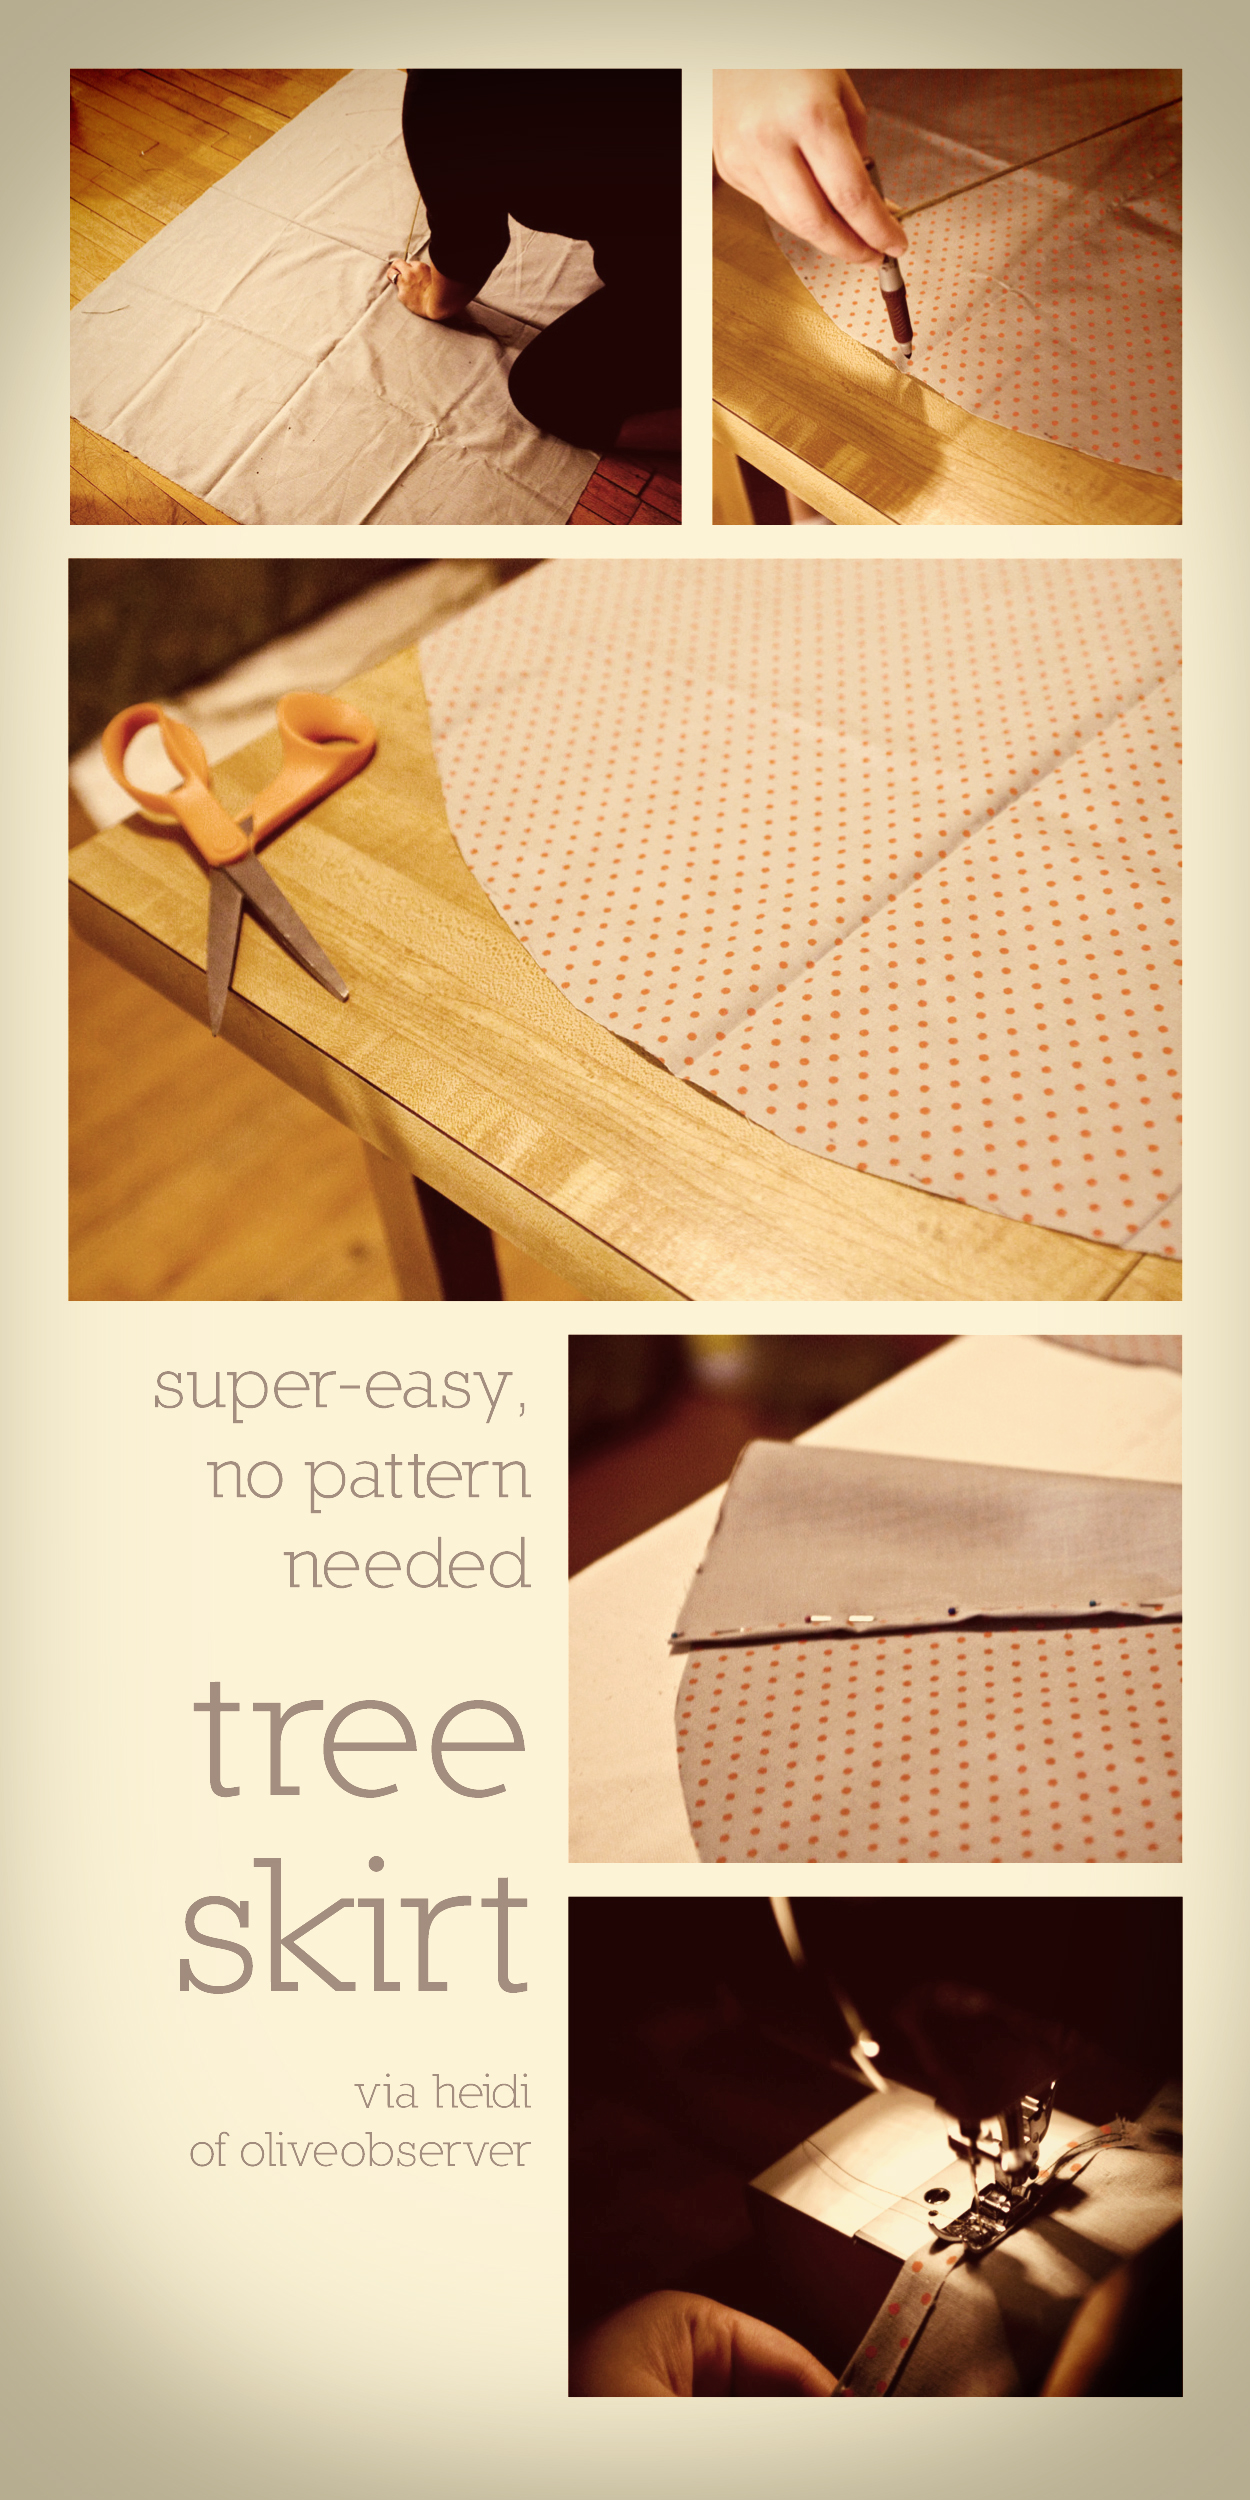
Day 36: Hey PaperMama readers. It’s Heidi from OliveObserver.I’m going to preface this DIY project with the fact that I’m by no means very good at sewing. This project was so super easy, didn’t require any sort of pattern and took me less than two hours from beginning to end.So here it is, the Super Easy, No-Pattern-Needed Tree Skirt:What you need:1 yard of fabric in the pattern of your choice for the main skirt1/2 yard coordinating feltSewing machineThread the same color as the felt (or different colored if you’re all about contrasts)ScissorsMarkerPiece of stringPinsSomething to trace for the circles on the edge (small embroidery hoop, coffee mug, whatevz).

1. Take the string and measure out from the bottom of the tree how long you’d like the tree skirt to show.2. Lay out the 1 yard of main fabric on the floor, patterned side down. Tie a marker to one end of your string. Hold the other end of the string in the middle of the fabric and draw a circle with the marker end. You might need a husband, friend or child to hold the edges of the fabric for you.3. Cut out the circle. At the center of the fabric, cut a smaller circle (I totally eyeballed it) where the trunk will go through. Then cut a straight line from the center circle to the bottom edge for the opening where you place the skirt around the tree.4. Pin a 1/4″ hem on both end of the opening you just cut, and sew those to prevent fraying. I left the smallest circle unfinished.

5. On the piece of felt, trace the circles for the edging. The number of circles will depend how large you made the skirt and how large the object you chose to trace is. A half yard of felt was perfect for my skirt, leaving me with probably five or six circles to spare.6. Cut out the circles.7. Pin the circles around the bottom edge of your skirt, overlapping them a bit so none of the main fabric shows through.8. Set your sewing machine on a large zigzag stitch with a really loose tension. Sew the circles to the main skirt.9. Iron and place around your tree. Voila. Super easy, right?++++++++++++++++

olive observer button copy 200 x 160

………………………………………………..
Thank you SO much to Heidi from Olive Observer! What a LOVELY guest post. I AM SO making this! Thank you for joining my 50 DIY Days of Christmas!

Categories: 50 DIY Days


50 DIY Days with Olive Observer: Christmas Tree Skirt

Day 36: Hey PaperMama readers. It’s Heidi from OliveObserver.I’m going to preface this DIY project with the fact that I’m by no means very good at sewing. This project was so super easy, didn’t require any sort of pattern and took me less than two hours from beginning to end.So here it is, the Super Easy, No-Pattern-Needed Tree Skirt:What you need:1 yard of fabric in the pattern of your choice for the main skirt1/2 yard coordinating feltSewing machineThread the same color as the felt (or different colored if you’re all about contrasts)ScissorsMarkerPiece of stringPinsSomething to trace for the circles on the edge (small embroidery hoop, coffee mug, whatevz).

1. Take the string and measure out from the bottom of the tree how long you’d like the tree skirt to show.2. Lay out the 1 yard of main fabric on the floor, patterned side down. Tie a marker to one end of your string. Hold the other end of the string in the middle of the fabric and draw a circle with the marker end. You might need a husband, friend or child to hold the edges of the fabric for you.3. Cut out the circle. At the center of the fabric, cut a smaller circle (I totally eyeballed it) where the trunk will go through. Then cut a straight line from the center circle to the bottom edge for the opening where you place the skirt around the tree.4. Pin a 1/4″ hem on both end of the opening you just cut, and sew those to prevent fraying. I left the smallest circle unfinished.

5. On the piece of felt, trace the circles for the edging. The number of circles will depend how large you made the skirt and how large the object you chose to trace is. A half yard of felt was perfect for my skirt, leaving me with probably five or six circles to spare.6. Cut out the circles.7. Pin the circles around the bottom edge of your skirt, overlapping them a bit so none of the main fabric shows through.8. Set your sewing machine on a large zigzag stitch with a really loose tension. Sew the circles to the main skirt.9. Iron and place around your tree. Voila. Super easy, right?++++++++++++++++

olive observer button copy 200 x 160

………………………………………………..
Thank you SO much to Heidi from Olive Observer! What a LOVELY guest post. I AM SO making this! Thank you for joining my 50 DIY Days of Christmas!

Pin It

Categories: 50 DIY Days


A little candle makeover

Well….. this week will be pretty much ALL about my girl, Ruari. Yup. She will be 2 years old this next Sunday!!! Wow. Oh, my…. 
Well…. I saw a while back on the Pinterest (yup…. I’m crazay ’bout Pinterest)…. a blinged out birthday candle! I thought I’d try out my own candle. I think the candle was cute and all as is when I bought it… BUT, I thought it would look a lot better with some bling all over it…. SO, here it is! Before and after:

I’m excited for it! BY the way…. I didn’t really think about it before I created this thing… but, glue doesn’t really stick to wax. Yeah. SO, I did a first layer of hot glue…. then, I glued on the gems. It worked. ๐Ÿ™‚
Are you ready for a Ruari photo countdown! I am! Starting tomorrow!!!!!! Yay!
AND… FYI: your last day to enter the Holiday Photo Challenge to win some pretty neat prizes is Friday! Yay!

signature

Categories: Uncategorized


Steppin’ Out

My outfit: necklace//f21, cardigan//f21, blouse//jcrew, belt//thrfit, dress/thrift, tights//f21, shoes//marshall’s
So, I bought this lacy dress at a thrift shop a couple of months ago… and, just haven’t gotten around to actually trying to plan an outfit around it. It’s an older dress and I don’t like the top of it (there’s an odd lace up deal on the back). BUT, I love the bottom of the dress. I wish it was a skirt. ๐Ÿ™‚ Since it’s not a skirt I just threw my loose jcrew blouse over it… hoping it would look good… and, I think it did. ๐Ÿ™‚ Add a cardigan. We’re good. ๐Ÿ™‚ That dress was like $5… so, that’s awesome! And, all the other pieces of the outfit are old (except the tights and shoes). 
I wore this outfit out for a little girl’s night fun! So fun! I have photos to share of the night later this week!!!
Did you have a nice Friday?

Linking up with Mandy from Harper’s Happenings, The Pleated Poppy, and Beautiful Blendings.

AND, be sure to enter you lovely holiday photo into my Holiday Photo Challenge to win some awesome fabulous prizes!

signature

Categories: Uncategorized