Build that chicken coop!

Chicken Coop // thepapermama.com

Chicken Coop // thepapermama.com

Our girls are growing and we have been attempting to get our chicken home built before they outgrow their little box in the house. It’s quite the project building a coop without much building knowledge, but I think we’ve got it. OR, I should say my husband has it down. Hopefully we can get this built within a couple of weeks. I can just tell the chicks are ready to get outside.

Speaking of…

Since the weather was absolutely BEAUTIFUL the past few days, we let the young chickens outside for the FIRST time this weekend. They pretty much LOVED it. They wandered around the yard, but mostly stayed near us. It was so fun having our little chicks wandering around. I ALSO loved that they ate a ton of bugs. Yay! It was pretty adorable watching them chase flies.

Happy Tuesday!

– Chelsey


Chocolate Caramel Crack-ers

Chocolate Caramel Crack-ers // thepapermama.com

I love sweet awesome candy goodness, but I like to pretend that I don’t want to eat it ALL the time (especially when my kiddo is looking). Admit it… you’ve snuck the candy you JUST told your kiddo they could not eat, after they go to bed. Ha! Or, maybe that’s just me? I mean, she has a crazy sweet tooth and will eat all the candy/chocolate around and then she goes on an insane sugar trip and I lose my mind.

That’s what this recipe is for. I used all sugar free candies (except for the 10 Chewy Caramels). I’m still not going to let her go crazy and eat the whole thing, but I used sugar free caramels and chocolate. Let me tell you: it’s soooo good. So good. Cannot stop eating it! Here’s the recipe:

Chocolate Caramel Crack-ers

Recipe adapted from Serious Eats and All Recipes.

Caramel supplies:

– 65 Werther’s Original Sugar Free Hard Candy, unwrapped

– 10 Werther’s Original Chewy Caramels, unwrapped

– 1 Tablespoon of butter

– 2 Tablespoons of water

– 1 cup dry roasted peanuts

– 1 teaspoon baking soda

– 1 teaspoon vanilla extract

– Optional: 1/2 cup of coconut

Remaining ingredients:

– Approximately 51 saltine crackers

– 12 oz of chocolate chopped into small chip sized pieces (regular or sugar free, whatever you prefer)


Directions:

– First, prep the crackers. Cover a large cookie sheet with foil (I’d suggest using a cookie sheet with sides, so caramel doesn’t spill out). NOTE: I’d really suggest placing a Silpat over the foil. The caramel WILL leak through and stick to parts of the foil. If you don’t have a Silpat, maybe parchment paper would help?

– Evenly lay out your saltine crackers (salt side up). If you have any gaps or spaces in the saltine “blanket”, fill it with a broken cracker or crumbs.  If you have more saltines than you do space, prep another cookie sheet with foil/silpat and the remaining crackers. Set aside.

Chocolate Caramel Crack-ers // thepapermama.com

– Preheat the oven to 350 degrees.

– Prep your caramel: In a heavy bottomed medium-sized saucepan place all your Werther’s caramels and candies, butter, and water. Over low heat, heat mixture of caramels and candies until it’s melted. Stir often.

– Once melted, add your peanuts and cook for another 2 minutes.

– Stir in baking soda, coconut, and vanilla. IMMEDIATELY take your caramel off the heat and gently pour over the saltines. If needed, use a rubber spatula to carefully spread the caramel (without moving the crackers too much).

Chocolate Caramel Crack-ers // thepapermama.com

– Bake the saltine cracker/caramel goodness for about 5 minutes (or when it’s bubbling a bit).

– Remove from the oven and evenly sprinkle the chopped chocolate over the caramel. Allow the heat of the caramel to heat the chocolate a bit, then use your rubber spatula to evenly spread out the chocolate.

– Let your Chocolate Caramel Crack-ers cool completely. We waited overnight. BUT, if you’re in a hurry… maybe refrigerate? I do feel like refrigerating the chocolate may make it turn a bit white. Wont hurt it, just a little discoloration.

– Once completely cool, use a knife to chop up your treat into bite sized pieces. I guess you could leave it as one giant crack-er, but it’s hard to fit that in your mouth.

– Put it in a jar/container.

– Enjoy.

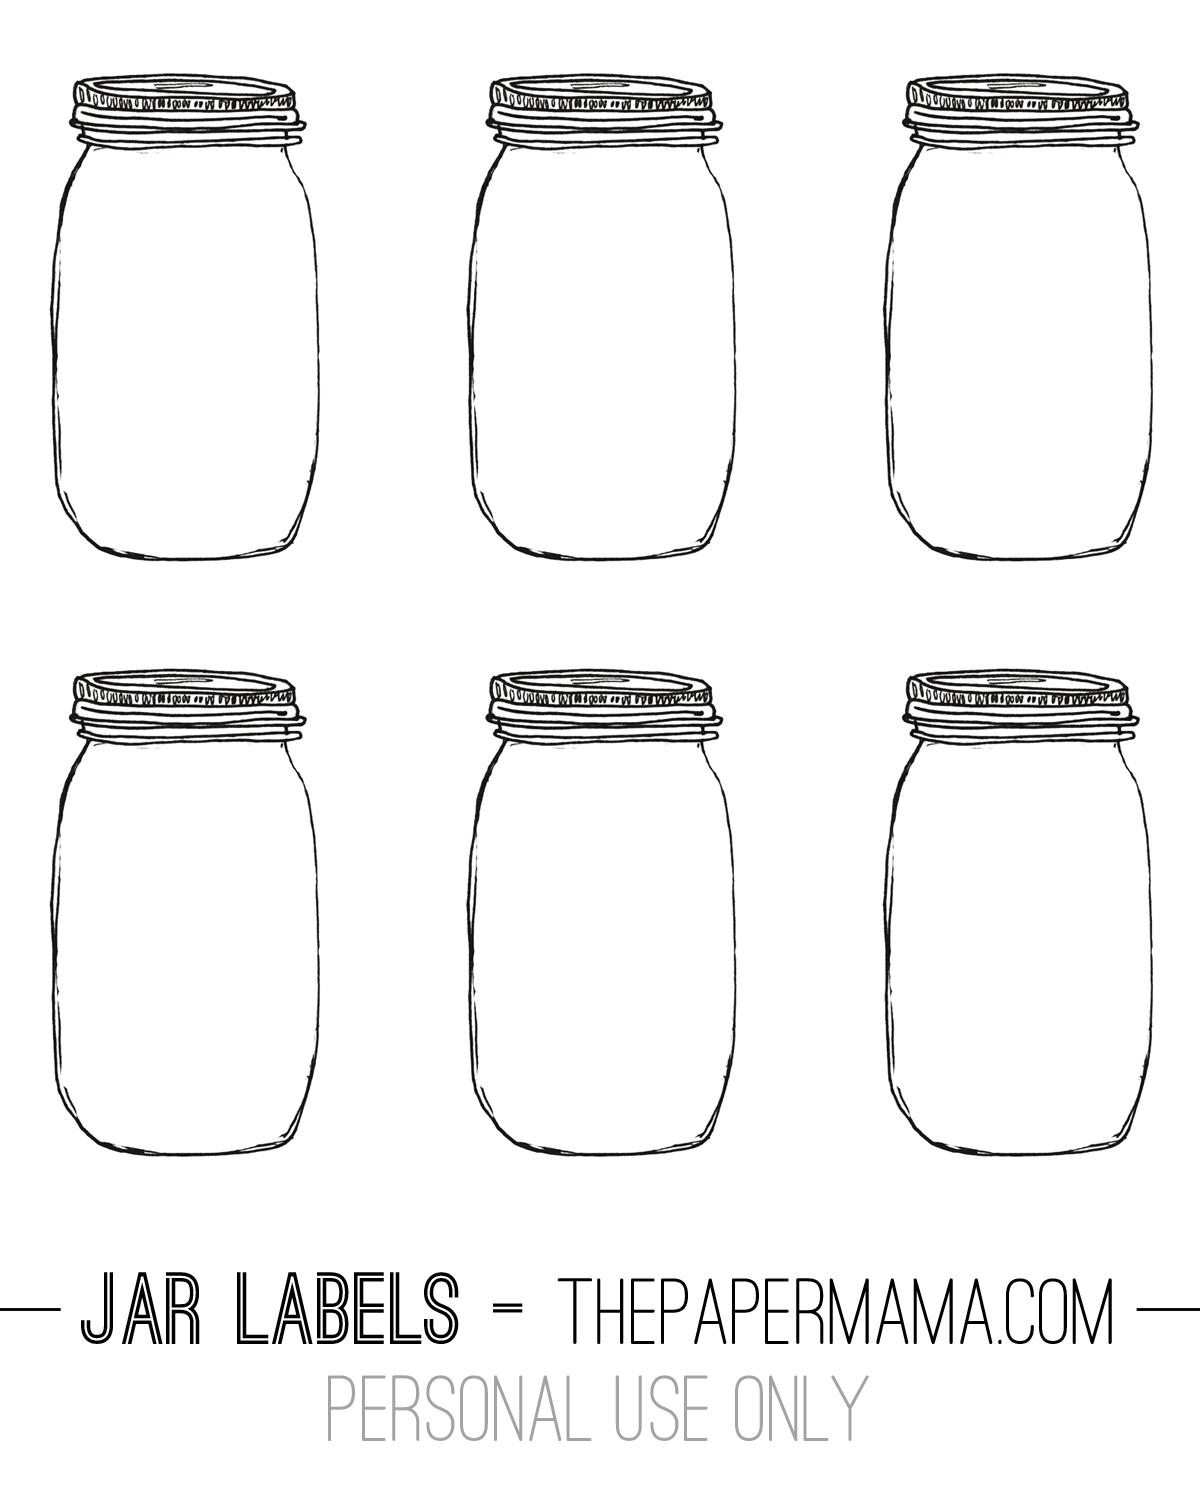
OPTIONAL: You can print out one of my jar labels and tie it to the jar with a little string. Give it to a friend. OR, give it to yourself. I gave a jar to myself. I loved it. (right click + save here or on the image below)

Jar Labels // thepapermama.com

Let me know if you try this out. It’s good.

– Chelsey

I was selected for this opportunity as a member of Clever Girls Collective, and the content and opinions expressed here are all my own.


You’re a gem printables and gift tags!

Gem Printouts // thepapermama.com

I love the gem trend happening around the interwebs. SOOOOO, I made some printouts to share with you. Some tags and some art prints. You’re a gem printables. Mother’s day is coming up in a week and these gift tags are perfect, OR maybe your mama would love a sweet print?

Gem Printouts // thepapermama.com

Gem Printouts // thepapermama.com

To download the prints and tags, right click + save: pink print, blue print, yellow print, orange tags, blue tags, and pink tags.

I hope you ALL enjoy! PLUS: today on BHG I’m sharing more awesome posts that include gems/diamonds! Check it out for more inspiration!

– Chelsey

P.S. all print outs are for personal use only. Thanks!


Lace Hanging Planter in the Portland Mercury!

Lace Hanging Planter // thepapermama.com

I’m pretty darn excited. Today I have a DIY in The Portland Mercury, found on the Crafty Wonderland insert. Since many of you aren’t lucky enough to get this awesome local newspaper…. I’m sharing the DIY here! Really excited about this. I’ll have to get a couple copies for myself and take a ton of photos. Ha! Well, here’s what’s going to be in the paper. I love these planters:

I live in a tiny home and I prefer not to cover my limited surfaces with plants. How do I deal with this? Hanging planters, of course! This is a VERY quick and simple project. Perfect for even the non-crafty people. I made these sweet little Doily Plant Holders to put in my little girl’s room. She wanted plants in her room, but I didn’t really want my 3-year-old to have easy access to dirt in her bedroom. Might as well just avoid that situation. Ha! SO, let’s make Lace Hanging Planter Holders.

Lace Hanging Planter // thepapermama.com

Supplies:

– 3 lace doilies

– 3 small containers (I used two old jars and a small tea cup)

– Rope (the length depends on how low you’d like your plants to hang, I used about 3 to 4 yards for each hanger)

– 3 small succulents

– 3 scissor snaps

– Needle and thread

– Scissors

Directions:

1. Cut 4 even sections of rope. For my shorter hanging planters I used just under a yard for each section of rope. If you prefer, you can use 3 pieces of rope to hang your planter, but 4 strands is a bit sturdier.

2. Thread the end of one rope strand through a hole on the doily. Tie a secure knot. Repeat this with all of your rope strands, making sure you spread the rope out evenly.

Lace Hanging Planter // thepapermama.com

Lace Hanging Planter // thepapermama.com

Lace Hanging Planter // thepapermama.com

3. Use a needle and thread to sew and secure the knots.

Lace Hanging Planter // thepapermama.com

4. Optional: If your doily has a few scallops (like mine) you can stitch the sides of each scallop to it’s neighbor. This will make the doily deeper for your planter.

Lace Hanging Planter // thepapermama.com

Lace Hanging Planter // thepapermama.com

5. Place your container in the doily and hold it up with your hand, try to make it hang evenly, then tie the strands of rope into a knot.

Lace Hanging Planter // thepapermama.com

Lace Hanging Planter // thepapermama.com

6. Braid the remaining portion of your rope, leaving about 3 inches at the end.

Lace Hanging Planter // thepapermama.com

7. Tie your rope onto one scissor snap (I like these because they twist). Use your needle and thread to secure the knot onto the scissor snap.

Lace Hanging Planter // thepapermama.com

8. Plant one small succulent into one container.

9. Hang your doily plant holder somewhere special, and place your planted succulent in the doily.

Lace Hanging Planter // thepapermama.com

10. Repeat steps 1 through 9. to make your remaining plant hangers.

11. Enjoy!

Lace Hanging Planter // thepapermama.com

– Chelsey

 ……………………………………………………………………………………………………………………………………

If you have a Wednesday post, please feel free to link it up below. And, feel free to link up to these blogs too… Parenting by DummiesProject AliciaJenni from the BlogIn The Moment With, and Live and Love Outloud.


The girls and their awkward years (days).

The Girls // thepapermama.com

Wow. I realized it’s been a while since I shared my girls. My urban chickens. They are around 5 or 6 weeks old and have officially hit the awkward years (or days). I took these photos a few days ago. They’re all pretty gangly and clumsy. Trying out their wings and pooping in their water NON STOP. OMG. so many poops. in the water. why in the water?

anywho.

They have been a great addition to our family. The kiddo loves them, but chooses to not hold them. I like to get in their box and the two friendly girls (Booksat and Boca) jump in my lamp to fall asleep. It’s sweet. Mrs. Pickles has decided that all people are out to kill her. I do looooove fried chicken, so I can understand her fear/concern.

The Girls // thepapermama.com

The Girls // thepapermama.com

I can’t get over how fast they’ve grown. In case you’ve forgotten how adorable they once were… here you go:

This weekend we are officially kicking off the chicken coop construction. Not sure how long it will take us…. since we don’t usually build large scale structures… hopefully it goes well! Lots of chicken coop googling happening over here. Ha! Wish us luck.

– Chelsey


2013 Bloggers for Babies Raffle… March for Babies

I’m about to go on another March for Babies walk. I’m here to share some info about a fantastic raffle that my friend, Mandy, is sharing on her blog. We’re raising money for the babies, March of Dimes. Look at all the goodies you could win (for a good cause):

MoD1

1. Ergo carrier in Mystic Purple (purple because it’s MoD’s color!) – a $115 value.  2. Onesie of the Month Club from Spunky Stork! – a $250 value. 3.$50 to spend as you please at Little Hip Squeaks4. $50 to spend atRuche!

MoD2

5. Narwhal cozy for your iPad, Kindle, tablet, etc. from Life Geekery (I just die) – $27 value. 6. One mask of your choice from Opposite of Far7. $30 shop credit to Yarn Bombed Antlers8. Your choice of sling from Umi Sling– $55 value.

MoD3

9. Sterling Silver City and State necklace of your choice from GlassCast – a $45 value. 10. “You are my favorite adventure” 8×10 print from Nole & Paper – $20 value. 11. Custom infant/toddler crocheted narwhal hat (!) from Jess Judkins12. $25 to spend at Quarter Life Luck!

MoD4

13. Vintage Double Drop Earrings from elladolce14. Robins egg blue cowl from Sarahnade shop15. 5 winners will get a block set (boy, girl, baby) from Littlest Lulu16. A one year subscription to the Monthly Spread fromARMOMMY!

MoD5

17. $30 to spend at Peach State Yarnworks18. Gift pack (Betsy Johnson necklace, vintage brass owl trio and $25 shop credit) from Stars Appearing19. An instant Raggedy Ann and Andy nursery (Lamp, mobile, wall art, crib quilt and chalk ware figure – so cuuute!) from Lishyloo Vintage20. $20 to spend as you please at Up a Tree Cup of Tea!

MoD6

21. 5 winners will each win a Bullshit stamp from Future Primitive (love these so much).  22. A mother/daughter set of boot socks from Burke & Louise Co23. Custom drawing from Peanut Gallery Prints – $50 value. 24. All Four Seasons infinity scarf from Teeny Tiny Bows – $26 value. 25. A gift pack of Petite Posters and cards from Type A Calligraphy – $42 value.

Entering is easy! Every $5 you donate (directly to March of Dimes) is one entry in this raffle. You donate $20, your name is in the “hat” 4 times. Simply click here, donate (credit/debit and PayPal are available) and you’re in. She will be choosing a winner after May 18th (the day of our walk).

Good luck!

– Chelsey