Milk Jug Watering Can for the kiddo!

Milk Jug Watering Can // thepapermama.com

The milk jug watering can. It’s free and easy to make! Wait…. why make it? Well, if your kiddo is like mine and wants to help you water the plants every time, and always ends up getting soaked from normal watering cans, then this is for you.

There are a couple ways to make this. You can poke holes in the lid or right on top of the jug. I failed with getting the lid to work (the lid was very flimsy), so I scrapped that idea and poked holes on the top instead. I used a large nail to start the holes (spacing them about 1 inch apart). The holes weren’t large enough to get a nice water flow from the original nail hole, so I used my  X-acto knife to trim and make each hole a little bigger. Draw on a face (kiddo asked if the watering can could look like she’s spitting… I think it looks like she’s puking, but she loves it), add some water, and put on the lid.

Milk Jug Watering Can // thepapermama.com

Hand this watering can over to your kid and HOPEFULLY it’s easier for them to water (and maybe they stay dry while watering in their jammies before bedtime).

– Chelsey


Cardboard Playhouse!

Cardboard Box Playhouse // thepapermama.com

Cardboard Box Playhouse // thepapermama.com

This past week I took on something new… A full on DIY with my kiddo. With her help. It was hard, but we did it. I’ll chat more about working with my kiddo at home, but for this moment I really just want to share what we made. Cardboard Playhouses! I’ve been seeing these wonderful creations ALL over Pinterest (I mean, where else) and I have wanted to make this for R. It’s cheap and easy. That’s perfect for me.

Cardboard Box Playhouse // thepapermama.com

Directions:

– it’s all pretty easy… but the basic idea is starting with a couple of large boxes. There was an awesome guy that helped us, at Home Depot, to find these damaged boxes.

– Unfold the box and use masking tape to connect the flap edges of the box or boxes.

– Use a permanent marker to draw on doors and windows.

– Cut out the doors and windows with an xacto knife (watch your fingers).

– We decided to turn our 2 boxes into one giant row house, cutting a door on the inside and taping it together.

– I added some cardboard to the roof area to add height (especially since my kiddo is so tall. Put on the roof.

– If you’d like a shingled roof, cut out little rectangle shapes for the roof top. Scalloped roof? Use some paper and cut scallops out. Tape on with clear tape.

– Add paint to any doors/windows. Let dry.

– Tape or ModPodge on some cute wrapping paper onto your home. I went with ModPodge, since I know this will help keep this home cleanish for a bit longer.

– Do any touchups, and you’re done!

Cardboard Box Playhouse // thepapermama.com

The kiddo has LOVED this. It’s long enough she can lay down in it (for about 10 more minutes). This was a fun project to create with my kiddo.

Enjoy!

– Chelsey

P.S. one of my favorite cardboard house inspirations is from Skunkboy Creatures.

Tags: , , , , , ,

Categories: diy


Wednesday Goodies: Chicken time!

Chickens // thepapermama.com

Yooooouuuu guys. I have them! Cheekens!

If you’ve been reading my blog for a while…. I’ve had this chicken dream for a while. It took a lot of convincing my hubby. I planted the idea TWO years ago. Yeah. TWO. It was an immediate no. Cause… well. Chickens in the city? That was not his idea of a good time. BUT, with time…. he grew to like the idea… then decided he did want chickens. First things first… we needed a fence. Last summer we saved up and the hubs built a little picket fence. It still needs to be painted and we need to put some chicken wire at the base, but it’s just about there!

Let me introduce you to the girls (Pleease let them all be girls… I guess there’s a 10%ish chance the didn’t get the sex right, and we have a rooster… which is a no no in the city). Any who…. Here they are:

Chickens // thepapermama.com

Mrs. Pickles.

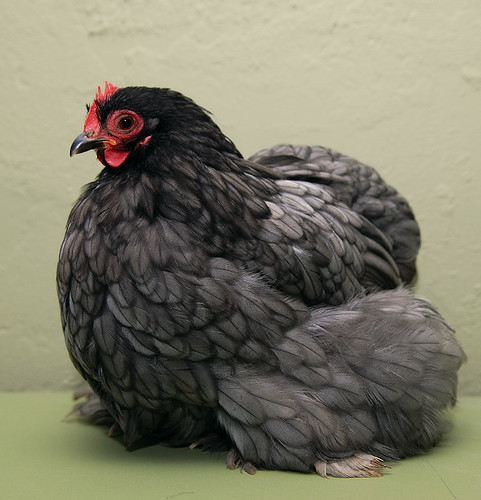
My husband named her, and I kinda like it. Mrs. Pickles is loud. She doesn’t seem like she’s distressed, but she’ll randomly screech out real loud and let us all know she’s awake.

She’s a Blue Cochin. To give you an idea of what she’ll look like… here’s a little photo of an adult below.

Booksat

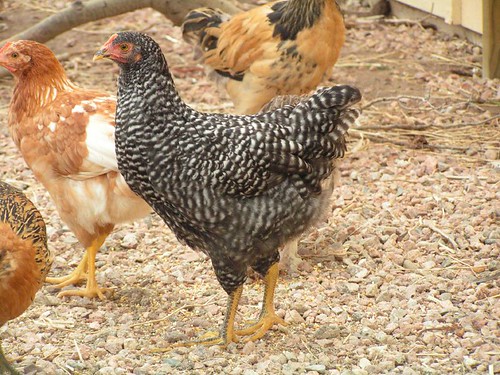
Uhhh. Yeah. I’m not sure about the name either. Buuuut, that’s what my kiddo named her. I kept asking her over and over what the name was and she never forgot it, “Booksat.” So, Booksat it is. I imagine we’ll probably start calling her “Booksy” or something. All our pets have crazy nicknames. Hee.

Booksat is a Plymoth Rock and is a jumpy girl. A little nervous and not so sure about the giant hand that comes down to pick her up (she’s also super fast for a little one).

Boca:

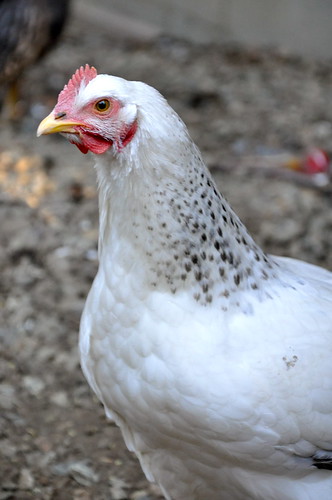
This is Boca. She is named Boca because she is naughty (Boca means “mouth” in spanish). We had to separate her on the 2nd day because she will NOT stop pulling on the other chick’s toes. Non stop. She just grabs toes and yanks them off their feet. She’s even drawn blood. I’ve tried a couple of recommended things (Blu Kote and Pick No More), she wont stop. Hopefully she just grows out of it.

Anywho…. She’s a Delaware and will look like this someday….

All my chicks and supplies were purchased at the Urban Farm Store in Portland. The owners of this store also wrote the book, A Chicken in Every Yard. WHICH I read and took a ton of notes. If you’re interested in getting your own little flock, I recommend this book. I think it would be helpful for the beginners (like me).

I’m very excited to start my little chicken family. VERY excited for eggs! Happy Wednesday!

– Chelsey

{Grown chicken photos via: Blue Cochin, Plymoth Rock, and Delaware}

……………………………………………………………………………………………………………………………………

If you have a Wednesday post, please feel free to link it up below. And, feel free to link up to these blogs too… Parenting by DummiesProject AliciaJenni from the Blog, and Live and Love Outloud.


Homemade Velveeta Cheese Recipe! So Tasty!

Homemade Velveeta Cheese // thepapermama.com

The other day I found this on Pinterest…. Homemade frickin’ Velveeta cheese. I really love cheese…. It’s pretty much a necessity in my life. I had to make this IMMEDIATELY! I mean, yeah: cheddar cheese is almost the same thing… but there’s something magical about Velveeta. Unlike cheese, it doesn’t turn into greasy mess when you melt it. It’s just creamy cheesy goodness. Toss in some tomatoes or beans into this cheese and you have an amazing dip.

We went ahead with a grilled cheese sandwich for our first Homemade Velveeta Cheese experiment. The result: delicious. We did just plain cheese for our kiddo and added spinach and bacon for us. PLUS, tomato soup. So yummy. This pinterest find is a WIN.

Homemade Velveeta Cheese // thepapermama.com

I researched about 5 different recipes and decided this was the recipe for me (I only adjusted the salt and types of cheese amounts). I hope you check it out (unless you hate cheese, then don’t… ha):

Homemade Velveeta Cheese

Recipe adapted from, America’s Test Kitchen via The taste Tester

1 Tablespoon water

1 1/2 teaspoons powdered gelatin (unflavored)

1 cup colby jack cheese, grated*

1/2 cup sharp cheddar cheese, grated*

1 Tablespoon non-fat or whole dry milk powder

1/2 teaspoon salt

1/8 teaspoon cream of tartar

1/2 cup + 2 tablespoons whole milk

Directions: 

– Line a small pan with plastic wrap (with the wrap hanging over the edge). The recipe called for a 5 x 4 bread pan, but I used a 5 x 9 x 1 inch high pan. Worked fine.

– Place the 1 Tablespoon of water in a small bowl and sprinkle the gelatin on top. Let sit for 5 minutes.

– Pulse your grated cheese, dried milk, salt, and cream of tartar in a food processor (about 5 times).

– Bring the milk to a boil over medium heat (it starts to boil pretty quick). When it reaches a boil, remove it from the heat and stir in the gelatin until it dissolves.

– Pour the milk mixture into a liquid measuring cup. With your food processor running add the milk into the cheese mixture. Blend until the mixture is combine and velvety smooth.

– Immediately pour the cheese mixture into your prepared pan. Chill in a fridge for 3 hours or overnight.

Homemade Velveeta Cheese // thepapermama.com

This is delicious. I mean… yeah, it’s cheese… BUT, it’s just like Velveeta cheese. There’s something different about Velveeta. It’s creamy and fantastic. This is a wonderful substitute. Let me know if you try it! It’s so good. I mean: cheese. Also…. try and take photos of a grilled cheese sandwich while your kiddo is watching… it’s almost impossible, “Mama, I’m Soooooooo starving hungry.” Ha!

– Chelsey


Rainbow Heart Headband DIY For the Kids

Rainbow Heart Headband // thepapermama.com

I’m sort of on a rainbow kick (if you haven’t already noticed) and I felt like there was something missing in my life, I couldn’t quite place it. Then, it came to me: my kiddo needs a rainbow heart headband. I made one and now my life is complete! Hee. She was pretty stoked to see what I had made for her… but then she asked me to make another one with ONLY Purple Hearts. That kid is addicted to purple.

Anywho… if you’d like to make this for yourself OR kiddo… here’s how you can make my Rainbow Heart Headband:

Rainbow Heart Headband // thepapermama.com

Supplies:

Colored hearts printout

Mod Podge

– Glitter in rainbow colors (red, orange yellow/gold, green, blue, purple)

– Old brush

– A section of ribbon (measure on your head, or kid’s, and add about 12 inches to tie a bow)

– Optional: Acrylic sealer spray

Directions:

– Print and cut out your colored hearts printout. I chose to use the smaller hearts for my headband.

– Add a layer of Mod Podge to a heart and add a layer of glitter. Let dry completely and repeat a second layer of glue and glitter (if necessary). Do this to ALL of your hearts.

– Add about 2 coats of Mod Podge OVER the glitter on the hearts. This will seal them and keep the glitter in place.

– Let dry completely (maybe a couple of hours).

Optional: Spray a couple of Acrylic Sealer Spray coats onto your hearts (Mod Podge is water-based, and needs a sealer if exposed to a lot of moisture). I chose to skip this step, since my kiddo pretty much hides from rain. Ha! So, no worry about it falling apart from the rain.

– Hot glue your hearts, in a line, onto you ribbon. Let cool.

Rainbow Heart Headband // thepapermama.com

– Tie around your head (or your kiddo’s), and dooone.

Rainbow Heart Headband // thepapermama.com

Enjoy.

– Chelsey


The -Sometimes I Want to Cuss- Banner!

Lucky Lady Banner // thepapermama.com

I’m a mama. A mama to a kiddo that repeats EVERything I say. When I say everything… that’s really what I mean. Usually the kiddo likes to copy each word I say. SO, that means I cannot cuss. I want to cuss. So bad, but I can’t. Unless I want my 3-year-old to do the same.

Sometimes I just want to hang banners up that say, “Lucky Bitch”. I do hang it up for about 2 minutes…. then my kiddo comes in the room and asks me what I’m doing. I take it down and I replace it with my “Lucky Lady” banner. For a tiny moment it was there. I imagined I could cuss freely… out loud. That’s not how it is, so I keep my cursing to myself.

Lucky Lady Banner // thepapermama.com

I want to cuss, but I don’t need to… Ok, sometimes I need to: stubbing toes, getting cut off by a driver, breaking something, frustration, cussing for joy (weird one), and just plain cussing because I feel like it. I reserve my cussing for a kid-free night with my friends (kid-free moms cuss like a bunch of drunk sailors, not even joking).

Whether you want to cuss it up all over your walls…. or you’d like to keep it clean and just be a Lucky Lady, this banner is fun for you. Perfect for the month of March. Want to make this for yourself? Ok!

Supplies:

– My letter’s printouts: one and two

– Green glitter

Mod Podge

– Old brush

– String

– Hot glue

Lucky Lady Banner // thepapermama.com

Directions:

– Print and cut out your letters from the printouts I provided (one and two).

– Place a layer of Mod Podge onto your letters, followed by a sprinkling of glitter. Let dry completely and add another layer of glue and glitter (the first layer wont fully cover with glitter).

– Once your letters are completely dry, glue the letters onto a bit of string of twine.

– Hang and you’re done!

Enjoy!

– Chelsey

Lucky Lady Banner // thepapermama.com


Magical Rainbow Wreath DIY

Rainbow Wreath // thepapermama.com

Hello Rainbow Wreath. You are quite lovely. This is one of my favorite wreaths to date. It’s fun and really reminds me of Rainbow Brite’s boots. Hee. This wreath is PERFECT for the upcoming St. Patrick’s Day holiday, but I plan on keeping it up for longer than this weekend. I think it’s a perfect wreath for Easter and even just for Spring (it’s almost Springtime, yay)!

Want to make this for yourself? Good. Here’s how I did it:

Rainbow Wreath // thepapermama.com

Supplies:

– Foam wreath

– Masking Tape (1 inch wide)

Mod Podge

– Glitter: red, orange, yellow (or gold), green, blue, and purple

– Old brush (about 1/2 inch wide)

Cloud printout

– 6 toothpicks

– Hot glue

Acrylic sealing spray

Directions:

– Cut off half of your wreath, creating a rainbow shape. I used a small hand saw to do this.

Rainbow Wreath // thepapermama.com

– Use your painters tape to tape off sections of your wreath. I tried to tape off about 1/2 to 1 1/4 inch sections. This is just a map to help you paint the rainbow stripes.

Rainbow Wreath // thepapermama.com

– Pick out the order you’d like your glitter in…. I chose the basic rainbow order: red, orange, yellow, green, blue, and purple. That means… every six sections (including the taped off spots) is the same color. Don’t worry about being too neat about this first round of colors, you’ll be covering any mess in the next set of colors.

Using your brush, put a layer of Mod Podge and glitter. Let dry and repeat a second coat of glue and glitter. Let the glitter dry COMPLETELY. I let it go a couple hours.

Rainbow Wreath // thepapermama.com

–  When your first round of glitter is dry, add tape to cover the glitter runoff and old tape.

Rainbow Wreath // thepapermama.com

– Add the remaining colors of glitter OVER the tape. Yup. Put Mod Podge on the tape and glitter. This also requires a couple of layers (and maybe a couple of quick touch ups). Let completely dry.

– Print and cut out the cloud printout. I chose to follow the cloud outline, but use the back of the page. I liked the pure white cloud instead of my cloud images. It was nice to have a pattern to follow while cutting.

Rainbow Wreath // thepapermama.com

– To support the clouds you’ll be hot gluing on, stick 3 toothpicks into the bottom of each side of the rainbow. Hot glue the clouds down.

Rainbow Wreath // thepapermama.com

–  Add a couple of coats of Clear Acrylic Spray to your Rainbow Wreath. Mod Podge is water based, and is NOT waterproof. I’d also suggest NOT putting this wreath in direct rain. My front door is safe from the rain, so I’m not too worried about a couple of splashes.

Rainbow Wreath // thepapermama.com

– Annnnd, you’re done! Hand your wreath where you can enjoy it everyday. I also suggest maybe tying the wreath with a bit of wire onto the wreath hangar. It’s a bit wobbly.

This project is a bit time consuming, but I love the end result. ALSO: messy. Glue and glitter… holy messy. Just take your time and let the glitter dry before adding more coats… that may help keep the frustration level down. Hee.

Also…. I photographed the wreath indoors… because I didn’t like the photos of it up against my red door. That’s it: time to paint the front door. I’m leaning towards a grey.

Rainbow Wreath // thepapermama.com

– Chelsey

P.S. Let me know if you create this!

……………………………………………………………………………………………………………………………………

If you have a Wednesday post, please feel free to link it up below. And, feel free to link up to these blogs too… Parenting by DummiesProject AliciaJenni from the Blog, and Live and Love Outloud.



Save