14 Super Neat Spring Cleaning Organization Ideas!

14 Spring Cleaning Organization DIY Ideas // BHG Style Spotters

Hello and Happy Thursday! For whatever reason, this week has really flown by. I can’t believe it’s almost the weekend (yay), and that also means it’s time for my Better Homes and Gardens post! This week I found 14 Spring Cleaning Organization DIY Ideas for you to check out. Something happens in the winter… I get too busy and maybe a little lazy with the whole keeping things clean and organized.

EVERY year, right around the start of March, I feel the need to change things up. They really are awesome. To check out the whole list of really cool DIY’s, head on over to my Better Homes and Gardens post!

– Chelsey

P.S. photo links: 1. A Thousand Words, 2. The Paper Mama for BHG, 3. Just The Bee’s Knees, 4. C.R.A.F.T., 5. Liz Marie Blog.


Up next: St. Patty’s Day!

What’s up next on the Holiday Train? It’s Saint Patty’s Day! I gathered some of the Saint Patrick’s Day themed DIY’s I’ve made to share with you. I think I’m catching ANOTHer cold, so this post is a wee bit short. The husband and I pretty much catch anything our kiddo brings home from preschool. OH, parenthood. Enjoy! My favorite is the banner below. Hee.

The “Lucky Lady” or “Lucky Bitch” Garland. AKA: My Sometimes I Want To Cuss Banner.

Lucky Lady Garland // thepapermama.com

Lucky Bitch Garland // thepapermama.com

Rainbow “Bum” Cookies. My failed attempt at rainbow cookies. Ha!

Rainbow Bum Cookies // thepapermama.com

Rainbow Wreath.

Magical Rainbow Wreath DIY // thepapermama.com

AND, Monday’s Lovely Post (by Lulu The Baker). Rainbow Cupcakes + Rainbow Cupcake Topper.

Rainbow Cupcakes and Rainbow Cupcake Toppers // thepapermama.com

Hope your Wednesday is lovely!

– Chelsey


A good idea: Hot glue gun tip

Keep water nearby while using hot glue, to prevent burns. // thepapermama.com

So, I have a thing for hot glue. I have to say the hot glue gun is my #1 favorite tool. I seem to use it for 75% of my projects and it can do no wrong… except burn my fingers. Hot glue can be my best friend, and my worst enemy. I’m working on a project, just gluing along, and then the burning hot glue attaches itself to my finger… And I curse/freak out all at once. A couple years ago a blog friend shared a fabulous tip with me (a Martha Stewart tip), and after burning myself multiple times last week I thought I should share with all of you!

It’s pretty simple. Just keep a small cup of water nearby when using your hot glue. It’s amazing. Got a bit of hot glue on your finger? Quickly dip the burning glue/finger into your water cup to cool it off. It’s so obvious, but I never really thought about this idea until my friend shared this hot glue gun tip with me.

I have burned myself BAD with the hot glue gun multiple times before I started keeping the water nearby while I worked. It’s really a good idea. Do you have any crafting tips?

Happy (burn-free) hot gluing!

– Chelsey

Tags: , , , , ,

Categories: diy


Rainbow Cupcake Recipe & Free Rainbow Cupcake Topper Printable

Rainbow Cupcake Recipe and Rainbow Cupcake Topper Printables // Lulu the Baker for thepapermama.com

Here’s a real quick intro to the newest contributor for The Paper Mama Blog: Lulu the BakerThis post is sponsored by CourseCraft.
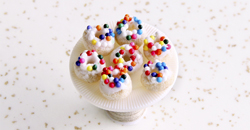
I am of the opinion that cupcakes are the perfect sweet ending to any celebration or event. They have pretty much everything you could ever ask for in a party food. Miniature size? Check! Self-serve-ability? Check! No utensil dirtying? Check! Delicious and cute and colorful and did I mention delicious? Check! I can’t think of a single person I know who doesn’t like cupcakes, or a single holiday that they wouldn’t be perfect for. In honor of the upcoming St. Patrick’s Day festivities, I made sweet little rainbow cupcakes. They’re so party-perfect, and guess what? They’re so easy too! It only takes a few extra minutes of work to get this eye-popping effect. And for an even bigger dose of rainbow cuteness, I topped my rainbow cupcakes with…you guessed it: rainbows!

Rainbow Cupcake Recipe and Rainbow Cupcake Topper Printables // Lulu the Baker for thepapermama.com

Rainbow Cupcakes Recipe How-to

Supplies:

  • 1 white cake mix, plus all of the ingredients to make it (usually oil, water, and eggs), or your favorite recipe for homemade white cake
  • a large mixing bowl
  • a large spoon or electric mixer
  • 6 small bowls
  • food coloring (you can get by with just red, yellow, and blue if you have to)
  • a small spoon
  • cupcake pans
  • 24 paper cupcake liners (the rainbow striped ones I used were from Shop Lemon Drop)
  • a teaspoon
  • 1 batch cream cheese frosting
  • a frosting spreader or butter knife
  • a 2″ circle punch
  • scissors or a paper trimmer
  • Rainbow Cupcake Topper printable

Rainbow Cupcake Recipe and Rainbow Cupcake Topper Printables // Lulu the Baker for thepapermama.com

Directions:

1. In the large mixing bowl, make the white cake batter according to package directions.

2. Divide the cake batter evenly among the 6 small bowls. You should get about 1/2 cup of batter per bowl.

3. Add 15 drops of food coloring to each bowl. For the red (really pink), use all red. For the orange, use orange food coloring or a combination of red and yellow. For the yellow, use all yellow. For the green, use green food coloring or a combination of blue and yellow. For the blue, use all blue. For the purple, use purple food coloring or a combination of blue and red. In all instances, only use 15 drops of food coloring TOTAL per bowl. Mix well with a small spoon, and rinse the spoon in between colors.

4. Put the paper cupcake liners in the cupcake pans.

5. Put 1 teaspoon of purple batter in the bottom of each cupcake paper. If you still have leftover purple batter after you’ve put a teaspoon in each cup, distribute the leftover batter among the cupcakes papers. Repeat the process with the blue batter, then green, yellow, orange, and finally pink.

6. Bake the cupcakes according to package directions. Allow to cool completely.

7. Using the frosting spreader or butter knife, frost the cupcakes with cream cheese frosting.

8. To make the rainbow cupcake toppers, begin by downloading the printable pdf. Once the file is saved to your computer, open it and print it. I scaled it to about 94% so nothing would be cut off, and chose the “Best” quality option.

9. Punch each rainbow circle out with the 2″ circle punch, then use the scissors or paper trimmer to cut each circle in half.

10. Gently push a paper rainbow into the frosting on each cupcake. Voila! A rainbow extravaganza!

Rainbow Cupcake Recipe and Rainbow Cupcake Topper Printables // Lulu the Baker for thepapermama.com

Rainbow Cupcake Recipe and Rainbow Cupcake Topper Printables // Lulu the Baker for thepapermama.com

– Melissa, Lulu the Baker

This Rainbow Cupcake Recipe post was sponsored by the very fun site, CourseCraft:

CourseCraft // thepapermama.com


See you soon! I’m off to Meet Make Do in Palm Springs! #meetmakebing

SEE YOU SOON Palm Springs Meet Make Do // thepapermama.com

Alright, I’m off! I’m flying out to Palm Springs today for the Meet/Make/Do gathering! I can NOT wait. I’ll be joining some of my favorite crafty bloggers for 3ish days filled with creating, learning, and fun! Hosted by Chelsea (Lovely Indeed), Brittni (Paper & Stitch), Kelly (Studio DIY), annnnnd sponsored by Bing.

See you soon Palm Springs! I get to enjoy 70 degree weather from today through Saturday… then I fly back home to rainy Portland. I don’t really mind the rain (and even like it sometimes), but I am ready for a break from the Oregon winter. You can definitely follow along on IG and Twitter with the #MeetMakeBing hashtag! Also, follow along on my IG: @thepapermama.

Meet Make Do Logo by Jordan Brantley

– Chelsey

P.S. the Meet Make Do logo was created by the lovely Jordan Brantley and this wonderful event is sponsored by the fabulous Bing!


Mailbox Makeover DIY for Under $15!

Mailbox Makeover DIY // thepapermama.com

I know it’s winter and all my plants are dead right now, but my front yard is REALLY bumming me out. A lot. I’m typically a fall and winter sorta girl, but for whatever reason I am so ready for the weather to warm up so we can get outside to build things and the plants can start growing! Until the weather changes, I’ll just have to stick to other projects. My Mailbox Makeover DIY (for Better Homes and Gardens) is actually something I could work on in my garage and house.

Mailbox Makeover DIY // thepapermama.com

Mailbox Makeover DIY // thepapermama.com

I LOVE how the mailbox turned out. I mean, the old box was pretty beat up and ugly to start… so maybe it wasn’t that hard to make it look nicer. Ha! My favorite part of this project: the pop of hot pink inside. We still have a ton more ideas for the front yard, but this little update has helped. Each time I walk up to my front door I smile, and yeah… I open the mailbox to look at the pop of pink (my neighbors probably think I’m so weird).

I’ve shared a bunch of metal painting tips (painting metal can be difficult), plus exactly how I updated my mailbox. You can head on over to BHG to see the full tutorial for my Mailbox Makeover DIY. Trust me, it’s an easy DIY. The work wasn’t really hard, but it does take a bit of wait time (for the drying paint) and patience. It took me a week to finish, but actual work time was about 3 – 4 hours.

Mailbox Makeover DIY GIF // thepapermama.com

Next up, I want to paint the front door. Probably black. I’m tired of the red. Maybe white? Hmmm… or yellow? Ha! I don’t know. We’ll see. What do you think

– Chelsey

I’m a paid contributor for the Better Homes and Gardens website. 

Save

Tags: ,

Categories: BHG, diy, For The Home, gif


Better late than never: The PNW Blogger Holiday Party Recap

PNW Blogger Holiday Party 2013 // thepapermama.com

PNW Blogger Holiday Party 2013 // thepapermama.com

Well, the PNW Blogger Holiday Party happened WAY back in November. I’ve been so busy I am just now getting to the recap post! Yup. Well, better late than never! We had an amazing event full of wonderful people, fun crafts, and goodies! Check out the photos below to witness the awesome!

PNW Blogger Holiday Party 2013 // thepapermama.com PNW Blogger Holiday Party 2013 // thepapermama.com PNW Blogger Holiday Party 2013 // thepapermama.com PNW Blogger Holiday Party 2013 // thepapermama.com PNW Blogger Holiday Party 2013 // thepapermama.com PNW Blogger Holiday Party 2013 // thepapermama.com PNW Blogger Holiday Party 2013 // thepapermama.com PNW Blogger Holiday Party 2013 // thepapermama.com PNW Blogger Holiday Party 2013 // thepapermama.com PNW Blogger Holiday Party 2013 // thepapermama.com PNW Blogger Holiday Party 2013 // thepapermama.com PNW Blogger Holiday Party 2013 // thepapermama.com PNW Blogger Holiday Party 2013 // thepapermama.com PNW Blogger Holiday Party 2013 // thepapermama.com PNW Blogger Holiday Party 2013 // thepapermama.com PNW Blogger Holiday Party 2013 // thepapermama.com PNW Blogger Holiday Party 2013 // thepapermama.com

Thanks to EVERYone that came and I hope your 2014 has been off to a great start! Also, a BIG thank you to all of our sponsors, especially the event sponsors: The 7th Chamber, Pinhole Press, Yoked, and Graham and Brown. Also, a bit thank you to Macey for taking the photos!

– Chelsey

2013 PNW Blogger Holiday Party Sponsors:


   photo PNW-Blogger-Logo-2013_zps8b6117cc.png


  photo justlovely_zpseb489bd4.png