Love this: Dry Erase & Chalkboard Frame!

Dry Erase & Chalkboard Frame

My friend Amy (from Mod Podge Rocks) made this really great Dry Erase & Chalkboard Frame for the HP Create blog. It’s so cute! She made it for a fun teacher gift, but I can see this sweet thing in my office space. I love that it’s part chalkboard and part dry erase. What do you think, will you be making this? Head on over to see her full post here.

– Chelsey

P.S. I am a paid contributor for the HP Create Blog.

Tags:

Categories: favorite blogs


Happy Tea Towel DIY (with free printables)

Happy Tea Towel DIY

This month on the HP Create blog we were challenged to create 3 DIY’s that made us happy! I immediately thought of Pharrel’s Happy song. I know. It’s all over the place and REALLY get’s stuck in your head, but I can’t help it. It makes me happy. It also makes my kiddo dance (that always makes me happy). SO, I created a printable using some of the songs lyrics and ironed them onto this tea towel. It’s so quick to make.

Happy Tea Towel DIY

Happy Tea Towel DIY

How lovely would this gift be for Mother’s Day? If your mom is into cooking…. Hee. I wrapped a favorite cookbook up in the towel and tied on some wooden spoons and rosemary! It’s so quick to make. If you’d like to make this for yourself, or a friend, head on over to my post on HP Create! The Happy Tea Towel post comes with the printable to make your tea towel.

– Chelsey

I’m a paid contributor for the HP Create site.

Save

Save

Save

Tags: , ,

Categories: diy, For The Kitchen, HP


Star and Banner Cake Topper (with free printables)

Star and Banner Cake Topper on HP Create

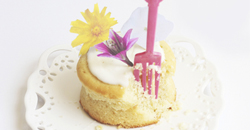
Getting married soon? Well, I have a perfect little cake topper for you. It’s adorable and inexpensive (plus, super easy to make). This summer I’ll be celebrating my 6th wedding anniversary, but I can still remember the rush/stress/craziness of planning a wedding. Maybe this little free printable will help make your day a little less crazy? I hope so. If you’re not planning a wedding, no worries: this topper would also be an adorable birthday cake topper, OR a very cute baby shower cake topper. Really, you can use it for any celebration.

Star and Banner Cake Topper - with free printables

Supplies:

Directions:

STEP 1: Print out the banner and stars printable. If you have a larger cake, keep the print scale around 100%. My cake was small, so I scaled down the print size to 70%.

Star and Banner Cake Topper - with free printables

STEP 2: Use your pencil to draw out the names on the banner. Grab the paint. The reason I recommended the Martha Stewart Glass Paint is because the top of the bottle has a point, perfect for tracing the names you just drew with the pencil. Let the paint dry completely.

Tip #1: want to skip the whole handwriting the name on the banner? Well, if you have photoshop you can download the print I provided and type out the names in white (placing the font over the banner). Save and print.

Star and Banner Cake Topper - with free printables

Star and Banner Cake Topper - with free printables

STEP 3: When the paint is dry, use scissors to carefully cut out the banner. Then, use the hot glue to attach the back of the banner to the tops of two skewers (see photo above).

Star and Banner Cake Topper - with free printables

STEP 4: Let’s make those stars sparkle! I didn’t want to use glitter for this step, because if it fell on the cake (seriously, glitter gets EVERYWHERE) then it may be eaten. So, I found these pretty colorful cake sprinkles to use in place of glitter (no harm eating these cake sprinkles). Use an old paintbrush to brush a coating of Mod Podge on the star, then sprinkle on a coating of the cake sprinkles. Let dry completely.

Tip #2: Sometimes it’s hard to get the Mod Podge smooth, so I use my finger to smooth it out on the stars before I put on the sprinkles.

Star and Banner Cake Topper - with free printables

Star and Banner Cake Topper - with free printables

STEP 5: Cut out 2 pieces of wire (the length is up to you, but I started with 12 inches and trimmed down). Wrap the end of both wire near the top of the skewer. Hot glue the back of one larger star over the wrapped wire to cover it up (see photo above). Use your hands to curve the wire a bit (see image above). Space out some stars and hot glue them along the wires. Trim any excess wire.

Star and Banner Cake Topper - with free printables

STEP 6: If needed, trim the length of your skewers. Since I had a tiny cake, I trimmed off about 4 inches from each wooden skewer with my wire cutter.

Star and Banner Cake Topper - with free printables

STEP 7: Choose a spot for your banner and stars to go on the cake. I put my banner in front and put the stars about 2 inches behind the banner. Carefully push the skewers into the top of the cake. You are done!

Star and Banner Cake Topper - with free printables

– Chelsey

I am a paid contributor for the HP Create website. All opinions are my own. I picked up this beautiful cake from a local Portland bakery, The Cakery. Highly recommended if you’re in the area and don’t feel like baking a cake.

The Paper Mama Shop


More Favorite Free Number Fonts

More Favorite Free Number Fonts // thepapermama.com

Last friday I shared 11 of my favorite free number fonts, and I really had a TON more I wanted to show you. So, that’s what’s happening today. Here are 10 more of my favorite number fonts. They are all free to download (some do accept a small donation for their hard designing work).

A. Fyra (this font is ALL numbers, check it out)

B. Tightrope (I imagine this would be good for a circus birthday party)

C. Bender

D. DymaxionScript

E. Forty Second Street

F. Upper East Side

G. Ribbon

H. Lobster

I. Mission Script (I use this font A LOT)

J. Duke

If you love fonts as much as I do, check out my previous collections: Last week’s Favorite Free Number Fonts, Free Commercial-Use Fonts take one and take twoJess Font used in a project, and my favorite collection of cool Dingbats!

– Chelsey

P.S. Just a note: all of these fonts are free, but most cannot be used for commercial-use (unless you purchase a license).  They should all be fine for personal use, but just don’t use them in any product you plan on selling. ALSO note: the rules and regulations of each font are subject to change at any time, and I can’t guarantee these will still be free in the future. You need to read the rules for each font you download. 

Tags: ,

Categories: favorite, Uncategorized


Painted Trellis DIY

Painted Trellis DIY // thepapermama.com

Today is supposed to be BEAUTIFUL here in Portland. This weather makes me so ready for gardening. A couple weekends ago my husband and I built this sweet handmade trellis. We needed something large and sturdy (for some crazy raspberry plants) and we just couldn’t find what we wanted at any garden store… for the price we were willing to pay. So with a bit of time, wood, paint, nails, and sweat… we built this guy! It’s all ready. This weekend we plan on placing it behind those crazy berries. You can find the full painted trellis DIY here on Better Homes and Gardens today. Do you have any garden DIY plans this year?

Enjoy and happy gardening!

– Chelsey


“Home Is Wherever Mom Is” Mother’s Day Printable

"Home Is Wherever Mom Is" Mother's Day Printable // thepapermama.com

Wow… it’s almost May. I can’t even believe it. Time is flying and that also means Mother’s Day is right around the corner, so I made a Mother’s Day Printable for all of you! I made 5 different versions for you to download. It’s the perfect free gift for your mama. Just print, trim the image to 8 inches by 10 inches, and put it in a frame! Click on one of the five links below, right click + save.

Pink Background // Blue Font // Blue Background // Grey Background // Grey Font

"Home Is Wherever Mom Is" Mother's Day Printable // thepapermama.com

Gift this to your mama and enjoy!

– Chelsey

P.S. All of these prints are for personal use only.

Save


Baby chicks!!!!!!!!!!!!

Baby Chicks // thepapermama.com

Baby Chicks // thepapermama.com

You guys. The baby chicks are hatching! I don’t think there’s much I need to say… cause adorable chicks! Yeah. That’s right. We put 6 eggs under her and by the time we tucked her in tonight, we had 4 chicks hatched… with one more egg almost ready to go. Hoping the other 2 are all hatched by tomorrow! Yay! Yay adorable babies! Warning, adorable baby chick video below…

– Chelsey

P.S. If you’re wondering… yes, my chicken is telling me to back up. Serious chicken is serious. Hee.

Tags: ,

Categories: paper mama farm