AND, the winner of the "Fall" photo challenge is…

This weeks challenge was: Fall

First:
{Lulu tutu photo}


Congrats to the winner! Great job, and please feel free to grab the Fact: I’m Awesome button! Because You are awesome!!

The Paper Mama


Second:
{Nurse Loves Farmer}


Third:
{Photo Mommy}


Fourth:

{live.love.travel}


Fifth:
{Les Cadeaux}


Congrats to my top 5 winners! If you’d like… you are more than welcome to grab a Top 5 Photo button below!

The Paper Mama


My favorites (in no particular order):

{Gatorette and Me}
{Bunch of Barrons}
{Through a Photographer’s Eyes}
{Olive Observer}
{Ac Photography and Knits}
{Miggyhood}


If you’re one of my favorites you are more than welcome to grab a “Paper mama hearts me” button below!

The Paper Mama

 . 2010 winners . 2011 winners .

Family.

โ™ก Chelsey

Categories: Uncategorized


50 DIY Days with That is all: Holiday Makeup

Day 20: Hi, Paper Mama readers!My name is Ashley, and I blog over at That is all. Iโ€™m kind of a cosmetics nuts (just recently started a Youtube beauty channel), so when Chelsey asked me to contribute to the 50 DIY Days of Christmas, I knew it had to be a makeup tutorial.Iโ€™m sharing a bronze, glittery eye that would be perfect for all your holiday engagements. I hope you enjoy! ๐Ÿ™‚

50 DIY Days of Christmas (2)

50 DIY Days of Christmas

That is all.

………………………………………………..

Thank you SO much to Ashley from That is all! What a LOVELY guest post. I LOVE that wreath. ๐Ÿ˜€ Thank you for joining my 50 DIY Days of Christmas!

Pin It

Categories: 50 DIY Days


Holy McMoly. She’s 23 months.

Oh man. Oh my goodness… just 1 more month and my child will be 2 years old! Wha? How did this happen….Oh gosh. I’m so happy and sad at the same time. I love the human she’s growing up into…. but, then I get sad that she’s growing so fast!
Sometimes it’s so hard to be a mom….. BUT, mostly it’s wonderful. I love the sweet kisses she runs up to give me…. the funny words/things she’s saying…. the chubby toddler fingers… cuddly arms… Even after she melts down and I am so frustrated with the moment… I get a sweet hug from her after she calms down. Sweet sweet girl. 
Ruari: you are my love. Thank you for being my daughter! – Mama

BY THE WAY…. this is why it’s so hard to get a photo of a toddler….

Oh, and I’m guest posting over at Mandy’s (A Sorta Fairytale) today! Head on over to see a day in my life!
signature

 alt design banner

Categories: Uncategorized


La dee da!

Here are a few of my most recent banner creations! I wanted to share with you and let you know I’m ALMOST to my goal to make it to Alt Design Summit! ๐Ÿ˜€ Thanks to all of you and your banner orders and ad space purchases! If you’d like a banner or some ad space to help get me to Alt Design Summit at SUPER discounted prices…. click on the widget below to donate and I’ll email you! Only $20 for a banner/button order! That’s a $16 savings!

signaturealt design banner

Categories: paper mama shop


50 DIY Days: Cheeseball Snowman

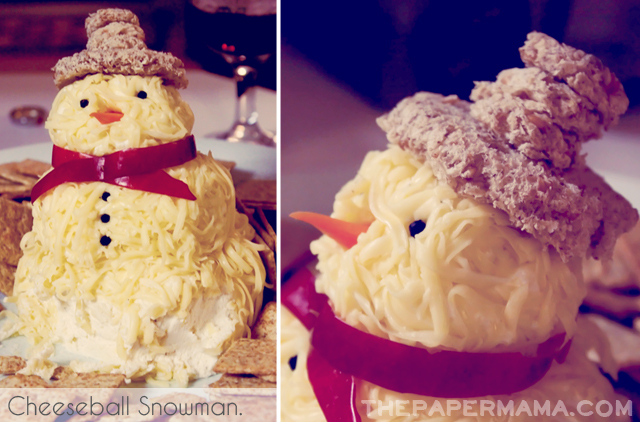
Day 19: The cheeseball snowman! Yup, I have been making this guy every year since I found the recipe in the Martha Stewart magazine around 2005? Yup. It’s delicious. It’s cheese! How could it not be fantastic? The photos above are from a Christmas Party last Christmas. He’s delicious! I’d like to share the recipe… here it is….
Cheeseball Snowman
By, Martha Stewart magazine
1 pound cream cheese, softened
1 1/2 cups Monterey Jack cheese, grated
1 garlic clove, finely chopped
Salt and freshly ground pepper
**Celery, clove, pumpernickel slice, black olives, and carrot
1. In a food processor, combine cream cheese (reserve a spoonful for hat), 1/2 cup Monterey Jack, garlic, and salt and pepper to taste. Freeze until firm, 30 minutes.
2. Shape mixture into 3 balls; roll balls in remaining Monterey Jack. Freeze until firm, about 1 hour.
3. Just before serving, stack balls; secure with toothpicks. Use vegetable peeler to shave celery scarf; pin with clove. Cut bread into 1- and 1 1/2-inch rounds; glue hat together with cream cheese, then secure with toothpick. Punch dots from olives with plain round pastry tips, and cut end off carrot; press in place. Serve with crackers.
**If you’ll notice… I do not have celery, pumpernickel, or olives on my snowman…. Pretty much I used the stuff I already had in my home. Instead of the suggested decorations…. I used apple skin for the scarf, peppercorns for the eyes and buttons, and just normal bread for the hat. ๐Ÿ™‚
Enjoy! AND, trust me: it’s delicious and super easy to make! The kids thought it was pretty amazing!

My cost: About $6
Time: 30 minutes.


signature

Categories: 50 DIY Days, food


Things I love this week.

Our Christmas card for this year!

Talk about a sweet nursery! Very lovely.

I am in LOVE with all of these illustrations….. I want them all over my home!

Thanks for the sweet shout out and I LOVED working with this person!

Yummy apple chips snack for Ruari.

Have you checked out my Yellow Finch Designs sponsor? Sweet blog. ๐Ÿ™‚

Jess shared this awesome artist’s blog with me. I LOVE IT. New blog to follow for sure.

OMG. I want to make one of these for Ruari soooo bad!

Thank you for the love for my 50 DIY Days!

Have you seen this awesome ombre cake? Sweet blog too.

Wow. This DIY party is AMAZING.

Check out this sweet FREE felt ornament PDF.

AND: hee hee hee hee hee hee hee hee. giggle. hee.

signaturealt design banner

Categories: Uncategorized


50 DIY Days with Chronicles of Corbin: Bumble the Snow Monster T-shirt

Day 18: hello lovelies! it’s Jill from Chronicles of Corbin! i was super excited to be asked by my pal chelsey to be a part of the fifty diy days of christmas! i’ve made a few felt t-shirts lately as gifts and for my own son so i thought it would be fun to show you all how fun, easy, and inexpensive they are to make!!
the supplies you’ll need are: a t-shirt (i bought this one at target for four dollars!), felt (craft stores carry them by the sheet and are usually three for one dollar), scissors, needle and thread in the coordinating felt colors, and a print out of the design. for this one i just searched “bumble the snow monster” in google, saved the image i liked, cropped out his face, and printed it.
start from the biggest shape of the design, pin it to the felt, and start cutting the pieces out.
snip, snip! i keep a picture of the design handy to reference and always love watching it come to life!
for bumble i cut jagged edges around his face to make him look furry and then started sewing him onto the shirt after i arrange it just how i want it and pin it down.
after his head was sewn on i worked on sewing the smaller pieces together so there would be less to handle once i actually sewed the face pieces to the shirt. it’s helpful to lay the paper cutout on the head to get the face pieces in the exact spots too! then just pin them on and sew them to the shirt!
last step is to bribe your kid with a peanut m&m to stand and take a picture of the finished product! he promises outstretched arms and monster noises but won’t settle for taking his eyes off his new truck!
what i’ve found best is to wash these shirts with like colors inside out and then hang to dry!
………………………………………………..
Thank you SO much to Jill from Chronicles of Corbin! What a LOVELY guest post. I think Ruari needs one of those shirts for sure! ๐Ÿ˜€ Thank you for joining my 50 DIY Days of Christmas!

Pin It

Categories: 50 DIY Days