Wednesday Goodies: Chicken time!

Chickens // thepapermama.com

Yooooouuuu guys. I have them! Cheekens!

If you’ve been reading my blog for a while…. I’ve had this chicken dream for a while. It took a lot of convincing my hubby. I planted the idea TWO years ago. Yeah. TWO. It was an immediate no. Cause… well. Chickens in the city? That was not his idea of a good time. BUT, with time…. he grew to like the idea… then decided he did want chickens. First things first… we needed a fence. Last summer we saved up and the hubs built a little picket fence. It still needs to be painted and we need to put some chicken wire at the base, but it’s just about there!

Let me introduce you to the girls (Pleease let them all be girls… I guess there’s a 10%ish chance the didn’t get the sex right, and we have a rooster… which is a no no in the city). Any who…. Here they are:
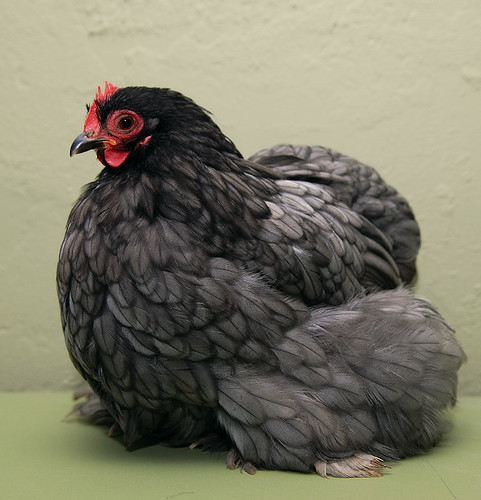
Chickens // thepapermama.com

Mrs. Pickles.

My husband named her, and I kinda like it. Mrs. Pickles is loud. She doesn’t seem like she’s distressed, but she’ll randomly screech out real loud and let us all know she’s awake.

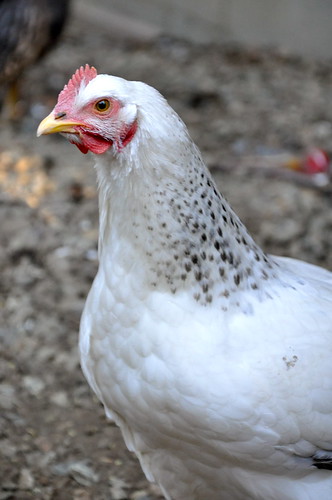
She’s a Blue Cochin. To give you an idea of what she’ll look like… here’s a little photo of an adult below.

Booksat

Uhhh. Yeah. I’m not sure about the name either. Buuuut, that’s what my kiddo named her. I kept asking her over and over what the name was and she never forgot it, “Booksat.” So, Booksat it is. I imagine we’ll probably start calling her “Booksy” or something. All our pets have crazy nicknames. Hee.

Booksat is a Plymoth Rock and is a jumpy girl. A little nervous and not so sure about the giant hand that comes down to pick her up (she’s also super fast for a little one).
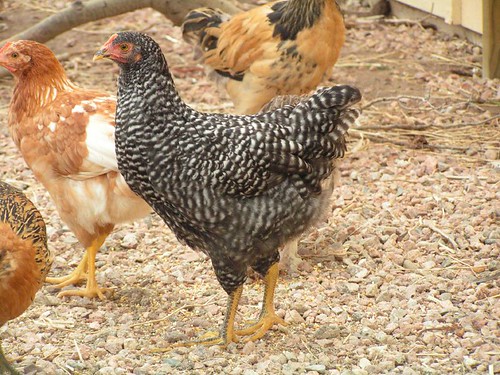
Boca:

This is Boca. She is named Boca because she is naughty (Boca means “mouth” in spanish). We had to separate her on the 2nd day because she will NOT stop pulling on the other chick’s toes. Non stop. She just grabs toes and yanks them off their feet. She’s even drawn blood. I’ve tried a couple of recommended things (Blu Kote and Pick No More), she wont stop. Hopefully she just grows out of it.

Anywho…. She’s a Delaware and will look like this someday….

All my chicks and supplies were purchased at the Urban Farm Store in Portland. The owners of this store also wrote the book, A Chicken in Every Yard. WHICH I read and took a ton of notes. If you’re interested in getting your own little flock, I recommend this book. I think it would be helpful for the beginners (like me).

I’m very excited to start my little chicken family. VERY excited for eggs! Happy Wednesday!

– Chelsey

{Grown chicken photos via: Blue Cochin, Plymoth Rock, and Delaware}

……………………………………………………………………………………………………………………………………

If you have a Wednesday post, please feel free to link it up below. And, feel free to link up to these blogs too… Parenting by DummiesProject AliciaJenni from the Blog, and Live and Love Outloud.


Spicy Pickled Carrots Canned

Spicy Pickled Carrots // thepapermama.com

If you follow my Instagram, you may have noticed I’ve been canning (insert Portlandia reference here… it’s so true, ha) and have even joined the Portland Preservation Society. It’s a group of people that WANT to know where their food comes from. My pickled carrots: from my garden and pickled by me.

Canning has been quite an adventure. Have you wanted to try it? I’ve enjoyed it and can’t stop! Pickling is DEFINitely a great way to start. It’s super simple… and pickles are delicious! This recipe I used (adapted from Serious eats) is a great one to try as your first canning. The water bath canning instructions are at the end of the directions. A couple of notes that I find are important for starting canning:

– If you are using old jars to can with, make sure they are specifically for canning and have no chips on the rim. There will not be a proper seal with a chip.

– Only use new lids. You can use old bands, but all the lids should be new. The old lids will not create a proper seal and the food will probably spoil.

– Vegetables cannot be pickled using the water bath method… without some sort of acidity. That’s why pickling is awesome! Pickle all the veggies! Hee.

– Most fruit should have enough acidity to can with the water bath method.

– I recommend checking out the Ball site if you have any questions.

Spicy Pickled Carrots Canned

Adapted from Serious Eats

  • 1 1/2 pounds carrots, trimmed to fit your jars
  • 1 cup white vinegar
  • 1 cup water
  • 1 tablespoon pickling salt
  • 1 teaspoon dill seed
  • 1/2 teaspoon red chili pepper flakes
  • 1/2 teaspoon black peppercorns
  • 1 clove of garlic for each jar

Directions (adapted from Serious Eats): 

1. Bring a small pot of water to a boil in which to blanch the carrots.

2. Prepare 1 pint and a half jar, or 2 12-ounce jelly jars. Place lid(s) in a small pot of water and bring to the barest bubble to soften sealing compound.

3. Peel carrots and trim to fit jars. Cut into thin sticks.

4. When the water comes to a boil, drop in the carrots and cook for either 90 seconds if you plan on canning your pickles, or 3 minutes if you’re making them as refrigerator pickles.

5. When time is up, remove carrots from water and run under cold water to stop cooking.

6. Combine vinegar, water and salt in a small saucepan and bring to a boil.

7. Place spices and a garlic clove into the bottom of each jar.

8. Pack carrots sticks upright in jar(s).

9. Pour the boiling brine over the carrots, leaving 1/2 inch headspace.

10. Tap jar(s) gentle to remove air bubbles.

11. Wipe the rims and apply the lids and rings.

12. If you’re canning the pickles, process them for 10 minutes in a boiling water bath.

13. When time is up, remove jar(s) from canner and let cool.

14. Sealed jars can be stored in a cool, dark place for up to one year. Refrigerator pickles should be placed in the fridge as soon as the jars are cool.

15. Let pickles rest in pickling liquid for at least 48 hours before eating.

Spicy Pickled Carrots GIF

– Chelsey


Pacific Northwest Spring Blogger Party!

PNW Blogger Meet Up Seattle // thepapermama.com

Yay! Time for another Pacific Northwest Blogger Meet Up.

The date: Saturday, April 27th.
The location: Von Trapp’s, Seattle, WA.
Time: 5 pm to 8 pm
Ticket price: $25 + ticket fee.

Tickets go on sale at 8 am PST today!!!

BUY YOUR TICKETS HERE!


This event is open to bloggers and handmade shop owners. Please don’t buy a ticket for your significant other/kiddo (unless they are bloggers, ha), since we are so limited on space. <3

I really hope to see you there, and am SO excited to host this in Seattle again!!!

ALSO: We often have inquiries from local artists/shop owners about donating goodies to go in our gift bags, we’d love to have you! Just send me an email (thepapermama at gmail dot com) with “PNW BLOGGER GOODIE BAGS” in the subject line and we can chat more. We are asking that goodies are provided in increments of 25 (that way it’s easier for us to evenly split up everything in the bags).

PNW Blogger Meet Up Seattle // thepapermama.com


PNW Spring Blogger Party!

PNW Blogger Meet Up Seattle // thepapermama.com

Yay! Some of you have inquired about the date of the next meet up, and I haven’t been able to share the date…. but now that it’s all confirmed: April 27th! It will be in Seattle, WA this time (yay for all the Washington Bloggers).

The tickets ($25 + ticket fee) go on sale on Monday, March 25th at 8 A.M. PST. I’ll have a post ready with a link to the ticket sale site. The event is capped at 50 tickets. I have no idea if these will sell out fast, but the last time we were capped at 50 people it sold out in one day. Soooooooo: good luck! I’ll ALSO share more info about the exact location, etc. on Monday.

This event is open to bloggers and handmade shop owners. Please don’t buy a ticket for your significant other/kiddo (unless they are bloggers, ha), since we are so limited on space. <3

I really hope to see you there, and am SO excited to host this in Seattle again!!!

ALSO: We often have inquiries from local artists/shop owners about donating goodies to go in our gift bags, we’d love to have you! Just send me an email (thepapermama at gmail dot com) with “PNW BLOGGER GOODIE BAGS” in the subject line and we can chat more. We are asking that goodies are provided in increments of 25 (that way it’s easier for us to evenly split up everything in the bags). 

See you Monday!

– Chelsey

P.S. thanks to my helpers for this event: Jenni and Heather

PNW Blogger Meet Up Seattle // thepapermama.com


Homemade Laundry Detergent and Wash Jar

Homemade Laundry Detergent + Painted Jar // thepapermama.com

I finally tried it: Homemade Laundry Detergent! And it does work. I’m not great at math so I won’t do the calculations of my costs per load… but I do know the costs are less. Because I made my own laundry detergent I need a place to store it. I found a large glass jar at the local thrift store and painted “WASH” onto it. It looks great in my laundry room.

Below I shared a quick rundown of how I made the detergent (this recipe can be found on multiple sites so I’m not sure of the original source).

Ingredients:

1.5 cups of Borax (a natural laundry booster)

1.5 cups Arm & Hammer’s Washing Soda (NOT baking soda)

1 bar of Castille soap (I used Dr. Bronner’s peppermint bar)

Directions:

– Use a cheese grater to grate up your Castille soap.

– In a food processor, blend your grated up soap and a 1/2 cup of Borax and a 1/2 cup of Washing Soda until blended (you want those shreds of soap to be small).

– Pour the blended soap into a bowl with the remaining Borax and Washing Soda. Stir until it’s all blended well.

– Pour into a jar that has a seal (keep it fresh).

When washing your clothes: Use one to two tablespoons of your homemade powder per load. We usually prefer to wash in cold water, and it’s been working!

– Enjoy all that money you’re saving.

Painting WASH onto your jar:

Homemade Laundry Detergent + Painted Jar // thepapermama.com

If you make you’re own detergent, you’re going to need a cute jar to seal it in. It’s pretty easy to add the gold painted “wash” word to your jar.

– Wash and dry the outside of your glass.

– Print and cut out a word from my “Wash and Laundry” Printout.

– Tape a small piece (red side down) of Saral Paper to your jar and tape your word over the Saral paper.

Homemade Laundry Detergent + Painted Jar // thepapermama.com

– Trace the outline of the words with a ballpoint pen.

Homemade Laundry Detergent + Painted Jar // thepapermama.com

– Remove your paper and you’ll notice a wonderful red line to follow while you paint!

Homemade Laundry Detergent + Painted Jar // thepapermama.com

– Using some Martha Stewart Multi Surface Paint, paint in your words. If needed add more layers of paint (letting the paint dry for about 1 hour between each layer). I ended up using 3 layers of paint.

Homemade Laundry Detergent + Painted Jar // thepapermama.com

– Let dry. NOTE: on the back of the paint bottle, it notes that you need to let the paint cure for 21 days before washing or handling too rough. AFTER that you should be good!

Homemade Laundry Detergent + Painted Jar // thepapermama.com

If you give this a try, let me know! I’d love to see how it works for you. Happy washing!

– Chelsey

Disclosure: I may earn a small commission for my endorsement, recommendation, testimonial, and/or link to any products or services from this website. There are affiliate links in this post. Thank you for your support.

Tags: , ,

Categories: diy, Tips and Tricks, tried it


Homemade Velveeta Cheese Recipe! So Tasty!

Homemade Velveeta Cheese // thepapermama.com

The other day I found this on Pinterest…. Homemade frickin’ Velveeta cheese. I really love cheese…. It’s pretty much a necessity in my life. I had to make this IMMEDIATELY! I mean, yeah: cheddar cheese is almost the same thing… but there’s something magical about Velveeta. Unlike cheese, it doesn’t turn into greasy mess when you melt it. It’s just creamy cheesy goodness. Toss in some tomatoes or beans into this cheese and you have an amazing dip.

We went ahead with a grilled cheese sandwich for our first Homemade Velveeta Cheese experiment. The result: delicious. We did just plain cheese for our kiddo and added spinach and bacon for us. PLUS, tomato soup. So yummy. This pinterest find is a WIN.

Homemade Velveeta Cheese // thepapermama.com

I researched about 5 different recipes and decided this was the recipe for me (I only adjusted the salt and types of cheese amounts). I hope you check it out (unless you hate cheese, then don’t… ha):

Homemade Velveeta Cheese

Recipe adapted from, America’s Test Kitchen via The taste Tester

1 Tablespoon water

1 1/2 teaspoons powdered gelatin (unflavored)

1 cup colby jack cheese, grated*

1/2 cup sharp cheddar cheese, grated*

1 Tablespoon non-fat or whole dry milk powder

1/2 teaspoon salt

1/8 teaspoon cream of tartar

1/2 cup + 2 tablespoons whole milk

Directions: 

– Line a small pan with plastic wrap (with the wrap hanging over the edge). The recipe called for a 5 x 4 bread pan, but I used a 5 x 9 x 1 inch high pan. Worked fine.

– Place the 1 Tablespoon of water in a small bowl and sprinkle the gelatin on top. Let sit for 5 minutes.

– Pulse your grated cheese, dried milk, salt, and cream of tartar in a food processor (about 5 times).

– Bring the milk to a boil over medium heat (it starts to boil pretty quick). When it reaches a boil, remove it from the heat and stir in the gelatin until it dissolves.

– Pour the milk mixture into a liquid measuring cup. With your food processor running add the milk into the cheese mixture. Blend until the mixture is combine and velvety smooth.

– Immediately pour the cheese mixture into your prepared pan. Chill in a fridge for 3 hours or overnight.

Homemade Velveeta Cheese // thepapermama.com

This is delicious. I mean… yeah, it’s cheese… BUT, it’s just like Velveeta cheese. There’s something different about Velveeta. It’s creamy and fantastic. This is a wonderful substitute. Let me know if you try it! It’s so good. I mean: cheese. Also…. try and take photos of a grilled cheese sandwich while your kiddo is watching… it’s almost impossible, “Mama, I’m Soooooooo starving hungry.” Ha!

– Chelsey


My little goal: dress up at least 3 times a week

Cateye Glasses // thepapermama.com

Since I’ve had my daughter, I always get into my “I don’t curr about what I wurr” rut. Translation: I just really don’t care about what I’m wearing. Yoga pants to the store? Yes. No makeup? Definitely. More sleep instead of a shower? YES. Buuuut, I don’t like getting into these ruts. I can definitely feel a change in my confidence/happiness when I start to slack in the style and makeup department. Clothes make me happy. Why don’t I dress up every day? So much easier to just be lazy and not give a damn.

No more. I want to get over this. I am not going to be overly ambitious and just set an easy goal to dress “nicer”  and wear makeup about 3 times a week. It’s been about 3 weeks of this and it’s going well. The more I push myself to get back into this routine, the easier it is for me to do. I’m a busy lady and I’d usually rather sleep in 30 minutes longer than get up/shower/put on real clothes, so it was hard at first.

Cateye Glasses // thepapermama.com

I have also decided to dive in and get the glasses I’ve been WANTing for years. I’ve always wanted cat eye glasses, but have been afraid I couldn’t pull it off. Much like my old “fear” of wearing red lipstick, I think these glasses seemed like they might make me be more noticeable and I’m not so into being noticed. Silly. Old insecurities.

Anywho…. They don’t have lenses yet. I’ve been testing them out to see if I like them. My decision: yes. I’m getting lenses put in them. They are comfy and cute. It took a while to actually get used to them… since the majority of vintage eyewear is a lot smaller in width. I also know they will fit better when they are adjusted to my face/head. Hee. I know for a fact that my ears are crooked… so glasses (and sunglasses) are always crooked… which is why they seem crooked in these photos. Ha ha ha!

These little lovelies come from The Vintage Optical Shop. Unlike other eyewear shops, The Vintage Optical Shop actually sells VINTAGE eyewear. They are based in NY and have SO many beautiful frames to look at (and possibly buy).

Cateye Glasses // thepapermama.com

Cateye Glasses // thepapermama.com

 {My style: //glasses: The Vintage Optical Shop//cardigan: f21//blouse: f21//skirt: thrifted//shoes: target//}

Okay… are you a get dressed and wear makeup every day person, or not so much?

– Chelsey

P.S. I seriously recommend checking out The Vintage Optical Shop, so many frames to enjoy. Have fun!