{CLOSED} GIVEAWAY: $50 shop credit to The Littlest Mammoth

The sweet Allie from It’s a Wonderful Life won! Congrats!

Have you been to The Littlest Mammoth shop yet? I have! AND, I love it. It’s so pretty! It’s lovely and you can find an amazing variety of art for your little baby boo’s room here. I love it. And, guess what…. Littlest Mammoth wants to give my readers  a chance to enjoy a piece or two for your home! They are offering a $50 shop credit to their shop! AWESOME!
What can you win?
$50 shop credit to The Littlest Mammoth!

How to enter:

Mandatory entry: Head to The Littlest Mammoth and leave a comment telling me which print you’d love in your home! {1 entry}

{For extra entries (Please use a separate comment for each entry):
1) Become a follower of this blog via google friend connect or bloglovinโ€™ (see sidebar) {1 entry}
2) “Like” me on FB: The Paper Mama{1 entry}
3) Follow me on twitter: @thepapermama {1 entry}
4) “Like” the Mammoth Collection on FB {1 entry}
5) Follow The Mammoth Company on twitter: @hellomammoth{1 entry}
6) Tweet, Facebook, Blog or Pinterest about this giveaway. You are welcome to copy and paste this tweet: ” GIVEAWAY! Win a $50 shop credit to The Littlest Mammoth http://tinyurl.com/6vqv4yt @thepapermama ” {1 entry}

Note: Giveaway ends on Monday, November 21st, 2011 11:59 PM Pacific Time. Winner will be chosen at random from Random.org.

signature

Categories: Uncategorized


50 DIY Days with Barely Measured: Setting a Festive Table!

Day 17: HOLIDAY DIY: Setting A Festive Table 
Hey everyone, It’s Heather from over at Barely Measured. < I don’t know if I have to say that, it’s weird ๐Ÿ™‚
One of my favorite things about the holidays are having friends and family over to our place. I especially love the hours before everyone arrives; putting the finishing touches on the meal, last minute cleaning and of course, decorating- the best part!  I think back to when I was a kid and how chaotic the house was, bustling with people hugging and laughing, eating and dancing. The mantle strewn with holly and pine cones. I try to recreate that toasty, inviting atmosphere at our gatherings. 
If you’re having people over for a seated dinner then you’ll probably want to put most of your creative energy at the table. You don’t have to run out to Crate and Barrel and spend half of your savings on decorations and napkins- I mean, that could be fun.. Instead I always start by looking through what I already have. Then if I need a few things to add a bit of flair I can make a quick trip out for only a few things. Tiny details make your guests feel special and they don’t have to take a lot of time or money. Here are three different no-sew holiday inspired table settings that I came up with using things from around the apartment and a few things I picked up a Paper Source where I spent $25.

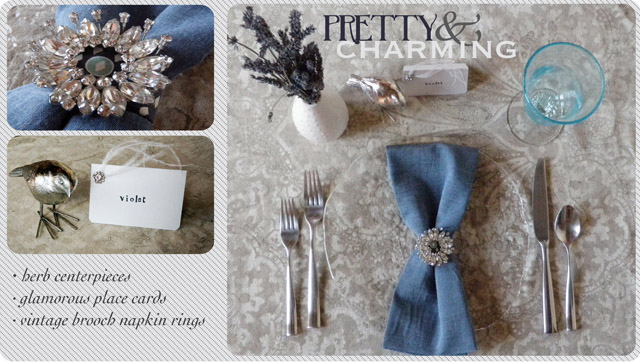
1. Experiment with color: While I love all things Christmas, I’m not always into the whole red and green thing. I love when people think outside the box and use other color palates. I looked through my fabric and used a linen fabric with a fun, vintage feel. It’s festive and warm and adds some spunk to this earthy theme. Hint: cut the fabric with pinking shears and there’s no need to hem!
2. Charming details: I used natural linen napkins that I already had and tied them with twine. A vintage feather brooch adds a special touch. Packs of feathers can be bought a your local craft store for cheap and they really look great- imagine peacock feathers! Use a hot glue gun to glue the feathers to whatever you tied your napkins with, twine, ribbon..
3. As for flowers- I love them- I even worked at a flower shop for awhile. BUT I always spend way too much on my centerpiece and we have to move it anyway for all the food! So- use plants you have around the house. I used a mini terrarium. It was super inexpensive to make- a cheap thrift store vase, soil, rocks, one tiny plant and a little moss. It doesn’t take up a lot of room and it looks great! 
4. Anne Taintor- she is amazing! Have some funny napkins out for hor dourves or coasters for drinks

1. Cheap vases from IKEA (.99 cents each) allow you to do a small vases at each setting- leaving the center of the table clear for food. Try using a few sprigs of dried lavender- it looks so elegant and you can get it pretty inexpensively plus, it will last much longer then your party. Also- go OUTSIDE! Grab some pine or holly- just be careful if you’re venturing into some else’s yard ๐Ÿ˜‰
2. I cut some card stock down to place card sizes. Of course, you can by them ready-to-go. Hand stamped anything is super cute so that’s always a fun way to go. I then glued on a few ostrich feathers and a rhinestone bead. A single ostrich feather is less than a $1 at a craft store and contains many plumes. Packs of gems or rhinestones are pretty cheap too.   
3. Make your own glamorous napkin rings! I had some rhinestone brooches that I thrifted awhile back. Simply pin the brooch on a piece of ribbon, elastic or scrap of fabric and then tie around your napkin, hiding the knot underneath!

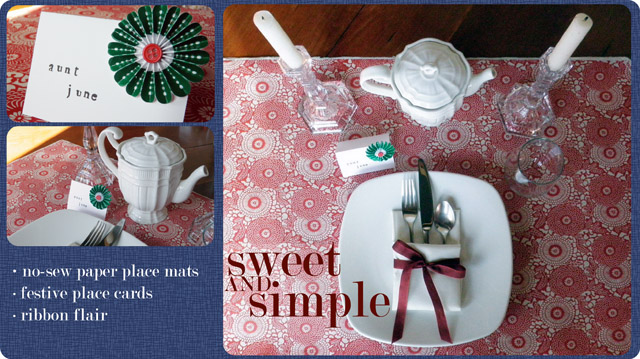
 1. A slightly more pricey way to go- but it’s a time saver. One piece of this Japanese paper was $4.95 and I could have made two place mats with it. I LOVE the way it looks though! A more modern take on a traditional Christmas-ey palate- red and white is festive and chic! 
2. I broke out the crystal candle sticks- a wedding gift it dress up this simple table. Also, loved the way the white teapot looked- so what if we aren’t having tea! Wouldn’t it look divine filled with red roses??
3. Other than the hand stamping- these place cards are super quick to make! Bought a pack 10 of those paper flowers from Paper Source, on sale for $2.95. They have they’re own sticky back so no glue needed. I think they look super adorable.
4. Ribbon can be the easiest way to add a little flair- and often it can be re-used! A simple red ribbon around the napkin really pulls everything together. Plus a spool of ribbon is what, $4 at most? Sweet deal.
So, I hope these inspire you to look around your house, and dig through your craft box the next time you have a holiday get-together. With some creativity, unexpected details and a killer Pandora playlist your party is sure to be unforgettable ๐Ÿ™‚
………………………………………………..
Thank you SO much to Heather from Barely Measured! What a LOVELY guest post. I LOVE your table settings. ๐Ÿ˜€ Thank you for joining my 50 DIY Days of Christmas!

Pin It

Categories: 50 DIY Days


Merry Christmas to YOU! From, the Paper family.

Hello! I’m so excited to show you our Christmas photo for 2011! I had SO much fun creating this! I’ll have to share some little tidbits about how I created it (that’s not our living room in the background… AND: this photo is comprised of 4 different photos)…. BUT, for now… here it is!

SO much fun. If you haven’t caught on already…. Christmas is my favorite time of the year. I love how magical and lovely it feels during that time. So, creating my own custom Christmas card has been going on for a few years now…. (I’ll have to pull the last few years card creations out of the archives for you guys. :D). 
Do you remember last years Holiday Photo Challenge? WELL, I’m bringing it back again this year! Yay! I had so much fun enjoying all of your creations… I had to bring it back! Just like last year…. there will be prizes to win! Are you interested? Stay tuned! The Holiday Photo Challenge 2011 starts on November 22nd! Can’t wait!
FYI: Mr. Paper is not smoking…. that’s all Photoshopped. ๐Ÿ™‚

Pin It

signature

alt design banner

Categories: family


50 DIY Days with Out of Alabaster: Pine-cone Extravaganza!

Day 16: It’s a pine-cone extravaganza. Pine-cones aren’t just for peanut butter bird feeders anymore; they are making a classy comeback! I’m going to show you several adorable ways for you to use pine-cones in your holiday decor this season. 
Mini Pine-cone Cake Bunting
This mini pine-cone bunting is a super easy cake topper, and I think it’s adorable… Perfect for a winter wonderland party! You need to build your little bunting first, and then when it’s assembled, stick it into the cake. First measure the length for your bunting with embroidery floss; for stability’s sake, you don’t want to put the candy canes super close to the edge of the cake. Wrap one end of your embroidery floss around a candycane, and secure  the end with a dot of hot-glue. Then, put a teeny dot of hot glue on top of each pinecone, and one at a time, add them to your bunting. Secure the end with hot glue, just like you did with the first one. Then, go back and add your teeny little bows on top of each pinecone. I used a strand of burlap, but you could use embroidery floss, or thin ribbon. Now you can place your bunting on the cake! Yay!
Paint-Dipped Pine-Cone Swag
Because my home is super colorful, I tend to gravitate toward holiday decor that is more understated. This pine-cone swag looks great hanging on my red dining rooms french doors. You could easily make it to fit your own decor, and I think it would look great any color!

Directions:
1) securely wrap a piece of craft wire around the pine-cone. 2) dip the pine-cone in your paint. 3) hang your pine-cones out to dry overnight 4) hot-glue a piece of jute rope to the top of each pine-cone 5) construct your bow by folding over a rectangular strip of burlap 6) pinch the burlap in the middle, and secure with craft wire 7) gather all of your jute strands together, and tie them in a knot. Be sure to create a loop, so you can hang your swag. 8)Secure your bow around the jute knot you created. 9)cover the wire in the middle of your bow with a piece of ribbon  10) Taada! 
Free Printable Pine-Cone Gift Tags
Oh you know, just because I love you, you internet peoples, you ๐Ÿ˜‰ 
Print these to add that extra little handmade touch to your gifts. Click here or the image below!

………………………………………………..
Thank you SO much to Lindsey from Out of Alabaster! What a LOVELY guest post. I’ve already printed those gift tags! Thank you for joining my 50 DIY Days of Christmas!

Pin It

Categories: 50 DIY Days


True.

“I ask you right here to please agree with me that a scar is never ugly. That is what the makers want us to think. But you and I, we must make an agreement to defy them. We must see all scars as beauty, okay? This will be our secret. Because take it from me, a scar does not form on the dying. A scar means, I survived.” Kate from Iris Inspired shared this with me on my Scars post. From Little Bee book.
I just really wanted to say thank you so much to all of you lovelies for the sweet comments you left me on my scars post. It really means a lot! Thank you! <3

signaturealt design banner

Categories: Uncategorized