
I’ve been asked by a few lovelies to share how I create a GIF with photoshop. It’s pretty darn simple. I first learned how from my friend, Jess. With practice… an idea… and a bit of planning… you can make a GIF too… in no time at all! (are you pumped? alright! Hee.).
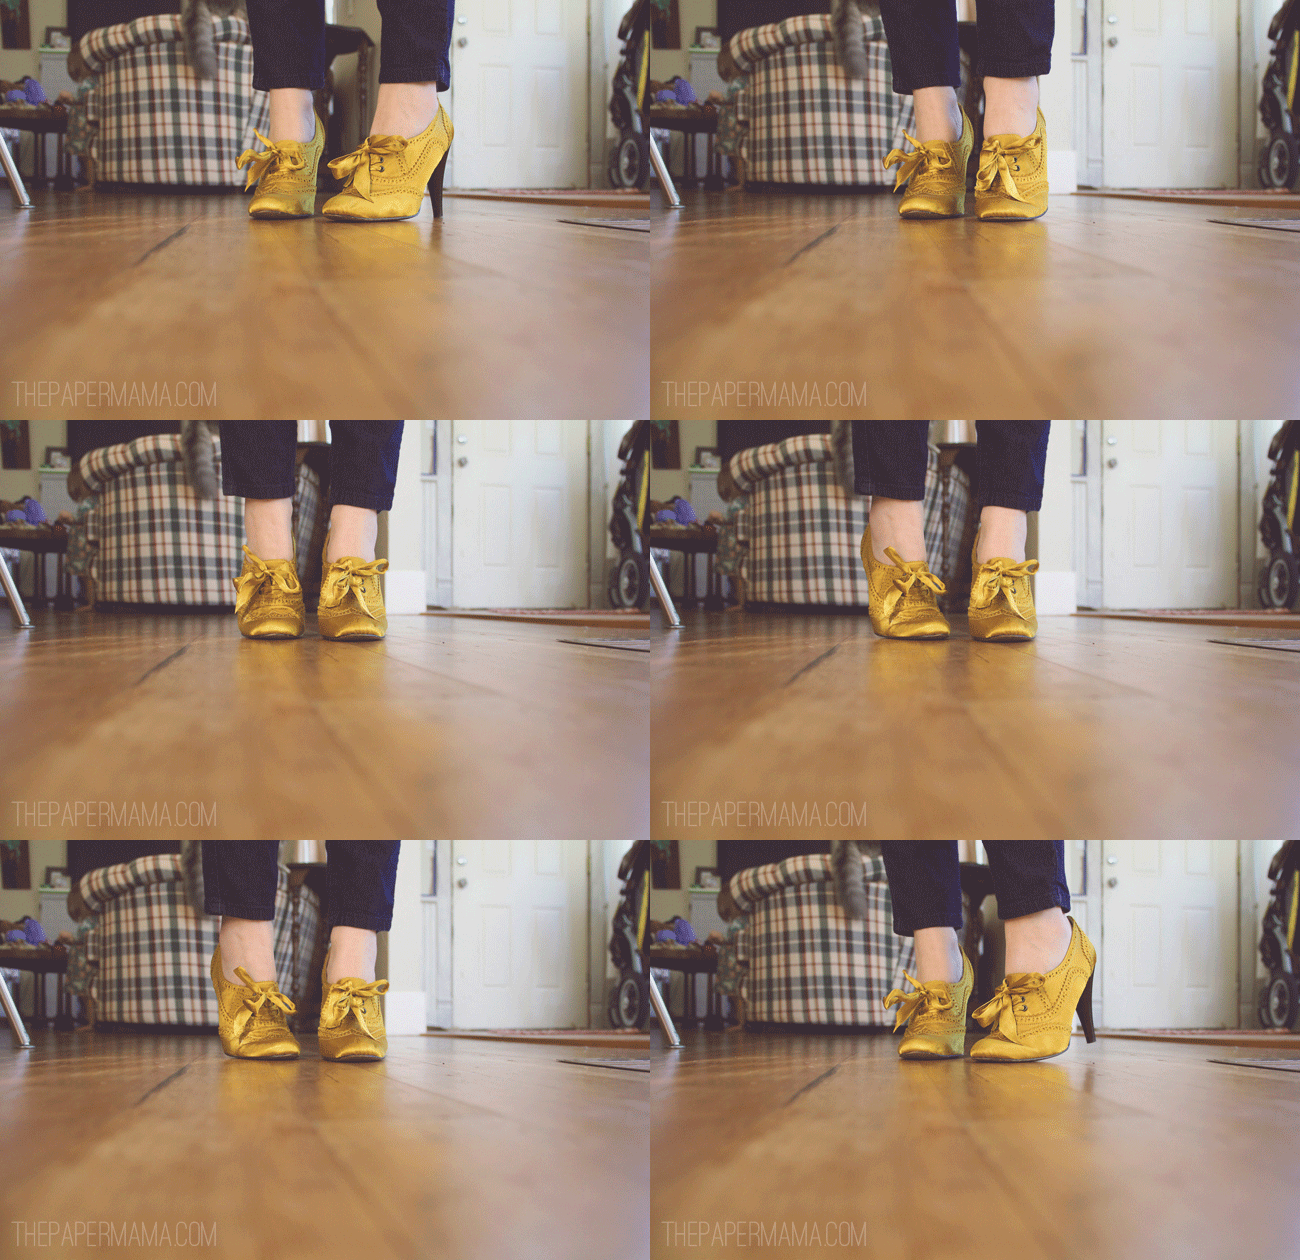
First things first: time to take your photos. Set up your photos however you’d like. Today I’m making a gif out of my gold shoes. It will be completely up to you if you’d like to set up your camera so it won’t move. For me, I set my camera on the floor, grabbed my shutter release, and snapped away. I do know that sometimes moments happen in life and you just need to snap away… those GIF’s are alway fun! (see Ruari eating a cookie). But, mostly I like to plan ahead while taking my GIF photos. What will my beginning shot be, and what will my end shot be? Will the last photo and first photo blend well together? Just some things to think about while taking your photos. Ok, onto the how-to…
1. Once all your photos are shot and edited to your taste… save each photo to the exact size you’d like. For me, I make all my GIF’s 650 wide (the width of my blog stream). Side note: I also save all my resized images in numerical order of how I’d like them to play, starting with #1. PLUS, always think about the future of your photos… will someone borrow it for their blog or pin it? You don’t know. Watermark your stuff!
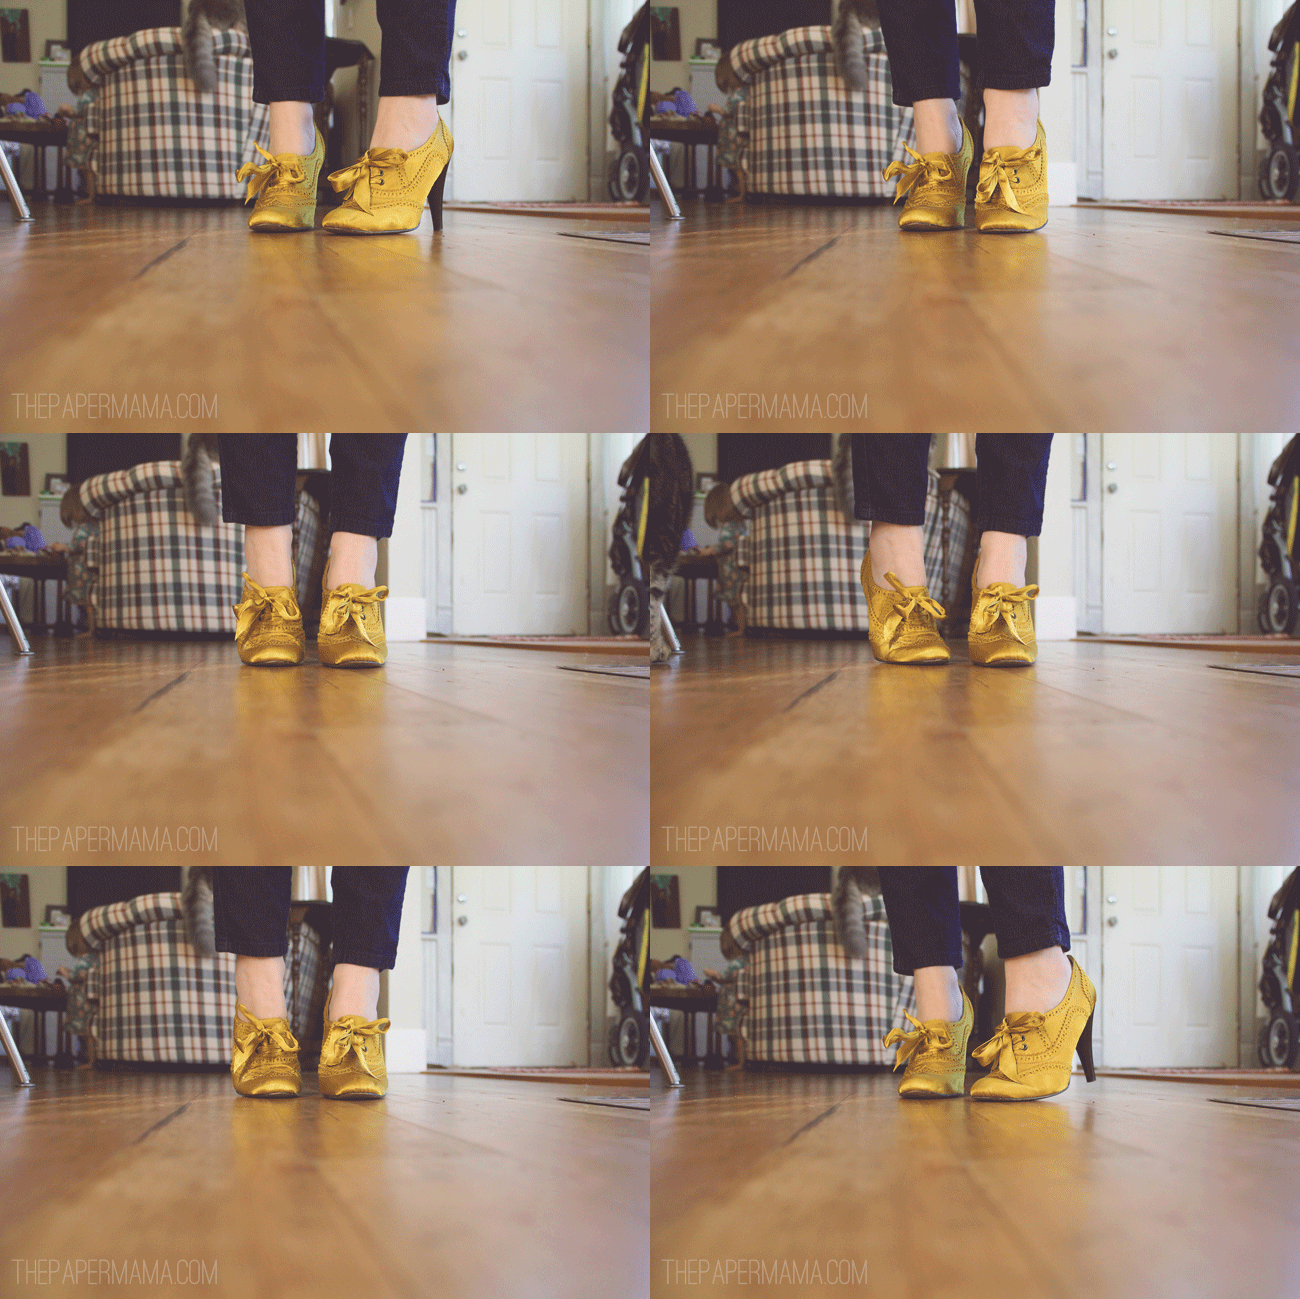
2. Optional step: I don’t always do this step…. BUT, I did for the GIF above. If you want your movement to be focused onto just one moving part… this step is for you. I had my cats and daughter moving around in the background of my photos, and I only wanted my feet to move (I also made a GIF without this edit… you can see it at the bottom of this post).
First, you’ll choose an image to use as your base photo. This photo will be your unmoving background. Drag and drop the next image onto your base photo. You’ll be erasing everything in this next photo, except for the part of the photo you want to move (for me, my shoes). Tip: be sure to use the soft round eraser (no hard edges to your erasing).
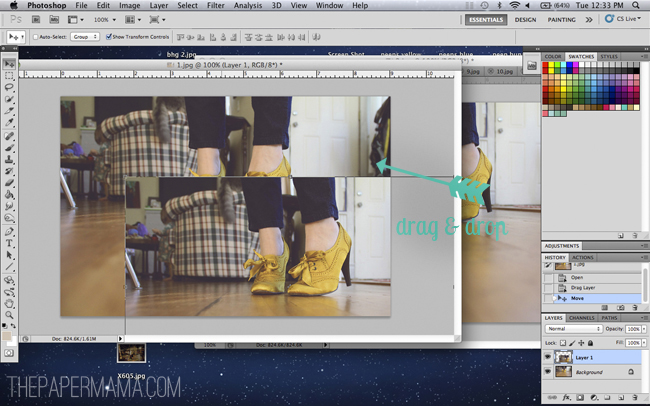
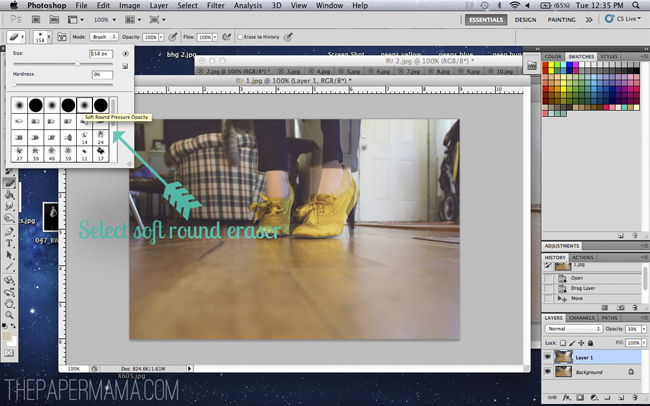
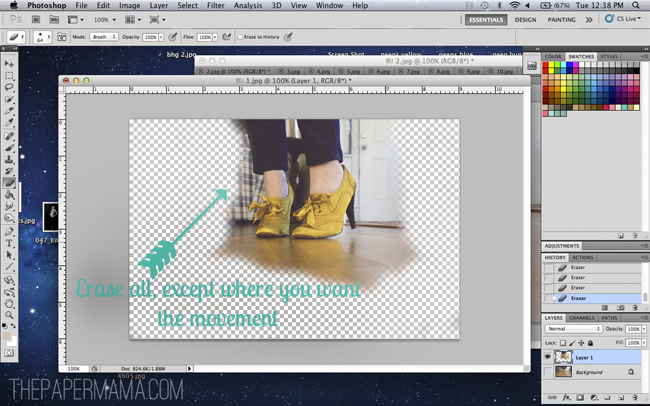
Continue to do this for each image and save as you go along.
3. Open up your GIF photos folder, on your desktop (outside of photoshop) and highlight all of them. Open up a new file, in Photoshop, to the exact size you’d like your GIF to be. Mine are 650 wide by 433 high. Drag and drop your file photos into your photoshop file. You will see a light “x” over your image. Just keep hitting “Enter” until all over your images appear in your layers section.


4. When you have all your images in order and open, go up to the “Window” tab, and open up “Animation”. The animation window will pop up.
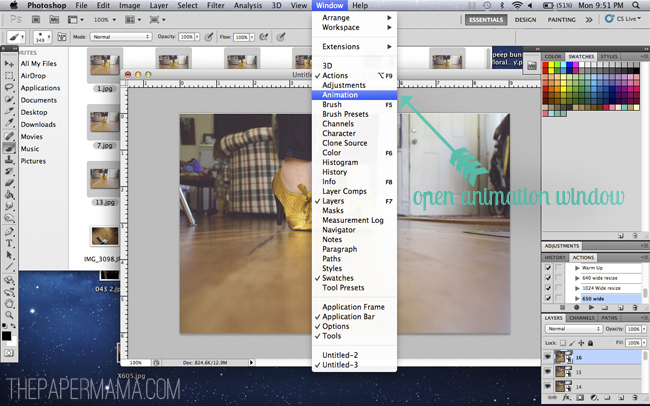
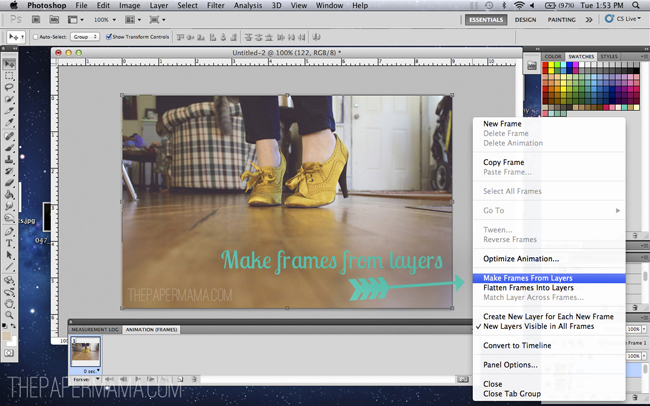
5. On the animation window you will see a little options (4 lines) button on the upper right-hand corner. Click on it and choose, “Make Frames From Layers”. Side note: if you have an image in your animation window you don’t like, you can always highlight it and click the “trash” icon.
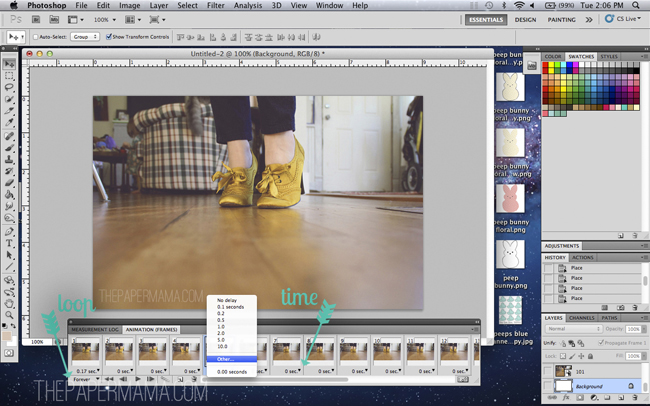
6. Time to get these images moving! Under each frame on the animation window, there are options for the speed. You’ll need to change the speed for each individual image. For most of my GIF’s I like to run my speed at .17 – .2. BUT, this will be completely up to how fast you’d like yours to run. I chose “no delay” today. You can even choose to have one image run a little longer/shorter than another. P.S. don’t forget to change the loop to “Forever” located under the first frame. This way your GIF will run forever…
7. Time to save your creation! Head up to the “File” tab and click on “Save for Web & Devices”.
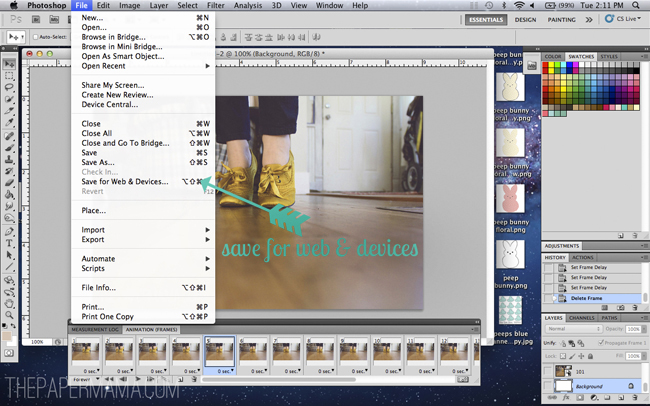
8. When the “Save for Web & Devices” window pops up, make sure it’s set to GIF. That’s pretty important. You don’t want it set to jpeg. And, again: make sure the looping is set to “forever”. Really everything else should already be set up. Click save.

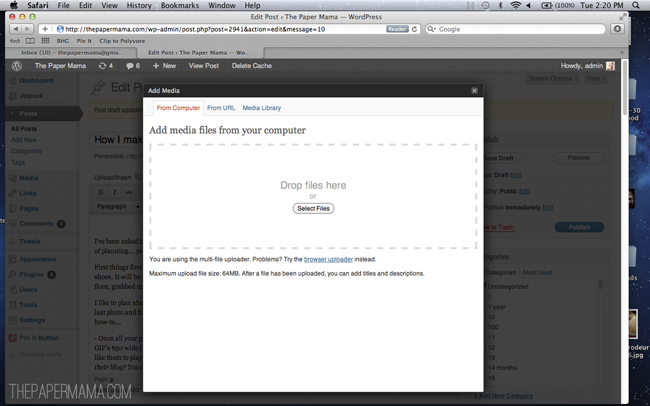
9. Once you are all saved, upload your GIF to a blog post to share. That’s it!
With the internets today…. there are actually quite a few free sites to make a GIF (Gickr being a popular one). But, you definitely have more control and better end results when using Photoshop.
If you tried out step #3, I just want to share what my GIF looks like without the fine tuning/erasing. See the difference?
P.S. Don’t forget to take advantage of the sale ad prices! 35% off if you purchase 2 months. Whew! Last day is the 31st.
…………………………………………………………………………………………………………………………………………………………..
{If you have a Wordless{ish} Wednesday, please feel free to link it up below. And, feel free to link up to these blogs too… Parenting by Dummies, Project Alicia,And Then She Snapped, Jenni from the Blog, and Live and Love Outloud.}





Pingback: Wordful Wednesday. Awesomeness of Fall 2012. | Kids
Pingback: Wordful Wednesday. Awesomeness of Fall 2012.
I love the tip about how to narrow in on one part of the picture. Thanks!!
You're welcome!
Pingback: Links We Love and I Heart My Snap | I Heart Snapping
Your GIFs are so cute! I love the ones with your hair tutorials (which I also love). I wanted to stop by and let you know I shared this post on my Friday Favorites post! Have a great weekend!
http://thenodramama.com/2012/05/25/friday-favorit…
Pingback: Friday Favorites « The No Drama Mama
I love your shoes. And your GIFs. And your blog. Thanks for the continuous stream of inspiration!
Thank you sweet lady!
That's about the coolest gif I've seen!
Hee!
I was wondering how you did that! Very cool.
Thanks for the awesome and thorough tutorial! I really want to try this out! They look so cool!
Great tutorial, but more importantly – girl where did you get those shoes! Love 'em!
A thrift shop…. Yes!
I don't have photoshop but if I did, I would totally do this! 🙂 I have used some online gif generators and they are ok. Happy Wednesday!
You'll have to get it someday. 🙂
Cute! I am in love with those shoes!
Thank you!
I need to try this out…thanks for sharing!
Let me know how it goes!
Your gifs always make me smile!
That makes me smile. 🙂
Great tutorial. Thanks for sharing! And i LOVE your shoes 😉
Thank you! AND, me too… they were an awesome thrift find!
Cool. I've only done a GIF in photoscape, so I'll be stopping back later to check this out. Happy WW!
Ooooo. I can't wait to see what you make. Please share when you're done! <3
Thanks for sharing! I always wanted to make my own gif. I will give it a try 😉
x Nicky http://oneluckytwinmum.blogspot.co.uk/
Have fun!
Those shoes are so cool!!!
Thanks!