
Hey! Missed you guys! Well… I’m back from BlogHer… BUT, I’m still recovering. I’ll blab all about my wonderful trip tomorrow and the next day… and the next day… and the next… 🙂 For now… how about another hair experiment….

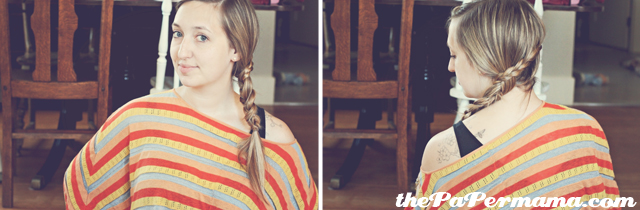
So… I do this hair style A LOT. It’s nothing fancy… it’s more of a get this hair outta my face style. 🙂 BUT, it’s cute and simple to do. Simple is a SUPER plus for me. I have really long hair… but, I’m completely weird and I don’t usually like it down… So weird. So, up it goes…. The wrap-around side-braid shouldn’t need any bobby pins… just 3 clear hair ties and some hair spray for fly-aways.
Ok…. here goes…

- Grab just a small chunk of your bangs right up against your part, I started on the right side of my head (if your bangs are super short… just let them hang and grab some hair behind them).
- Start braiding (Or, french braiding I guess). I braid to create a sort of crown of braid on my head… grabbing small chunks of hair to weave in and hold the braid up every couple of braids or so.
- When you get to the back of your head start braiding down to bottom of the opposite side of your head (for me this is the left side). When you reach the opposite side of your head: stop grabbing hair to weave in and just finish off that braid and put a hair tie on it.
- Split your hair in half in the back. Take the remaining hair on the right side and start french braiding the hair on the nape of your neck towards the left side. (This is a great step I take for me. My hair is super slick and always slips out if I don’t do a second braid by my neck.)
- When you get to the back left side of your head finish off the braid and put a hair tie on it.
- Now, with all of your hair on the left side split your hair into four pieces (the 2 braids will each count as a piece). And, you’ll do a four chunk braid. I have no idea what this sort of braid is called… but, it makes my normally skinny braid SO much thicker. How about instead of me trying to explain it… just check out this image I found below. It really is simple once you get the hang of it.
- That’s it! You now have a super/amazing/awesome wrap-around side-braid. Ta-dah!
If you try this hairstyle out and blog about it with a link back to me… let me know! I’d love to link you to this post to inspire others to create pretty hair!
♡ Chelsey


That is way cute!!! The braid at the end that u didn't know what it was called looks like a fishtail braid 🙂 thanks for the styles