Pregnancy Update and a Delivery Nurse Gift Idea (with free printable)

This is a sponsored post written by me on behalf of Nutrimom. All opinions are 100% mine.

Pregnancy Update and a Delivery Nurse Gift Idea (with free printable)

Well guys, I’m officially 30 weeks pregnant! That means my baby will probably be here in about 6 weeks (we are taking her out a little early just to be safe and not have a repeat of my first daughter’s birth). I can’t believe it’s almost here. Our baby girl is growing perfectly and we are getting so excited to meet her. I’ve been feeling okay, but I’ve been put on limited movement to keep the contractions from getting too crazy. That’s been sort of a bummer, but totally understandable to keep this baby in my belly and growing.

I’m still trying to focus on keeping myself healthy by making sure I’m getting the nutrients at every stage of this baby’s development, and attempting to avoid most of my crazy cravings (I do have to give in sometimes, because cookies are so good and I want to eat all of them). A couple weeks ago I mentioned that I’ve been getting some personal coaching, from Nutrimom, to help me navigate the first 1,000 days of this baby’s life (from pregnancy to age 2) and I’ve been exploring the 7 Pillars of Early Life Nutrition to inspire healthy eating/living and to prepare myself for when baby gets here. Some of my favorite things I’ve picked up in the last couple weeks are planning out my meals, and prepping for breastfeeding (the dreaded breastfeeding).

Pregnancy Update and a Delivery Nurse Gift Idea (with free printable)

Planning out my meals:

  • The husband (my wonderful chef) has been making larger portions of our healthy dinners so we can have leftovers for my lunch. Cause I’ll be honest with you: I don’t enjoy cooking and lunch tends to be the meal that I’m most likely to eat unhealthy. If I have some healthy grub already prepared for me to eat and all I need to do is warm it up, I’m good. Sometimes just making a big portion of vegetables the night before will help me eat healthy the next day. I swear, I’m so lazy at lunch time.
  • I have also been changing up my favorite quick meals. If I’m making a quesadilla, I make sure to add veggies to it. We love spaghetti squash in our home and we use that in place of spaghetti noodles (seriously give it a try, it’s so good).
  • I’m making my snack time healthier by prepping my snacks the night before each day. I cut up carrots, apples, and other fruits to easily grab and eat in between my meals. This saves me from choosing other not-so-healthy snacks, like crackers.

Prepping for breastfeeding (ugh):

  • I do have a negative view when it comes to me breastfeeding a baby. My 1st daughter was born through emergency c-section and the whole breastfeeding thing never worked. She just preferred a bottle and I was really hard on myself for not getting it to work (I realize now that I tried all I could and it just wasn’t going to work with her). I want to be more mentally prepared this time around. My Nutrimom coach sent me some articles that share tips and strategies to help me prepare before my baby actually gets here.
  • I’ve found out what my hospital does to support moms with their new babies when it comes to breastfeeding: the baby stays in the room overnight right from the start, skin to skin contact is encouraged, they don’t give pacifiers to the babies, a lactation consultant will come help a few times, and no bottles (in the beginning).
  • The biggest thing I will be reminding myself through this whole breastfeeding journey: it’s okay if the baby doesn’t get it. I’m not a failure and all I can do is try my best and prepare myself ahead of time. Also: don’t forget to ask for advice from other moms, like my friends and Nutrimom coach, that are already pros at breastfeeding.

All this research and support from my Nutrimom coach is really helping me prepare for this little baby. I’ll be sure to share another update in the next couple weeks with you guys!

Pregnancy Update and a Delivery Nurse Gift Idea (with free printable)

To celebrate my 30 week milestone, I’m sharing my Delivery Nurse Gift Idea (with a cute printable label) for you to create your own thank you gift for the nurses. Back when my first kiddo was born, I had many nurses (I was in the hospital for a week) and I really wish I could have done something for them to say thank you for all their help. This time I’m actually prepared with my ‘You Rock’ gift bags. You just need a few items to create them. I prepared 8 bags and I think that should be enough.

Pregnancy Update and a Delivery Nurse Gift Idea (with free printable)

What you need for your Delivery Nurse Gift Bags:

  • my ‘You Rock’ printable (click here to download)
  • 5 inch wide plastic gift bags (found at most party stores)
  • chapstick
  • lotion
  • tissue
  • hand sanitizer
  • and maybe a little treat

Pregnancy Update and a Delivery Nurse Gift Idea (with free printable)

Put all those goodies together in the little gift bag and staple my ‘You Rock’ to the top. Pack these into your hospital bag, and you’re ready to go. Yay!

– Chelsey

Visit Sponsors Site

Tags: ,

Categories: about me


Day 24 Handmade Gift: Heart-Shaped Planter DIY

Day 24 Handmade Gift: Heart-Shaped Planter DIY

Day 24 of my 50 DIY DaysHeart-Shaped Planter DIY

Today I’m sharing a DIY I created for the Minnetonka blog a while back and I wanted to share it with all of you again. I created it as a Valentine’s gift, but I think it will make a perfect handmade gift for the gardener in your life. It’s inexpensive to create and I provided a pattern so you can make your own. It’s never too early to start planning out your gifts. Before you know it December will be here!

Supplies needed to create my Heart-Shaped Planter DIY:

  • 6 to 8 oz. of polymer clay (I used Sculpey)
  • a rolling pin (or use a glass if you don’t have a rolling pin)
  • knife
  • heart planter pattern (found on the original post, link below)
  • e6000 adhesive
  • succulent
  • potting mix for succulent plants
  • baking parchment paper

Day 24 Handmade Gift: Heart-Shaped Planter DIY

To check out the full DIY with a printable pattern, head on over to the Minnetonka blog!

Are you wondering what the 50 DIY Days is? Each year I share a bunch of holiday DIY ideas, recipes, and guides to inspire you during the Fall. Now, through early December, you’ll find a ton of great ideas to get you ready for Halloween, Thanksgiving, Christmas, and any sort of holiday gift giving. You can check out this link to explore past DIY Days.

– Chelsey

I want to see your creations! Share what your making with me on Instagram. It could be one of my DIY’s, or a project you’re working on. Share with my IG account @thepapermama and use the hashtag #papermamafriends.

Tags:

Categories: 50 DIY Days


Day 23 Christmas Decor: Happiest Christmas Poster Printable (from Christmas Vacation)

Happiest Christmas Poster from Christmas Vacation

Day 23 of my 50 DIY Days: Happiest Christmas Poster Printable (from Christmas Vacation)

Last night I shared my Sweet Cravings Christmas Tree and you may have noticed my fun Happiest Christmas Poster sitting there in the photos. I promised I would share it with you today, so here it is. This quote comes from one of my FAVORITE Christmas movies, Christmas Vacation. There’s more to this quote, but I had to keep it PG since I have an almost 6-year-old that’s trying to read and sound out everything. I’m going to assume you’re all old enough to see the full quote, so here you go:

“We’re gonna press on, and we’re gonna have the hap, hap, happiest Christmas since Bing Crosby tap-danced with Danny fucking Kaye. And when Santa squeezes his fat white ass down that chimney tonight, he’s gonna find the jolliest bunch of assholes this side of the nuthouse.”

If you want this poster for yourself, I have two different sizes for you guys to download. To print out the larger size, just head to a local print shop (just a reminder: these prints are for personal use only).

Happiest Christmas Poster from Christmas Vacation

Hap Hap Happiest Christmas - Christmas Vacation Quote GIF

Are you wondering what the 50 DIY Days is? Each year I share a bunch of holiday DIY ideas, recipes, and guides to inspire you during the Fall. Now, through early December, you’ll find a ton of great ideas to get you ready for Halloween, Thanksgiving, Christmas, and any sort of holiday gift giving. You can check out this link to explore past DIY Days.

– Chelsey

I want to see your creations! Share what your making with me on Instagram. It could be one of my DIY’s, or a project you’re working on. Share with my IG account @thepapermama and use the hashtag #papermamafriends.

Save


Day 22 Christmas Decor: Sweet Cravings Christmas Tree (with free printables)

Day 22 Christmas Decor: Sweet Cravings Christmas Tree (with free printables)

Day 22 Christmas Decor: Sweet Cravings Christmas Tree (with free printables)

Day 22 of my 50 DIY Days: Sweet Cravings Christmas Tree (with free printables)

Merry Christmas, everyone! Just kidding. I know we’re only one day past Halloween (and still weeks away from Christmas), but I’ve been challenged to share my dream tree with all of you for Michaels Makers’. As you guys know, I’m pregnant and I have sugar on the brain. It’s just what I think about these days, so that’s how I came up with my Sweet Cravings Christmas Tree. It was so hard to have to buy all of those sweet treats to photograph… and then eat when I was done photographing them. Just kidding, it was the best and I got to create a pretty tree out of all of these treats so I can always remember them.

What did I do to decorate this tasty tree?

Day 22 Christmas Decor: Sweet Cravings Christmas Tree (with free printables)

  • Ornaments: Well, I started out with some bright pink, silver, and matte white glass ball ornaments that I picked up from Michaels’.

Day 22 Christmas Decor: Sweet Cravings Christmas Tree (with free printables)

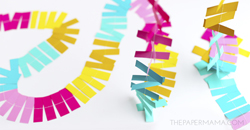
  • Garland: Next, I made this pretty Sprinkles Paper Strip Garland to string across the tree. Here’s the tutorial if you want to make it.

10

  • Tree skirt: This tree definitely needed a special skirt (since she’s such a pretty lady), so I made this No-Sew Doughnut Tree Skirt to dress her up (yeah, my tree is a lady). You can head over here to check out the tutorial to make it.

Day 22 Christmas Decor: Sweet Cravings Christmas Tree (with free printables)

  • Sweet treats: I printed out the sweet treats onto heavy cardstock paper and cut them out. I used washi tape to attach them onto the branches. Then, I updated my frame on the wall with some macaroons (taped on with washi tape). If you want to use my sweet treats for your Christmas project, you can download them here (for personal use only).

Day 22 Christmas Decor: Sweet Cravings Christmas Tree (with free printables)

  • Christmas print: Lastly, I went to a local print shop to print out my Happiest Christmas print. I’ll be sharing that print for you on the blog tomorrow if you want it for your home.

Are you inspired to start decorating your own tree? Make sure you visit Michaels’ blog, The Glue String, to see the other 49 Michaels Makers’ dream holiday trees that were created this year.

From now until November 14, you can get FREE shipping on all Christmas trees that are 6ft or taller on Michaels.com! If you’re just getting started on your holiday decor, you can also check out some of the ornament projects and tutorials available on Michaels.com.

– Chelsey

Are you wondering what the 50 DIY Days is? Each year I share a bunch of holiday DIY ideas, recipes, and guides to inspire you during the Fall. Now, through early December, you’ll find a ton of great ideas to get you ready for Halloween, Thanksgiving, Christmas, and any sort of holiday gift giving. You can check out this link to explore past DIY Days. I want to see your creations! Share what your making with me on Instagram. It could be one of my DIY’s, or a project you’re working on. Share with my IG account @thepapermama and use the hashtag #papermamafriends.

Michaels Makers' Annual Dream Tree Challenge

Save

Save


Day 21 of my 50 DIY Days: 28 DIY Photobooth Ideas

28 DIY Photobooth Ideas

Day 21 of my 50 DIY Days: 28 Photobooth DIY Ideas

Are you headed to a big party? Most likely there will be some sort of photobooth set up (people love to take photos with friends). Since we are headed into the holiday party season, I wanted to share a big collection of DIY Photobooth Ideas to get you ready for your upcoming bash and I shared them on the Better Homes and Gardens blog! The skill levels for the photobooths I found range from very very easy, to sort of hard. Something for everyone.


1) These sewn paper circles are like fancy paper chains. The perfect backdrop, from Oh Happy Day.

These sewn paper circles are like fancy paper chains. The perfect backdrop, from Oh Happy Day.

2) I’m loving this mini honeycomb ball photo backdrop, from Studio DIY.

I'm loving this mini honeycomb ball photo backdrop, from Studio DIY.

3) Hang up some favorite fabric to create this backdrop, from Design Love Fest.

Hang up some favorite fabric to create this backdrop, from Design Love Fest.

Do you have any big parties coming up? To check out the the full list of DIY Photobooth Ideas, head on over to the Better Homes and Gardens blog.

Are you wondering what the 50 DIY Days is? Each year I share a bunch of holiday DIY ideas to inspire crafting during the Fall. Starting now, through early December, you’ll find a ton of great ideas to get you ready for Halloween, Thanksgiving, Christmas, and any sort of holiday gift giving. You can check out this link to explore past DIY Days.

– Chelsey

 P.S. I am a paid contributor for the Better Homes and Gardens blog. The photos from the first image are from: Lovely Indeed, Design Love Fest, Oh Joy, Studio DIY, Studio DIY, Evite, You Are My Fave, Julep, Lovely Indeed, The Glitter Guide, A Beautiful Mess, Sarah Hearts, A Beautiful Mess, Oh Happy Day, Your Marketing BFF, and Oh Happy Day. Click here to see the full list of 28 DIY Photobooths.


Tags:

Categories: 50 DIY Days, favorite blogs


Day 20 Party Decoration: Sprinkles Paper Strip Garland and Backdrop

Sprinkles Paper Strip Garland and Backdrop

Sprinkles Paper Strip Garland and Backdrop

Day 20 of my 50 DIY Days: Sprinkles Paper Strip Garland and Backdrop

Hey, it’s party season. What do you need for a party? Decorations. Garlands. Probably a photo backdrop. This paper creation is the perfect party decor because it’s inexpensive, easy to make, and pretty! Want to make one for your next party? Check out the easy tutorial below.

Supplies needed:

  • six 8 x 10 sheets of different colored cardstock papers
  • straight edge cutter or scissors
  • sewing machine

Directions:

Sprinkles Paper Strip Garland and Backdrop

Step 1: Cut up each colored cardstock paper into 2.5 x 1/2 inch strips of paper. No need to be precise on size, this is just a guide. I hand cut all of my strips and they varied in shape and size.

Sprinkles Paper Strip Garland and Backdrop

Sprinkles Paper Strip Garland and Backdrop

Step 2: Before you sew, pull out the thread on your sewing machine about 12 inches. You’ll need this extra thread to hang your garland. Start sewing the paper down the center. Be sure to keep a little tiny space between each paper strip so the garland paper can spin! Note: if you are creating a garland, just keep sewing until you are happy with the length. If you are making a backdrop, sew multiple strips (to the length you need). You will need more paper strips cut for a big backdrop.

Step 3: When you have sewn your last strip, pull the thread out about 12 inches and trim. You’re done and the garland/backdrop is ready to hang! I suggest hanging these strips away from the wall so they can spin and twist. Very pretty.

Sprinkles Paper Strip Garland and Backdrop

Sprinkles Paper Strip Garland and Backdrop

Total cost & time: $0 (I already had all the paper and thread needed for the project). It took me 1 hour to cut the strips and less than an hour to sew. Not bad!

Are you wondering what the 50 DIY Days is? Each year I share a bunch of holiday DIY ideas, recipes, and guides to inspire you during the Fall. Starting now, through early December, you’ll find a ton of great ideas to get you ready for Halloween, Thanksgiving, Christmas, and any sort of holiday gift giving. You can check out this link to explore past DIY Days.

– Chelsey

I want to see your creations! Share what your making with me on Instagram. It could be one of my DIY’s, or a project you’re working on. Share with my IG account @thepapermama and use the hashtag #papermamafriends.


Day 19 Christmas Decoration: Doughnut Tree Skirt DIY

Doughnut Tree Skirt DIY

Doughnut Tree Skirt DIY

Day 19 of my 50 DIY Days: Doughnut Tree Skirt DIY

The other day, on Instagram, I mentioned that I am really CRAVING sweets (and other random foods, like grapefruit) and it is affecting my crafting. That’s why our Christmas tree skirt looks a lot like a doughnut… I couldn’t help myself. Sugar is on the brain! It’s really weird because I’m typically a salty person. Pregnancy is so weird.

Anyway, This doughnut is super cute sitting under the tree and it’s a bit healthier than a real doughnut. Right?

Supplies:

  • 50 inches of brown felt
  • 84 inches of white felt
  • 1 small sheet of pink felt
  • 1 small sheet of blue felt
  • 1 small sheet of gold sparkle foam
  • hot glue
  • scissors

Directions (I used photos from a past tree skirt DIY for this post, so don’t worry about the color being different):

Christmas Decoration: Doughnut Tree Skirt DIY

Step 1: Fold the brown felt in half, then fold it again (folded into quarters).

Christmas Decoration: Doughnut Tree Skirt DIY

Step 2: Measure out a piece of string to 48 inches and tie one end to a pencil. Hold the end of the string at the center of the folded felt corner and trace a line at the other end of the felt to create a curved line. Use your scissors to cut along that line.

Christmas Decoration: Doughnut Tree Skirt DIY

Step 3: Measure out a piece of string to 4 inches and tie one end to a pencil. Hold the end of the string at the center of the folded felt corner and trace a line at the other end of the felt to create a curved line. Use your scissors to cut along that line. This will be the hole that goes around the tree trunk.

Christmas Decoration: Doughnut Tree Skirt DIY

Use a ruler to cut a straight line from the outside circle to the inside circle (this will be the opening to go around the tree).

Step 4: Cut the white felt sheet in half at 42 inches. Fold one sheet in half, then fold it again (folded into quarters). Measure out a piece of string to 40 inches and tie one end to a pencil. Hold the end of the string at the center of the folded felt corner and trace a line at the other end of the felt to create a curved line. Use your scissors to cut along that line. Repeat this step for the 2nd sheet of 42 inch white felt.

Doughnut Tree Skirt DIY

Step 5: Stack the two white felt circles on top of one another (I double up the white felt because you can see the brown felt through one sheet of white). Use your scissors to cut a wavy line along the outside and inside edges of the circles.

Doughnut Tree Skirt DIY

Step 6: Lay the white circles on top of the brown felt circle. Cut a straight line on the white felt along the same cut line as the brown felt.

Step 7: Use your hot glue gun to glue down the two layers of white felt onto the brown felt. This is the doughnut frosting.

Step 8: Cut out small rectangles from the blue, pink, and gold sheets to create the doughnut “sprinkles”. Arrange them onto the doughnut “frosting”, then use the hot glue gun to adhere them to the doughnut.

Doughnut Tree Skirt DIY

That’s it! This DIY doesn’t really need any sort of pattern and you can really freehand most of it. That’s my kind of DIY!

Are you wondering what the 50 DIY Days is? Each year I share a bunch of holiday DIY ideas, recipes, and guides to inspire you during the Fall. Starting now, through early December, you’ll find a ton of great ideas to get you ready for Halloween, Thanksgiving, Christmas, and any sort of holiday gift giving. You can check out this link to explore past DIY Days.

– Chelsey

P.S. If you create this project, I’d love to see it! You can share a link in the comments below, or tag me in Instagram with a photo, @thepapermama, and use the #papermamafriends hashtag.