Laureli,
So much has changed in the last month. It’s almost like you’re human. Oh wait… you are! What you’ve been doing:
– Yelling.
– Crawling everywhere. Like a maniac!
– Saying: Ma Ma, Da Da, An-duh (Angus), and many other babbles that I don’t understand.
– Your favorite noise to make is a sort of raspberry/yelling mix.
– You’re the biggest copy cat! I cough… you copy. Pop my lips… you copy… put my hand in the air… so do you…
– You have my strange/odd/silly sense of humor.
– You crack up when I say, “Peek-a-boo!” in a very deep/manly/scary voice! Your fave.


– You are super ticklish on your belly! I like to blow raspberries on it.
– Kisses are another favorite. I give you a kiss… and then you lick my cheek.
– I don’t know how you do it… but, you manage to find ANYTHING and EVERYTHING on the floor… even after I vacuum!
– Your first cold was last month. It was VERY sad.
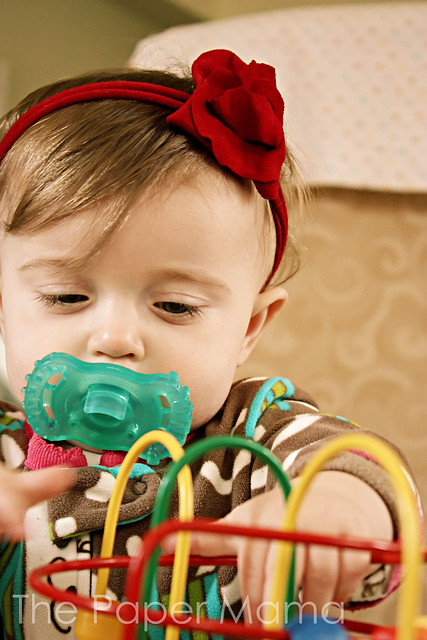
– You’re pulling yourself up on everything! Like a pro. But, you’re so cautious… I don’t know if you’ll be walking anytime soon.
– It is almost impossible to take photos of you anymore! Always moving = blurry.
– You love to stand at the window and dance (well, shake your head and bum from side to side)
– We found out the other night you’re allergic to oatmeal! Anywhere it touched your face the skin was red. 🙁


– We wave at everything. Especially dogs!
– The other day I heard you giggling… I looked over at you and your finger was in your nose! You thought that was hilarious.
– I sprinkle toys all over the floor to keep you occupied…
– You get SO excited when daddy gets home. You crawl to the front door screaming, “DA DA DA DA!”
– Bathtime is SO exciting.


– When Mandy’s dog, Jeffrey, kept licking in your mouth when you were crawling you got mad and pushed him away while yelling, “An-duh!” Which is your word for Angus! It was so funny.
– You’re very shy and grip onto me when we first get to a new place around a lot of people.
– You’ve lost most of your interest in television… unless there’s bright flashing colors!
– It’s really hard to keep any shoes, socks, or hats on you! We’re working on it!
– You’re still pretty addicted to that pacifier! If it makes you happy, then ok!
– Teeth: two on the bottom and two on the top!
– You’re shaking your head “no” to everything I ask you. I don’t know if you know that means “no”.

– Sleeping: ummmm… I guess it’s getting more consistent! You nap every morning (well, most of the time) for about 3 hours. You’re down to waking up 1-2 times a night.
– You weigh 21 pounds.
– You understand the sign for “Eat” and freak out if we don’t get the bottle to your mouth fast enough!
– You’re wearing 12 month – 18 month sized outfits.
– Now wearing size 5 diapers!
– You’re pretty awesome.
LOVE,
Mama
Anyone else freaking out that I only have one more month to finish her birthday plans???! I should probably get those invites created and ordered. What was I thinking?! Gotta finish.
For Ruari’s 11 month birthday..
she’d like a vote from you! She told me
that’s what she wants. 😀

Would ya could ya? Vote for me?