Recipe: Fried Egg + Polenta

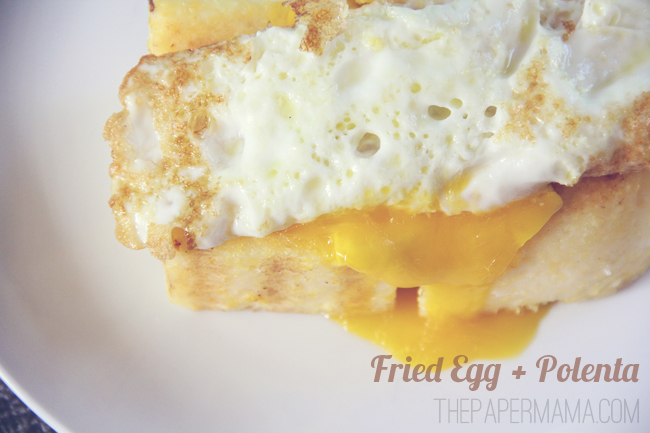
So, this is a recipe my husband found on the blog, The Italian Dish. She shares how to make this yummy pan fried polenta from Bill Buford’s book, Heat…. we added the fried egg. Oh man. A favorite for sure! Tools you need: A heavy pot (we love our cast iron pans for this), a whisk, and spatula.

Pan Fried Polenta adapted from Bill Buford, Heat

start out with about 6 cups water
1.5 cups polenta
1 Tablespoon kosher salt
3 Tablespoons butter (yes, butter – are you really still eating margarine?)
1/2 cup grated Parmesan cheese

Directions:

Bring the water to a simmer. Slowly add the polenta in a steady stream into the pot and whisk as you add it. Whisk for a couple of minutes and then let the polenta do its thing. Keep it at a low simmer. It may pop out at you, so be aware. Switch to your rubber spatula and give the polenta a good stir every now and then. When it absorbs all the water, add more water. And more. And keep stirring. And add more water. After about an hour, the polenta will be done. The granules will have become creamy and soft. Take it off the heat, add the butter and parmesan. You can serve it at this point with grilled meat or even put a nice bolognese sauce over it. That makes a great meal.

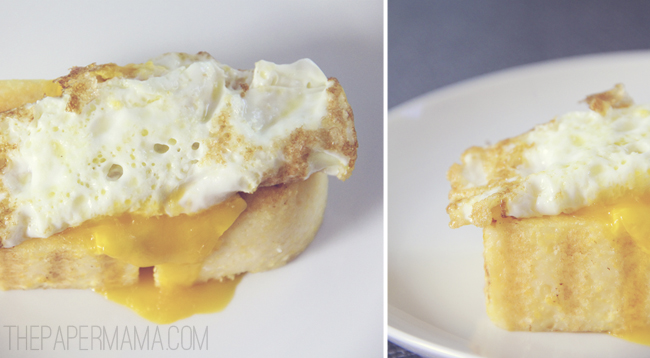
From here, pour your polenta into an 8 x 8 baking dish, refrigerate for several hours (we do overnight), cut into squares, and grill it with a little olive oil. Fry up an egg and pop it on top! There you go! You have yourself some yummy breakfast… OR, even dinner!

From what I’ve read… it seems this may be similar to grits. I haven’t really been lucky enough to try real grits here in the PNW… but, I can only assume I’d love it. Hmmm…. I can also assume that this pan fried polenta would be amazing with fried chicken…. goodness.

{Related Posts: //White Bean, Cauliflower, and Spinach Spread//Baked Ravioli//Pie//}


Wordless{ish} Wednesday: How I make a GIF

I’ve been asked by a few lovelies to share how I create a GIF with photoshop. It’s pretty darn simple. I first learned how from my friend, Jess. With practice… an idea… and a bit of planning… you can make a GIF too… in no time at all! (are you pumped? alright! Hee.).

First things first: time to take your photos. Set up your photos however you’d like. Today I’m making a gif out of my gold shoes. It will be completely up to you if you’d like to set up your camera so it won’t move. For me, I set my camera on the floor, grabbed my shutter release, and snapped away. I do know that sometimes moments happen in life and you just need to snap away… those GIF’s are alway fun! (see Ruari eating a cookie). But, mostly I like to plan ahead while taking my GIF photos. What will my beginning shot be, and what will my end shot be? Will the last photo and first photo blend well together? Just some things to think about while taking your photos. Ok, onto the how-to…

1. Once all your photos are shot and edited to your taste… save each photo to the exact size you’d like. For me, I make all my GIF’s 650 wide (the width of my blog stream). Side note: I also save all my resized images in numerical order of how I’d like them to play, starting with #1. PLUS, always think about the future of your photos… will someone borrow it for their blog or pin it? You don’t know. Watermark your stuff!

2. Optional step: I don’t always do this step…. BUT, I did for the GIF above. If you want your movement to be focused onto just one moving part… this step is for you. I had my cats and daughter moving around in the background of my photos, and I only wanted my feet to move (I also made a GIF without this edit… you can see it at the bottom of this post).

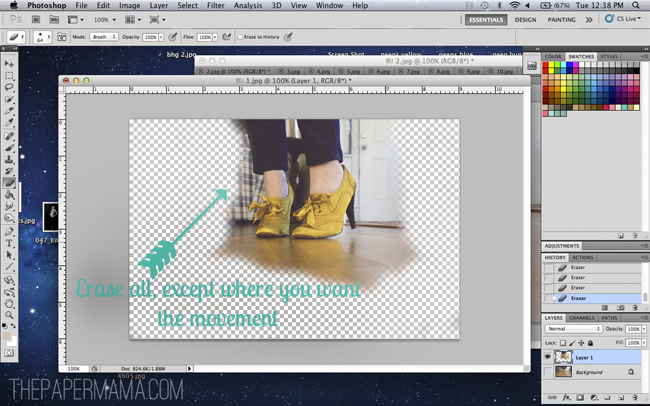
First, you’ll choose an image to use as your base photo. This photo will be your unmoving background. Drag and drop the next image onto your base photo. You’ll be erasing everything in this next photo, except for the part of the photo you want to move (for me, my shoes). Tip: be sure to use the soft round eraser (no hard edges to your erasing).
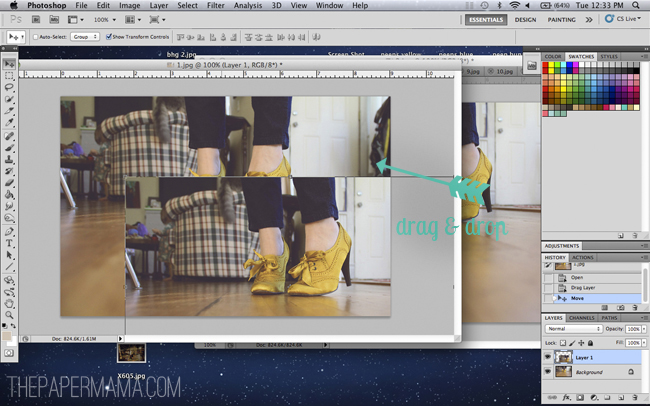
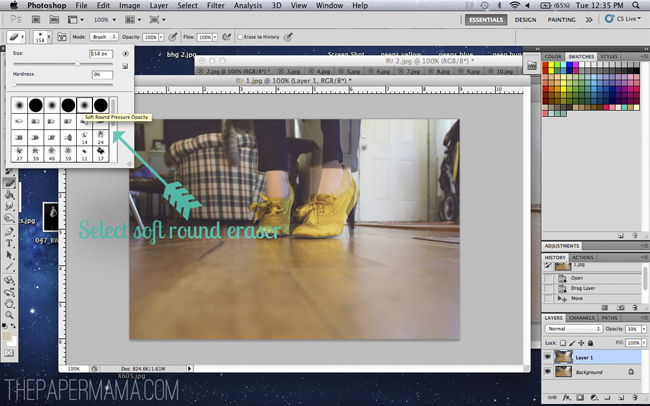
Continue to do this for each image and save as you go along.

3. Open up your GIF photos folder, on your desktop (outside of photoshop) and highlight all of them. Open up a new file, in Photoshop, to the exact size you’d like your GIF to be. Mine are 650 wide by 433 high. Drag and drop your file photos into your photoshop file. You will see a light “x” over your image. Just keep hitting “Enter” until all over your images appear in your layers section.

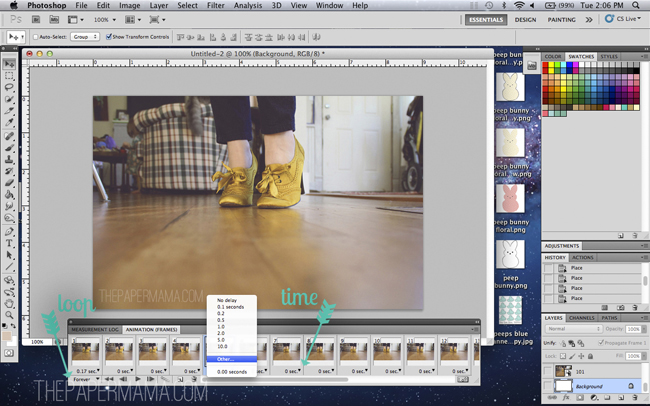
4. When you have all your images in order and open, go up to the “Window” tab, and open up “Animation”. The animation window will pop up.
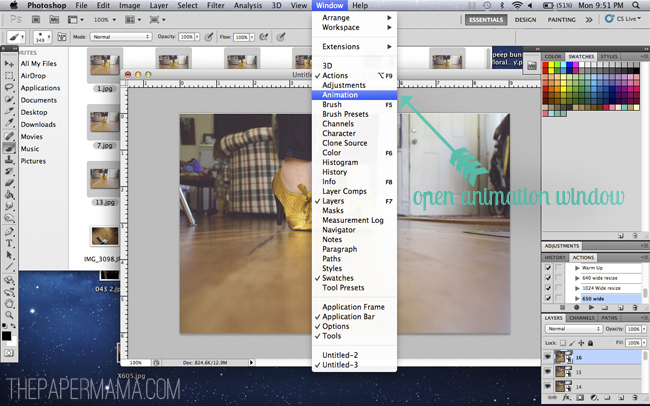
5. On the animation window you will see a little options (4 lines) button on the upper right-hand corner. Click on it and choose, “Make Frames From Layers”. Side note: if you have an image in your animation window you don’t like, you can always highlight it and click the “trash” icon.
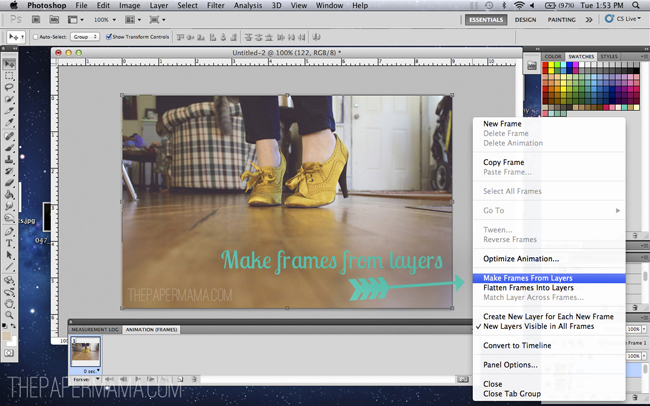
6. Time to get these images moving! Under each frame on the animation window, there are options for the speed. You’ll need to change the speed for each individual image. For most of my GIF’s I like to run my speed at .17 – .2. BUT, this will be completely up to how fast you’d like yours to run. I chose “no delay” today. You can even choose to have one image run a little longer/shorter than another. P.S. don’t forget to change the loop to “Forever” located under the first frame. This way your GIF will run forever…
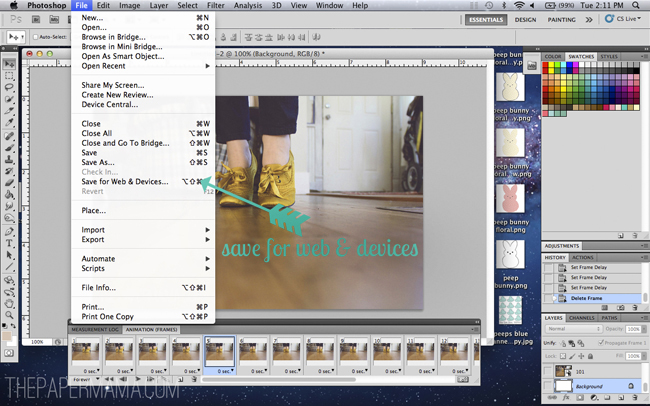
7. Time to save your creation! Head up to the “File” tab and click on “Save for Web & Devices”.
8. When the “Save for Web & Devices” window pops up, make sure it’s set to GIF. That’s pretty important. You don’t want it set to jpeg. And, again: make sure the looping is set to “forever”. Really everything else should already be set up. Click save.

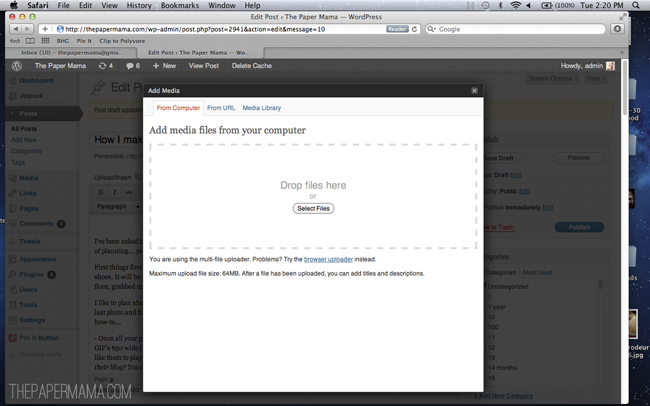
9. Once you are all saved, upload your GIF to a blog post to share. That’s it!
With the internets today…. there are actually quite a few free sites to make a GIF (Gickr being a popular one). But, you definitely have more control and better end results when using Photoshop.

If you tried out step #3, I just want to share what my GIF looks like without the fine tuning/erasing. See the difference?

P.S. Don’t forget to take advantage of the sale ad prices! 35% off if you purchase 2 months. Whew! Last day is the 31st.

…………………………………………………………………………………………………………………………………………………………..

{If you have a Wordless{ish} Wednesday, please feel free to link it up below. And, feel free to link up to these blogs too… Parenting by DummiesProject Alicia,And Then She SnappedJenni from the Blog, and Live and Love Outloud.}

Project plan a wedding in 2 weeks: done.

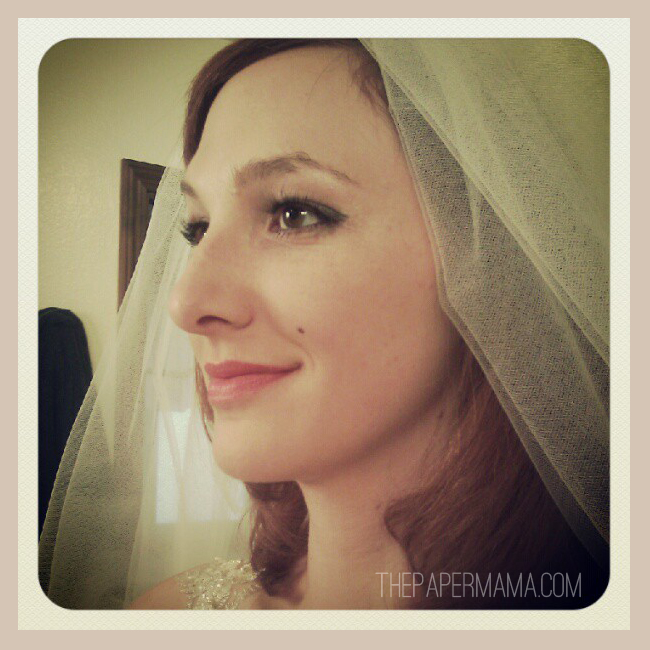
Oh friends…. I have been so busy. In a fantastic a way. One of my closest friends got married this last Sunday. If you follow my instagram… you probably saw my many wedding themed photos this weekend.

Why a wedding in 2 weeks? Well, I won’t go into too many details. My friend has a very important family member that’s very very sick and we’re not sure if they would be there for the wedding in July. SO, my friend dropped all of her wedding plans…. I’m talking all of them and started from step 1. Her fiancé (now husband) was amazing and sort of took over everything. All those little details and plans that needed to be handled: he did it.

It turned out to be a beautiful wedding (of course…. I was with my closest friends). It was such a happy and sad day. I cried so much… I’m tearing up now. We’re happy they are married. BUT, we are sad about the reasons the wedding had to come so soon.

Pretty much: it was a beautiful day (even with the record amount of rain) and I love my friend and her hubby so much. SOooooooo much. I have so many more photos to share (including her custom drawing I finished in RECORD time). BUT, we will wait until we get some photos back from the photographer… since I didn’t take any.

Happy Tuesday to you all! I’m just now catching up. Which, will take some time (remember, my meet up is in less than 2 weeks. Whoa). So, hang in there with me. AND, have a wonderful Tuesday! Hug and love your friends and family! <3

– Chelsey


Advertise?

Hello! Soooo, last week I was all, “Yeah, I have ad space on sale! Yay!” But, since I’m new to Passionfruit… I didn’t set up my discount code properly. SO, if you tried to use my code and it didn’t work, I’m sorry! It should be all fixed now. So, here’s the info: 25% discount off 1 month of ad space for one more week! Use this code:

PassionfruitParty2012

AND, if you’d like to get a BIGGER discount… just for this week (through May 31st) I’m offering 35% off the month if you purchase 2 quantity at the same time. So, when you fill out your ad space info, it will ask for the quantity… you need to put “2” for this promo code to work.
PassionfruitParty2months

Enjoy! And, hope to have you! Click here to buy your ad space.

P.S. If you need me to create a button for you (something I offer for free to all sponsors) just email me at thepapermama at gmail dot com after you purchase a spot and send me a couple photos you’d like me to work with. Your ad space time will start when I finish your button. 

Tags:

Categories: Uncategorized


Ruari in the front yard

We’ve been slowly…. slowly cleaning up our outdoor space. When we first bought our home, almost 5 years ago now, we had plans. SO many plans. We bought the home that was in the awesome neighborhood… but, the home needed some work… and love. Well, a LOT of love. And, was tiny (teensy).

So, really… It’s been waiting patiently for us to wake up and pay attention to it. Our poor lonely home just wanted some cuddles and lovin. AND, now we are giving it up. All our love. On the lowest budget ever… But, it will be awesome. We have been saving and scrounging to buy a fence… Soon. Which means… Next year: chickens. What? Yes. My chicken dream is coming true. ::highfives all around:: next Spring our little home will have a little chickey family. I’m sooooo excited.

Stay tuned for more home updates…. Hee! But, really… We’ve done so much already that i can’t wait to share. Soon.

Tags: , , , , ,

Categories: about me, family


The Paper Mama “Eyes” Photo Challenge

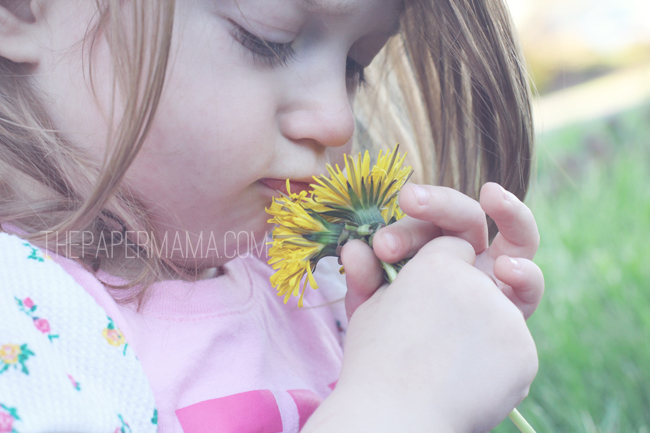
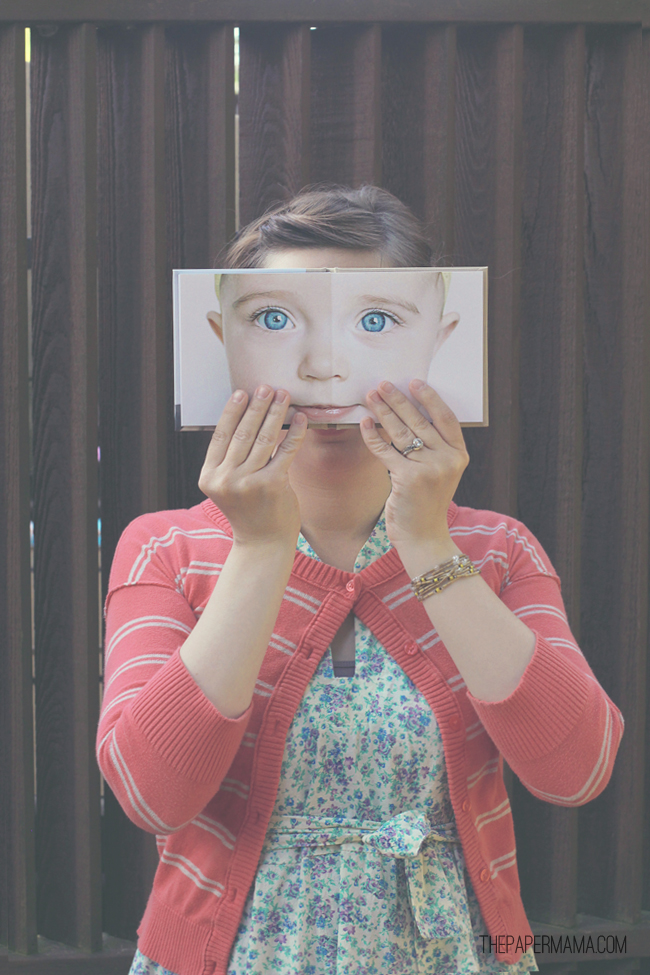
The challengeAll my photo challenges should be based around your children (pets are always welcome). Share a photo of the little one’s eyes.

My example of “Eyes”:

…………………………………………………………………………………………………………………………………………………
  • First time joining the Paper Mama photo challenge? Start here for rules and upcoming challenges.
  • My photo challenges do require you to have either your children or one of your furry children (pets) in the photo (unless it’s a self portrait week). It could be just one finger… or a toe… but, they must be there.

2010 winners . 2011 winners . 2012 winners .

Outside

…………………………………………………………………………………………………………………………………………………

Photo challenge buttons here:

The Paper Mama Photo Challenge


The “Pink” Photo Challenge Winners

This weeks challenge was: Heart!

First:

Congrats! You can grab your first place button here!

Second:

Third:

Fourth:

Fifth:

Congrats! You can grab your top 5 button here!

Favorites:
Congrats! You can grab your favorite button here!
…………………………………………………………………………………………………………………………………………………
  • First time joining the Paper Mama photo challenge? Start here for rules and upcoming challenges.
  • My photo challenges do require you to have either your children or one of your furry children (pets) in the photo (unless it’s a self portrait week). It could be just one finger… or a toe… but, they must be there.

2010 winners . 2011 winners . 2012 winners .

…………………………………………………………………………………………………………………………………………………