Category: Paper Mama House
-
6 Quick Tips to Protect Outdoor Furniture in the Winter
6 Quick Tips to Protect Outdoor Furniture in the Winter
October 7, 2019
Disclosure: Lowe’s Home Improvement provided me with free products in exchange for this post. All opinions are my own. Are you looking for some ideas to get your patio ready for Winter? Then these tips [...] Continue →
-
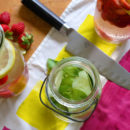
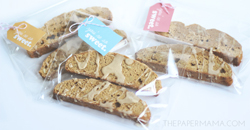
Back to School Infused Water Recipes for Kids with Primo Water
Back to School Infused Water Recipes for Kids with Primo Water
September 4, 2019
No more staying up late and sleeping in for my girls. We are going to bed at a reasonable time and, sadly, waking up at 6 AM because school is back in session. It’s [...] Continue →
-
How To Make a Home Fire Escape Plan with First Alert
How To Make a Home Fire Escape Plan with First Alert
August 9, 2019
Disclosure: Thank you First Alert for sponsoring this post. Plan, practice, and repeat your escape plan with First Alert! How to Make a Home Fire Escape Plan for Your Family I am embarrassed to [...] Continue →
-
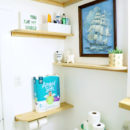
DIY Faux Floating Bathroom Shelves + Potty Training Round two
DIY Faux Floating Bathroom Shelves + Potty Training Round two
July 23, 2019
Thank you Angel Soft® for sponsoring this post. Ditch the spray and switch to Angel Soft® with Fresh Lavender-Scented Tube. Potty training is generally a dreaded experience for most parents. Attempting to potty train [...] Continue →
-
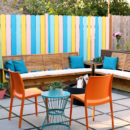
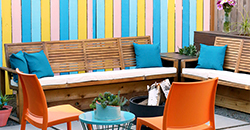
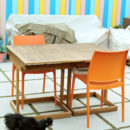
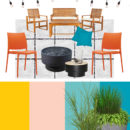
Our Colorful Small Space Patio Makeover: with Before and After photos!
Our Colorful Small Space Patio Makeover: with Before and After photos!
March 21, 2019
Disclosure: Lowe’s Home Improvement provided me with free products in exchange for this post of Our Colorful Small Space Patio Makeover. All opinions are my own. It’s the first day of Spring, so to celebrate [...] Continue →
-
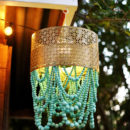
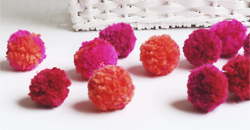
Pretty Wood Bead Chandelier DIY
Pretty Wood Bead Chandelier DIY
March 19, 2019
Disclosure: The Bead Chest provided product for me to create this sponsored Pretty Wood Bead Chandelier DIY. All opinions are my own. Thank you for supporting the sponsors that make The Paper Mama site [...] Continue →
-
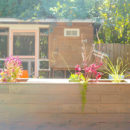
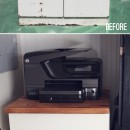
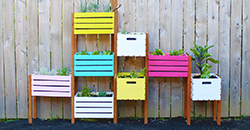
How to Incorporate Hidden Storage into the Backyard
How to Incorporate Hidden Storage into the Backyard
February 28, 2019
Disclosure: Lowe’s Home Improvement provided me with free products in exchange for this post. All opinions are my own. How to Incorporate Hidden Storage into the Backyard! We live in the Pacific Northwest and it [...] Continue →
-
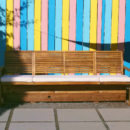
My DIY Outdoor Sofa Hack – For Those Scared of Building Furniture from Scratch
My DIY Outdoor Sofa Hack – For Those Scared of Building Furniture from Scratch
October 15, 2018
Disclosure: Lowe’s Home Improvement provided me with free products in exchange for this post. All opinions are my own. My DIY Outdoor Sofa Hack, For Those Scared of Building Furniture from Scratch, is for anyone that [...] Continue →
-
My Colorful Small Space Backyard Makeover Plan – with Before Photos
My Colorful Small Space Backyard Makeover Plan – with Before Photos
August 29, 2018
Disclosure: Lowe’s Home Improvement provided me with free products in exchange for this post. All opinions are my own. My Colorful Small Space Backyard Makeover Plan – with Before Photos I’ve been a little quiet [...] Continue →
-
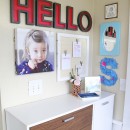
DIY Art Display for Kids – Easily Switch Out Their Artwork
DIY Art Display for Kids – Easily Switch Out Their Artwork
March 7, 2017
The other day I shared our living room gallery art wall and you may have noticed that we have two framed areas that are specifically for artwork made by our kids. Today I’ll share [...] Continue →
-

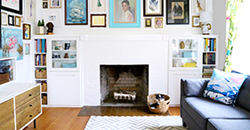
IKEA Hack: DIY Fireplace Built-ins
IKEA Hack: DIY Fireplace Built-ins
March 3, 2017
My family and I have lived in our little home for about 9 years. The first few years we owned this place we didn’t have the income or time to fix up this 1920’s [...] Continue →
-
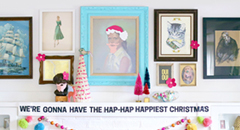
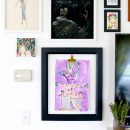
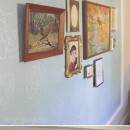
Mini Home Tour – Gallery Art Wall DIY
Mini Home Tour – Gallery Art Wall DIY
March 2, 2017
I finally have a space to hang all of my favorite artwork! We just finished this art wall a couple of weeks ago and I’m very happy with how it turned out. Our eclectic [...] Continue →
-
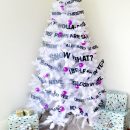
Day 3: Punny Christmas Tree
Day 3: Punny Christmas Tree
November 14, 2016
Day 3 of 50 DIY Days: Punny Christmas Tree Guys. This might be my weirdest Christmas DIY to date. Ha! And I love it. It’s me in tree form. If you know me personally, [...] Continue →
-
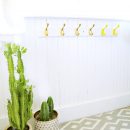
Coat Rack Makeover for $15!
Coat Rack Makeover for $15!
July 12, 2016
Coat Rack Makeover for $15! As I’ve mentioned before, I’m on a mission to makeover our front entry. I’ve already added some artwork and a cupboard shoe rack, but I still have more work [...] Continue →
-
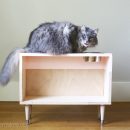
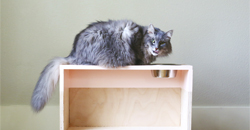
DIY Cat Food Table
DIY Cat Food Table
May 26, 2016
We have this little dog, Mr. Angus. His number 1 goal in his little Chihuahua life is to find food. Whenever he’s not sleeping, already eating, or asking us for food… He’s searching for [...] Continue →
-

Mini Toy Basket DIY – Encourage Your Kids To Pick Up Their Toys!
Mini Toy Basket DIY – Encourage Your Kids To Pick Up Their Toys!
April 1, 2016
Whenever I’m asked what I want for my birthday or Christmas or any gift giving time my answer is usually anything that will make my life easier, like a clean house. With a 4 [...] Continue →
-
Front Entryway Makeover
Front Entryway Makeover
February 1, 2016
We have lived in our home for almost 9 years and we have finally focused some time and energy into sprucing up our front entry. With getting married and having two kids, a lot [...] Continue →
-
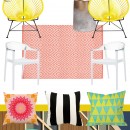
Backyard Studio Inspiration Board + Contest
Backyard Studio Inspiration Board + Contest
September 14, 2015
Backyard Studio Inspiration // Edison String Lights // Acapulco Side Chair // Outdoor Concrete Table DIY for Under $15 // Diamond Pink Outdoor Rug // Carmen Stacking Chair // You Are My Sunshine Outdoor [...] Continue →
-

Hand Stamped Citrus Wall DIY
Hand Stamped Citrus Wall DIY
January 15, 2015
Over the summer my husband and I gave one wall in our kitchen a makeover. Our home is lacking in the storage department, so we created a mini pantry in the tiniest nook in [...] Continue →
-
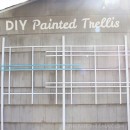
Painted Trellis DIY
Painted Trellis DIY
May 1, 2014
Today is supposed to be BEAUTIFUL here in Portland. This weather makes me so ready for gardening. A couple weekends ago my husband and I built this sweet handmade trellis. We needed something large and [...] Continue →
-
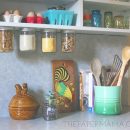
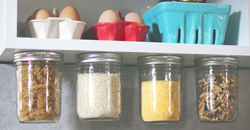
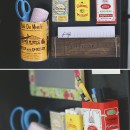
Under Cabinet Jar Storage
Under Cabinet Jar Storage
March 20, 2014
I’ve seen jar storage ALL over the Pinterest, and I’m finally using the idea. My under cabinet jar storage is one step towards a more organized kitchen. Seriously, our kitchen is lacking in quite [...] Continue →
-
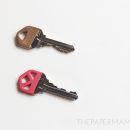
Painted Keys DIY
Painted Keys DIY
October 9, 2013
The other day I mentioned my move to a little studio for my craftiness. This also means I have 2 new keys… in addition to my home/car/mom’s keys, that adds up to 1 bazillion [...] Continue →
-
I’m moving!
I’m moving!
October 7, 2013
Well, I’m only sorta moving. Moving all my art supplies and crafty goodness over to a studio space. It’s a pretty awesome deal and it’s going to help with a LOT. Basically my old [...] Continue →
-
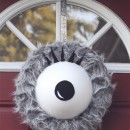
Monster Eye Wreath DIY
Monster Eye Wreath DIY
October 4, 2013
Boo! Scare the bajeebies outta your trick or treaters with my Monster Eye Wreath DIY! Actually, it’s kinda cute and I’m happy to have it on my door! It’s a cheap and easy craft, check [...] Continue →
-
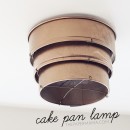
Cake Pan Lamp Shade! Yeah.
Cake Pan Lamp Shade! Yeah.
September 19, 2013
This past year I fell in love with a pendant light online. I loved it, but I didn’t NEED it. So, I never bought it. I don’t even know if they make it anymore, [...] Continue →
-
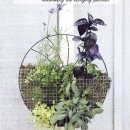
Rethinking the hanging planter
Rethinking the hanging planter
July 11, 2013
Today on the Better Homes and Gardens blog, I’m rethinking the hanging planter. I’ve made a sweet little garden for my herbs. You know what else this would be good for? Succulents. OR, ferns. [...] Continue →
-

Hanging Lightbulb Herb Vase
Hanging Lightbulb Herb Vase
May 15, 2013
My hubby went through the house and changed all the lightbulbs, and before he could recycle them I said, “Wait, I can use those for this project!” He may have given me that “year, [...] Continue →
-
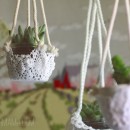
Lace Hanging Planter in the Portland Mercury!
Lace Hanging Planter in the Portland Mercury!
May 1, 2013
I’m pretty darn excited. Today I have a DIY in The Portland Mercury, found on the Crafty Wonderland insert. Since many of you aren’t lucky enough to get this awesome local newspaper…. I’m sharing [...] Continue →
-
Wednesday Goodies: Revamped cabinet!
Wednesday Goodies: Revamped cabinet!
April 3, 2013
We are in the process of organizing our messed up/crazy crammed laundry slash mud room. Actually, we are in the process of organizing our WHOLE home… but the laundry room is getting the most [...] Continue →
-
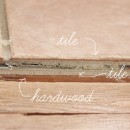
No asbestos for me!
No asbestos for me!
March 4, 2013
Yes! Last week I mentioned my concern about the flooring UNDER my entryway tile. The ugly pink tile I see EVERY day I walk into my home. I want to tear that tile out [...] Continue →
-
Our old home.
Our old home.
February 26, 2013
I’ve mentioned before, we live in a 90-year-old home. Yup. Well…. I guess she’s 93. Built in 1920. It’s tiny and needs a lot of work is unique. The entry to our home is [...] Continue →
-
Wednesday Goodies: Spruce up your furniture with… Washi Tape!
Wednesday Goodies: Spruce up your furniture with… Washi Tape!
February 13, 2013
I’ve been sharing a Wordless Wednesday link up for, gosh, FOREVER now. I love having this link up, but I really don’t know if it qualifies as a “wordless” post. I love Wednesday’s and [...] Continue →
-
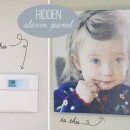
::Hidden Alarm Panel DIY:: on Better Homes and Gardens
::Hidden Alarm Panel DIY:: on Better Homes and Gardens
January 10, 2013
New year, new DIY. This is officially my FIRST DIY of the year. Yay! It was quick and easy to do, and now my alarm panel is no longer in sight. I originally found [...] Continue →
-
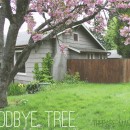
Goodbye, Tree.
Goodbye, Tree.
October 11, 2012
This last weekend we had to say goodbye to a good fried… one of our flowering cherry trees. It was surprisingly hard for me to actually give the “OK” to cut her down. She [...] Continue →
-
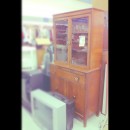
Wordless{ish} Wednesday: Spring, I mean, fall cleaning?
Wordless{ish} Wednesday: Spring, I mean, fall cleaning?
September 12, 2012
This would be why I don’t have much to say on this lovely Wednesday: I found this sweet little hutch yesterday, and I spent most of the day cleaning and organizing (out with the [...] Continue →
-
Better Homes and Gardens Post: Fridge Work Station
Better Homes and Gardens Post: Fridge Work Station
September 6, 2012
Another week, another DIY over at Better Homes and Gardens! I hope you head on over and check it out. I chat about creating your fridge work station! Made out of tins and a [...] Continue →
-

Natural Dye Experiment: Turmeric
Natural Dye Experiment: Turmeric
August 23, 2012
This past week I did a little bit ‘o experimenting! I really wanted to try and dye my own fabric…. But, I didn’t want to buy the dye from the store. Soooo, I used [...] Continue →
-
Made it: Framed Wallpaper
Made it: Framed Wallpaper
August 20, 2012
Well, it’s done! Our lovely framed wallpaper wall. Annnd: I lurve it. Our house is sort of awkward. It’s tiny and old with a weird shape. The living room/dining room is long and skinny, [...] Continue →
-
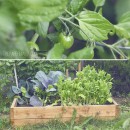
How to Build a Garden Box on a Budget
How to Build a Garden Box on a Budget
August 6, 2012
Today I’m sharing how to build a garden box on a budget. It’s simple, and anyone with basic knowledge of power tools can build this project. Enjoy! We’re growing things. Our garden is bursting [...] Continue →
-

Organize your jewelry! New BHG post.
Organize your jewelry! New BHG post.
July 12, 2012
This week I’m chatting about organizing jewelry with random pieces of glassware… showcase your favorite pieces! <3 Head on over to Better Homes and Gardens to check it out! I really love how it [...] Continue →
-

I’m no chicken.
I’m no chicken.
January 5, 2012
… Ok, maybe a little. BUT, just the thought of doing any large scale project scares the poo outta me! I have a Million ideas. Not even kidding. AND, I write them all down. [...] Continue →
-
Scavenger Hunt Sunday
Scavenger Hunt Sunday
February 27, 2011
Capture the Sky Everyday Going for a walk. Furry Life Little Danny. The newest addition to our little group. I believe we are now outnumbered… kids win. 🙂 Blurred Could I please get a [...] Continue →
-

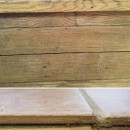
Wordless{ish} Wednesday: Hardwood floors.
Wordless{ish} Wednesday: Hardwood floors.
September 29, 2010
{Since Ruari is crawling Mike and I decided to remove the area rug from our living room… the designer in me is saying, “No no! Now what will define our living space!” While the [...] Continue →