Category: Paper Mama Farm
-
6 Quick Tips to Protect Outdoor Furniture in the Winter
6 Quick Tips to Protect Outdoor Furniture in the Winter
October 7, 2019
Disclosure: Lowe’s Home Improvement provided me with free products in exchange for this post. All opinions are my own. Are you looking for some ideas to get your patio ready for Winter? Then these tips [...] Continue →
-
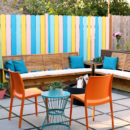
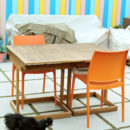
Our Colorful Small Space Patio Makeover: with Before and After photos!
Our Colorful Small Space Patio Makeover: with Before and After photos!
March 21, 2019
Disclosure: Lowe’s Home Improvement provided me with free products in exchange for this post of Our Colorful Small Space Patio Makeover. All opinions are my own. It’s the first day of Spring, so to celebrate [...] Continue →
-
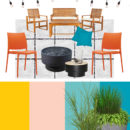
My Colorful Small Space Backyard Makeover Plan – with Before Photos
My Colorful Small Space Backyard Makeover Plan – with Before Photos
August 29, 2018
Disclosure: Lowe’s Home Improvement provided me with free products in exchange for this post. All opinions are my own. My Colorful Small Space Backyard Makeover Plan – with Before Photos I’ve been a little quiet [...] Continue →
-
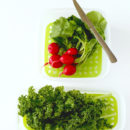
Keeping Veggies Fresh for the Bunnies (and us)!
Keeping Veggies Fresh for the Bunnies (and us)!
October 24, 2017
This is a sponsored post for SheSpeaks/Rubbermaid®. I hate it when I go to grab some veggies from our vegetable drawer and they are already a squish mess even though I purchased them the [...] Continue →
-
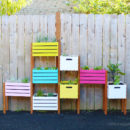
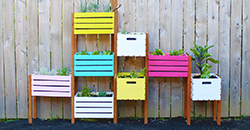
Rainbow Vertical Garden DIY
Rainbow Vertical Garden DIY
July 4, 2017
What do you do when you have a small yard and chickens that eat all the plants they can find? You build yourself a vertical rainbow garden! I’m sure a couple of our more [...] Continue →
-

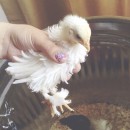
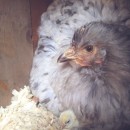
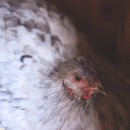
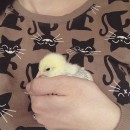
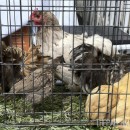
Our Growing Baby Chicks
Our Growing Baby Chicks
June 5, 2014
It’s been over a month since our chick eggs have hatched. Our little chicks have grown from sweet little puffs to super awkward preteens. After these little birds hatched out of their eggs, I [...] Continue →
-
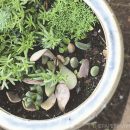
Fun Gardening Experiment: How To Propagate Succulents from Leaves
Fun Gardening Experiment: How To Propagate Succulents from Leaves
June 4, 2014
A couple of months ago I was working on this project for La Crema. It’s a very sweet mini succulent wreath. While I was putting this little guy together, quite a few succulent leaves [...] Continue →
-
What’s up with me these days?
What’s up with me these days?
June 2, 2014
What’s up with me these days? Just moving along with life and working…. – My kiddo has finished preschool for now and we are just about to start our summer. – The baby chicks [...] Continue →
-
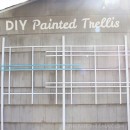
Painted Trellis DIY
Painted Trellis DIY
May 1, 2014
Today is supposed to be BEAUTIFUL here in Portland. This weather makes me so ready for gardening. A couple weekends ago my husband and I built this sweet handmade trellis. We needed something large and [...] Continue →
-
Baby chicks!!!!!!!!!!!!
Baby chicks!!!!!!!!!!!!
April 29, 2014
You guys. The baby chicks are hatching! I don’t think there’s much I need to say… cause adorable chicks! Yeah. That’s right. We put 6 eggs under her and by the time we tucked [...] Continue →
-
Sad day for the chicken eggs.
Sad day for the chicken eggs.
April 9, 2014
Well, sad day for our chicken eggs. The eggs we set under our hen last week are all duds. I’m sad (and she worked so hard), but there just weren’t any chicks developing in [...] Continue →
-
Well, let’s give this a try: hatching baby chicks.
Well, let’s give this a try: hatching baby chicks.
March 31, 2014
Well, our lovely girl (Ms. Pickles) has decided to go all broody on us. K, what’s broody? Well… it’s when your chicken can feel the start of Spring, loses her mind, and decides to [...] Continue →
-

Day 9: Painted Feather Ornament
Day 9: Painted Feather Ornament
November 7, 2013
Day 9 of my 50 DIY Days of Christmas: Painted Feather Ornaments. I’ve got feathers everywhere. My chickens drop them like crazy. It’s slowed down a bit since the weather got colder, but from the [...] Continue →
-
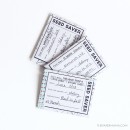
Seed Saver Packet Printables
Seed Saver Packet Printables
September 12, 2013
Summer is just about over, that’s why I made some Seed Saver Packet Printables. I’ve saved a few seeds from some favorite plants, and plan to save more (prepping some tomato plant seeds as [...] Continue →
-

Our first chicken egg!
Our first chicken egg!
September 6, 2013
Well, it happened. One of the girls laid our first chicken egg on Sunday, and we’ve had an egg each day since then. With a little investigation I figured out it was my cuddly [...] Continue →
-

Wednesday Goodies: A girl and her chicken.
Wednesday Goodies: A girl and her chicken.
September 4, 2013
Happy Wednesday! – Chelsey …………………………………………………………………………………………………………………………………… If you have a post you’d like to share today, please feel free to link it up below. And, feel free to link up to these blogs too… Parenting by [...] Continue →
-
Wednesday Goodies: Oh kale no!
Wednesday Goodies: Oh kale no!
August 28, 2013
I like kale. A lot. It’s really more of a LOVE. You can do so much with it. We usually sauté it, but I also love it in slaw form. More recently I’ve been [...] Continue →
-
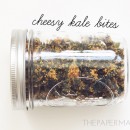
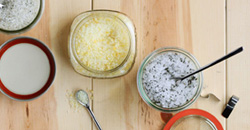
Cheesy Kale Bites Chips Recipe
Cheesy Kale Bites Chips Recipe
August 15, 2013
Yes, you read that right: MAGICAL Cheesy Kale Bites. These little pieces of heavenly goodness are so so delicious. They are cheesy, without the dairy. Because they taste as their loaded with cheese, my [...] Continue →
-
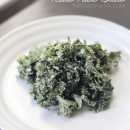
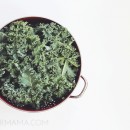
Raw Kale Slaw Recipe
Raw Kale Slaw Recipe
July 16, 2013
In our little mini garden we have a bunch of kale growing. Kale is one of my favorite veggies. I just love it. Sautéed, baked, and most recently as a slaw. It’s delicious and [...] Continue →
-
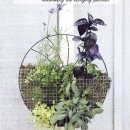
Rethinking the hanging planter
Rethinking the hanging planter
July 11, 2013
Today on the Better Homes and Gardens blog, I’m rethinking the hanging planter. I’ve made a sweet little garden for my herbs. You know what else this would be good for? Succulents. OR, ferns. [...] Continue →
-

All weekend with the chicken coop building.
All weekend with the chicken coop building.
June 10, 2013
Our whole weekend was spent building the chicken coop. OOoooooh man. We are 90% done. Sooooo close. Just the siding and the mesh for the run. The hubs and I are EXhausted and [...] Continue →
-
Build that chicken coop!
Build that chicken coop!
May 7, 2013
Our girls are growing and we have been attempting to get our chicken home built before they outgrow their little box in the house. It’s quite the project building a coop without much building [...] Continue →
-
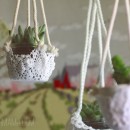
Lace Hanging Planter in the Portland Mercury!
Lace Hanging Planter in the Portland Mercury!
May 1, 2013
I’m pretty darn excited. Today I have a DIY in The Portland Mercury, found on the Crafty Wonderland insert. Since many of you aren’t lucky enough to get this awesome local newspaper…. I’m sharing [...] Continue →
-

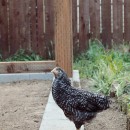
The girls and their awkward years (days).
The girls and their awkward years (days).
April 30, 2013
Wow. I realized it’s been a while since I shared my girls. My urban chickens. They are around 5 or 6 weeks old and have officially hit the awkward years (or days). I took [...] Continue →
-
Milk Jug Watering Can for the kiddo!
Milk Jug Watering Can for the kiddo!
April 24, 2013
The milk jug watering can. It’s free and easy to make! Wait…. why make it? Well, if your kiddo is like mine and wants to help you water the plants every time, and always [...] Continue →
-

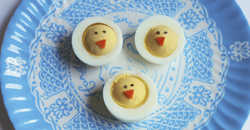
Wordy Easter Eggs DIY
Wordy Easter Eggs DIY
March 29, 2013
Yesterday I shared some inspiration I found to make some unique Easter eggs, and now we have our eggs. We chose to go the letter stickers route. We wanted to make Word Easter Eggs. [...] Continue →
-
Wednesday Goodies: Chicken time!
Wednesday Goodies: Chicken time!
March 27, 2013
Yooooouuuu guys. I have them! Cheekens! If you’ve been reading my blog for a while…. I’ve had this chicken dream for a while. It took a lot of convincing my hubby. I planted the [...] Continue →
-
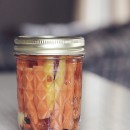
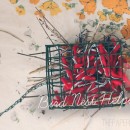
Spicy Pickled Carrots Canned
Spicy Pickled Carrots Canned
March 26, 2013
If you follow my Instagram, you may have noticed I’ve been canning (insert Portlandia reference here… it’s so true, ha) and have even joined the Portland Preservation Society. It’s a group of people that [...] Continue →
-
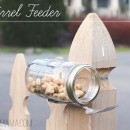
We feed the squirrels.
We feed the squirrels.
March 18, 2013
Do not feed the squirrels. Yeah, we feed those little rodents. I KNOW we probably shouldn’t… but it’s pretty cute to watch. They pretty much rule our neighborhood and I’m 90% sure they are [...] Continue →
-
Bird Nest Helper
Bird Nest Helper
February 18, 2013
Yesterday the kiddo and I made a little gift for the birds. When I was little I ALWAYS wanted to do this: a bird nest helper. Yarn bits and grass/branch pieces for our feathered [...] Continue →
-

Goodbye, Tree.
Goodbye, Tree.
October 11, 2012
This last weekend we had to say goodbye to a good fried… one of our flowering cherry trees. It was surprisingly hard for me to actually give the “OK” to cut her down. She [...] Continue →
-
Wordless{ish} Wednesday: Fall wha?
Wordless{ish} Wednesday: Fall wha?
August 22, 2012
If you follow my instagram, you might see my #papermamafarm photos. I’ve been THOROUGHLY enjoying my little itty bitty garden. This is the first year we’ve really put a lot of time, care, and [...] Continue →
-
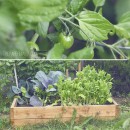
How to Build a Garden Box on a Budget
How to Build a Garden Box on a Budget
August 6, 2012
Today I’m sharing how to build a garden box on a budget. It’s simple, and anyone with basic knowledge of power tools can build this project. Enjoy! We’re growing things. Our garden is bursting [...] Continue →
-
El Pollo
El Pollo
July 23, 2012
As a little kid I knew I wanted many animals. Yes, kitties and doggies… BUT, I have always dreamed of having a little mini farm. Which is weird since I have zero desire to [...] Continue →
-
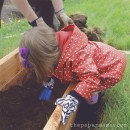
DIY: Raised garden bed for the kiddo
DIY: Raised garden bed for the kiddo
June 14, 2012
I have a new DIY up on Better Homes and Gardens! I hope you can check it out and say hello! We recently made a little garden box JUST for Ruari. She absolutely loves [...] Continue →
-

Weed Killer Recipe – Kill Weeds Without Pesticides
Weed Killer Recipe – Kill Weeds Without Pesticides
June 7, 2012
WEED KILLER RECIPE: The other weekend my husband mentioned something weird: he was going to spray our 1 million dandelions with vinegar. Umm. Ok. I thought he was insane (well, after almost 10 years [...] Continue →