
DAY 21 is brought to you by, the lovely Katie of Loves of Life: I’m excited to share this little holiday wreath project with you!
Honestly, these days it feels rare that I don’t open up Pinterest, find something I like, and then go from there when it comes to creating. I feel kind of vintage (HA HA) doing it the old fashioned way and, well, seeing a photo at a craft store or something and running with it. Honestly? It was a combo of just that and my love for the pinecone hanging I’ve seen floating around, which I mentally combined to make this little pretty:
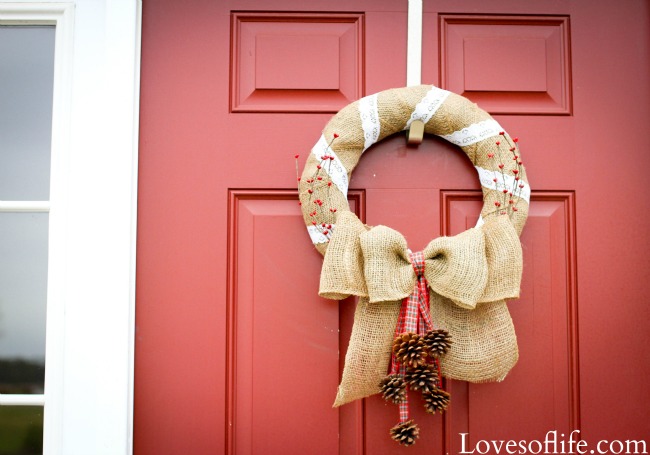
I love it. A lot.
It’s bound to spruce up an area of your home, and it’s not overly “Christmas’ey”, in fact, it’s so adorable and “wintery” I’m considering keeping it up from like, now till—March 🙂

What you need:
-Any size wreath base. I have found the trick is buying the cheapie straw wreaths versus the styrofoam ones. Who cares what it looks like underneath if you’re just going to cover it? Save the money!
-A roll of burlap
-Some pinecones
-Festive ribbon
-Lace “ribbon”
-Red festive fake berry thingies (I’m so fancy)…one bundle.
-Hot glue gun

1. Wrap the burlap around the wreath, pull tight. You’ll need to tack the first piece down with hot glue. Notice I didn’t even bother taking the plastic wrap off the straw wreath? Because, who cares!
2. Every few wraps, make sure to tack it a little here and there just to ensure the burlap stays put.
3. Stand back and admire your work. Oo-la-la.
4. Break out your lace. Tack it in the back with a dot of hot glue & wrap around the way you like it.
5. Stand back and say, dang, I’m good. Just kidding. Make sure it’s all evenly spaced and everything 🙂
6. Separate two ‘bundles’ from the fake-holiday-berry-thingies.
7. Lay them out and bend them a little to see where they’ll fit best once the bow is placed. You can hot glue them in place now, or wait until just before the bow goes on.
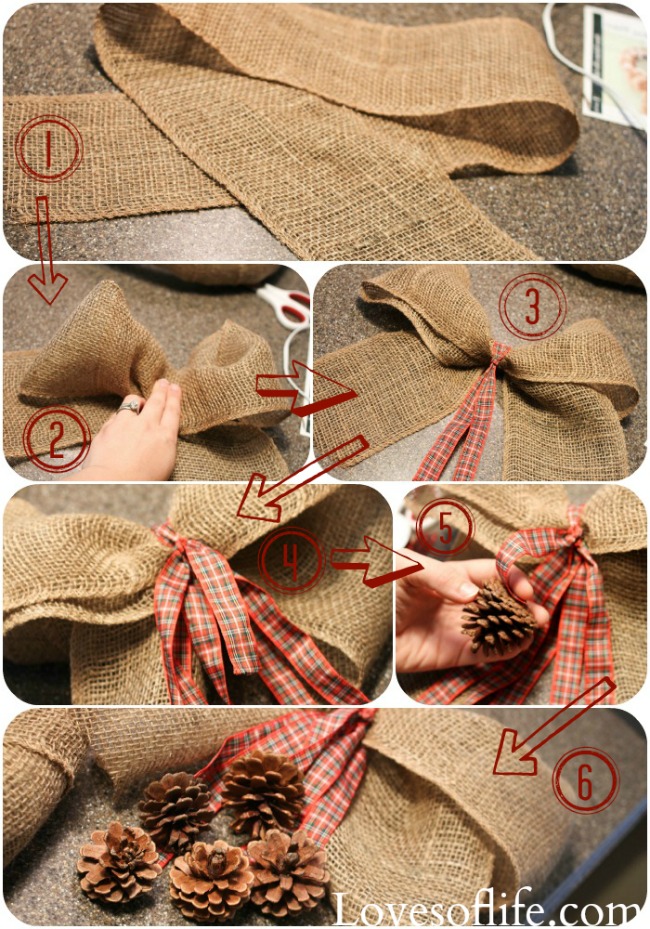
1. Measure out (or eyeball) about 2.5ft + of burlap and lay like you see pictured.
2. Cinch it all together to make it ‘bow like’.
3. Use your holiday ribbon and slip-knot a long piece around the center. You may want to add an extra ‘knot’ to it to make it tight.
4. Continue adding strips of ribbon at differing lengths.
5. Glue your pinecones on, with one little line of glue, folding the ribbon back as pictured.
6. Admire the cutie pinecones.
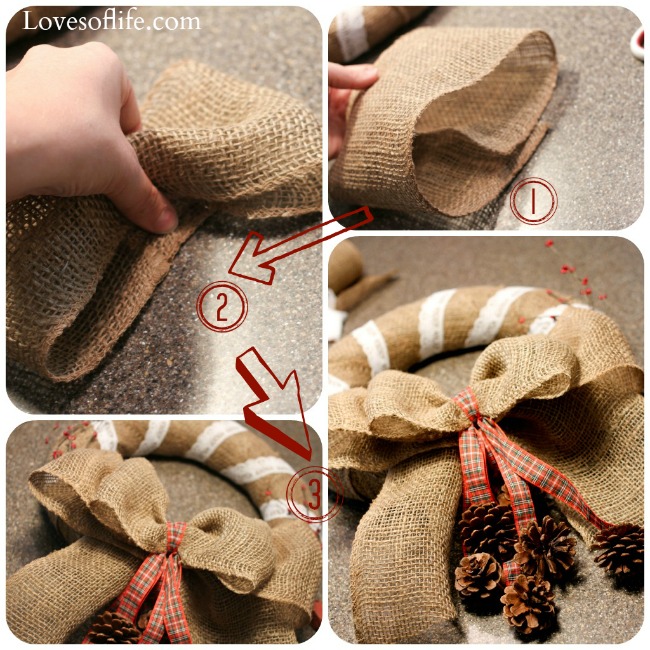
1. Loosely ‘fold’ a 1.5 ft (maybe a little less) piece of burlap as shown.
2. Cinch at the center.
3. Lay on top of existing ribbon to make a “double” ribbon.
4. Attach to the wreath by using more holiday ribbon and wrapping it around the entire wreath base, and use a little hot glue to tack the bow back if need be.

…………………………………………………………………………………………………………………………………………………
A very big THANK you to Katie for sharing this fantastic DIY. Please, be sure to give her blog home a visit.
To keep up with my 50 DIY Days, click here:


I LOVE burlap and this wreath is great!
I've loved these DIY wreaths since I've been seeing them on Pinterest but this one takes the cake! It is so me!
It's so sweet! She did a great job!
that's a super cute wreath!
I agree. 🙂 Katie did a great job!
That is so cute! I think I may have to make this one. I love it. Thanks for sharing!
Share a photo if you do!
Definitely! I'd love to see it, too 😉
I bet it would even look nice with colored burlap (especially since my door is already off white).
Definitely!
Thanks for having me, lady!
Thank you for sharing!
This is so cute!
She did a great job!