

Last Friday I was wandering the town with Miss R…. when, I realized that Coral’s birthday party was coming up and I hadn’t purchased a present for her yet. SO…. since one of my goal’s for this year is to keep most of my purchases of “stuff” to be handmade/thrift….. I had a bit of a challenge: One day to get a handmade present for a 2-year-old girl. My mind wandered…. and, I almost gave in and bought her a gift…. but, I held strong. My DIY-crazy mind came up with an idea. How about a little apron? Yes! An apron to carry her toys and to wear while she cooks up her plastic food for her loving family. The only item I had to purchase was a placemat (found at Target… it’s an Easter egg placemat) since I already have plenty of fabric and other supplies.
It turned out absolutely adorable! And, it’s the perfect size for a little girl. I am so happy to share a little VERY simple how-to for you to make your own! I had 2 placemats… so, I made 2 different versions! One for Coral and one for my little girl. <3
{side note: I am definitely not a professional seamstress…. whoa. Not at all. I wish! But, I do know how to turn on a sewing machine… and, my mom was there to fix it when I ran out of thread. Ha!}
How-to:
– Buy a placemat! I checked a local thrift shop first… hoping I could find a cool vintage placemat for her apron… but, with such short notice…. I had no luck. So, I took a little trip to Target… and, of course they had the perfect placemat. A little egg shaped placemat. I purchased 2 just in case I messed up on my first try…. $3 each.
– You’ll need 4 ties for your apron. I made ties out of fabric I already had…. sewing them into long strips…. BUT, you could also use a think and sturdy ribbon.
– I cut my placemat in half…. flipped the top portion over (so the back of the placemat was now in front) and pinned it on to the bottom half (see photo below).

– I wanted a cute trim for this apron… SO…. using a ribbon that came with a Mollie Make’s magazine…. I stitched the apron pieces together with the ribbon trim covering the seam. This is also the point I pinned on the 2 waist straps. Then, stitched them on with the ribbon.
– For a little frilly touch…. I gathered up some meshy fabric and stitched it onto the bottom of the apron.

– Of course the apron needed pockets…. SO…. I grabbed a piece of felt and free-hand cut the shapes of bear paws. Then, pinned on a piece of my Mollie Makes ribbon onto the tops of the paw…. and stitched them onto the apron.
– The top of my apron still had the rounded egg shape. I just folded it a bit and stitched it down.
– Stitch on the neck straps.
– The bear paws needed something. That’s where the little claws come in. Using a different color of felt I cut little points…. and, glued them on.
– That’s it. You’re done!

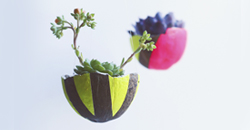
That apron above was given to Miss Coral (In addition to the apron for her birthday I did buy her a little dolly, baby bottle, and sunglasses: the bottle and sunglasses fit perfectly into the apron pockets). I hope she loves and enjoy’s it! I know she’s so young…. but, aprons are so fun! And, because I had an extra placemat and I love my little girl…. I made her a little apron too. <3

I made the second apron a bit different. Instead of cutting the placemat in half, I kept it in one piece. Just folded down a little flap on the top…. stitched it. Added a little red felt heart. The only change. Both so very cute. Miss R already shoved a few of her horses into the pockets (she loves pockets…. a lot).
I hope you all enjoy! Please do let me know if you make a little placemat apron! I’d love to see. Have a wonderful Tuesday!
{Related Posts: //Pressed Paper Flower Frame//Paper Terrarium Tutorial//}


Pingback: Monday | The Roo ☮ ♥
Pingback: LIfe Questions and Goals For Next Week (not a bummer post) | The Roo ☮ ♥
These are absolutely adorable! Love the bear paw pockets. What a neat idea! 🙂
Thank you!
Wow! This is so cute! Great work! …and girl. you can TOTALLY sew!
Hee. Thank you!
Too cute Chelsey! Wish I could sew. I need to learn one of these days 🙂
XOXO Ginny
I'm slowly learning. 🙂
This is so very very cute! I love the ribbon detail. 🙂 This reminds me of my “crayon” apron I had when I was little that had pockets for each individual crayon! haha
That sounds like an awesome apron!
That is super cutie cute 🙂 When Amelia was that age, I made her a little apron too. She used to get such a kick out of it in her play kitchen.
So cute!
This is cute!! 🙂
Thanks!
I just HAD to pin this… it is so cute! It may be a little over my head for now… I'm just learning to sew, but one day I'd like to make these for my girls. They are presh!
I don't really know how to sew either. Pretty much straight lines. Hee!